How to resolve the “Could Not Find This Item” error in Windows 10.Do you get the “Could Not Find This Item” error when deleting files, folders, or icons in Windows 10? The full notice reads:
Could not find this item: This /*file*/ is no longer located in /*Tên thư mục*/. Verify the item’s location and try again.
Provisional translation:
This item could not be found: / * This filename * / is no longer in / * Directory name * /. Please verify the location of the item and try again.
This is really annoying because you know for sure that this file is not being used by another program. The problematic object will not be moved to the Recycle Bin , no matter Deletehow many times you press the key . The most common reasons for this error are corrupted files, using invalid names or unable to open successfully after closing.
Follow this simple guide to easily delete files that cannot be deleted when you encounter this error.

Table of Contents
First thing to do
Before moving to the actual solution in this tutorial, you should try some simple workarounds. Usually, indelible file problems can be fixed on the next reboot or update. Access to Check for updates in system settings and rebooting will fix any outstanding issues.
Sometimes the problem is caused by Windows Explorer – the main application accessing all file systems. Press Ctrl+ Alt+ Delto navigate to Windows Explorer and the process ends task. Restart again to see if the problem continues to occur.

Resolve the “Could Not Find this Item” error using the Command Prompt
Using the Windows Command Prompt to remove errors is the simplest solution. Make sure your Windows 10 system is up to date to avoid any errors that occur with the Command Prompt. You can easily open the Command Prompt with admin rights .
Go to the problematic file / folder / icon and copy its path. You will need to use this path in the Windows Command Prompt. Make sure you have enabled the copy-paste feature in the CMD app, otherwise you will have to enter the entire path.

Enter the following text in the CMD window and press Enter:
cd (The file path has a problem)

Next, enter the following lines and press Enter. This will give you all the remaining file details.
dir/A/X/P

Check the file path and you can see the prefix is displayed prominently before the file / directory name. Copy the selected part. (To do this, use Ctrl+ Aon the whole window and simply release the mouse button, then click to select the desired part.) You can also type if you want.

In the next line, paste the path copied after the text indicating that the file / directory must be renamed. Name the file or directory. Do not leave the new name field blank, otherwise a syntax error will occur.
ren ( old file name) (new file name)

The problem file or folder has been successfully renamed from the Command Prompt, as shown here. You can easily modify its properties later and even delete it permanently.

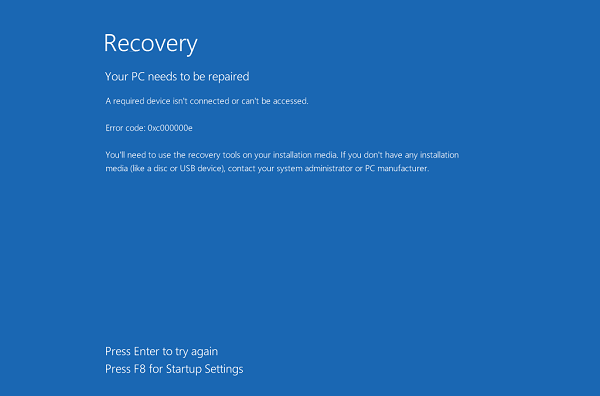
Delete the file in Safe Mode
In the worst case scenario, if files or folders cannot be deleted even by using the Command Prompt method, you can always delete it in Safe Mode of Windows 10. Refer to article: How to enter Safe Mode Windows 10 on startup for details on how to do it.