How to recover permanently deleted photos on Mac. When you delete photos and videos from your library, they are included in the Recently Deleted album, they are kept here for the number of days shown, after which they are permanently deleted.
You can restore items before that time period. If you have iCloud Photos turned on, you can restore photos and videos from iCloud for a period of 30 days before they are deleted from iCloud and your Mac. If you don’t use iCloud Photos, your deleted photos are just removed from your Mac. You can also manually delete photos from the Recently Deleted album to remove them immediately from your computer and iCloud.
Tip: If you’re deleting photos to create more storage space, remember that you must also delete them from the Recently Deleted album to remove them from your computer.
Table of Contents
Delete photos and videos
-
In the Photos app
 on your Mac, select the photos you want to delete.
 -
Do one of the following:
-
Delete photos from a moment: Press Delete, then click Delete. The selected photo will be deleted from your gallery and placed in the Recently Deleted album.
-
Delete a photo from an album, but not from the library: Press Delete. The selected photos will only be removed from the album and they will remain in your library.
-
Delete a photo from a Smart Album (for example, Last Import, Favorites, or Videos): Press Command-Delete. The selected photo will be deleted from your gallery and placed in the Recently Deleted album.
-
Delete the photos and then permanently delete them from the Recently Deleted album: Press Command-Delete, then open the Recently Deleted album. Select the items you want to permanently delete, click Delete, then click OK.
-
Recover recently deleted items
You can view recently deleted items and restore them back to the Photos library.
-
In the Photos app
on your Mac, click Recently Deleted under Albums in the sidebar. -
Select the photos you want to recover.
-
Click Restore.
If you use Time Machine to back up your computer, you can restore items after they’ve been permanently deleted from your Mac or iCloud.
How to recover permanently deleted photos on Mac
Method 1: Photo Recovery Software
There are many Mac photo recovery software applications that you can use to undelete permanently deleted photos and images from all kinds of storage devices. Some of them make photo recovery for Mac easy with a polished graphical user interface and various useful features, such as the ability to preview deleted photos prior to their recovery.
Let’s take a closer look at how to perform deleted photos recovery with one paid and one free photo recovery for Mac solution:
Paid: Disk Drill
Disk Drill is a user-friendly data recovery Mac tool that can restore images that are no longer available in the Photos app or Trash. Its one-click approach to data recovery makes it great for regular Mac users who don’t understand how photo data recovery on Mac works.
Here’s how to recover deleted photos with Disk Drill:
Step 1. Download and install Disk Drill for Mac.
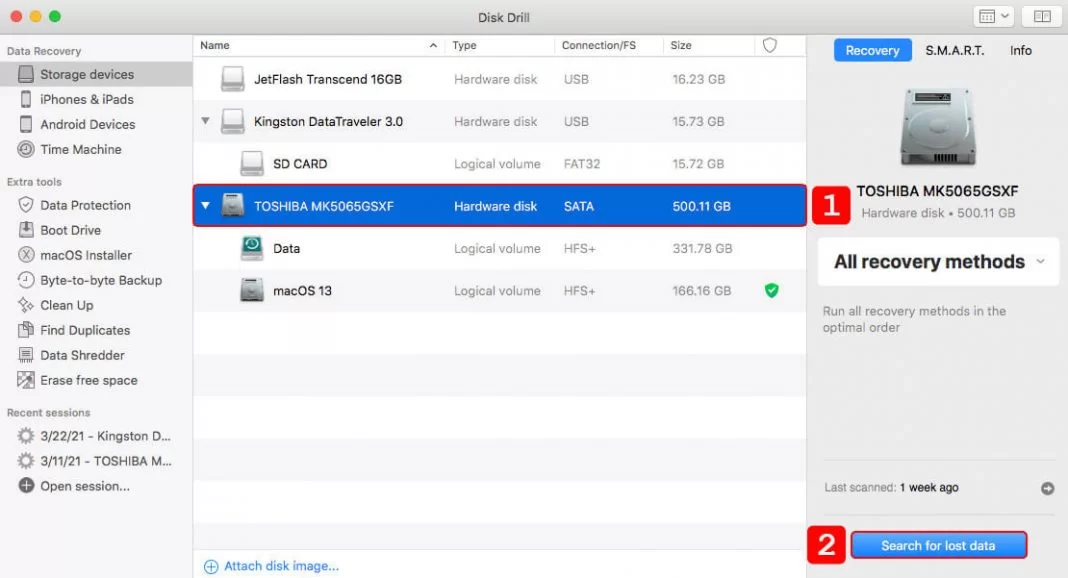
Step 2. Launch Disk Drill and click the Recover button next to the drive you want to recover.
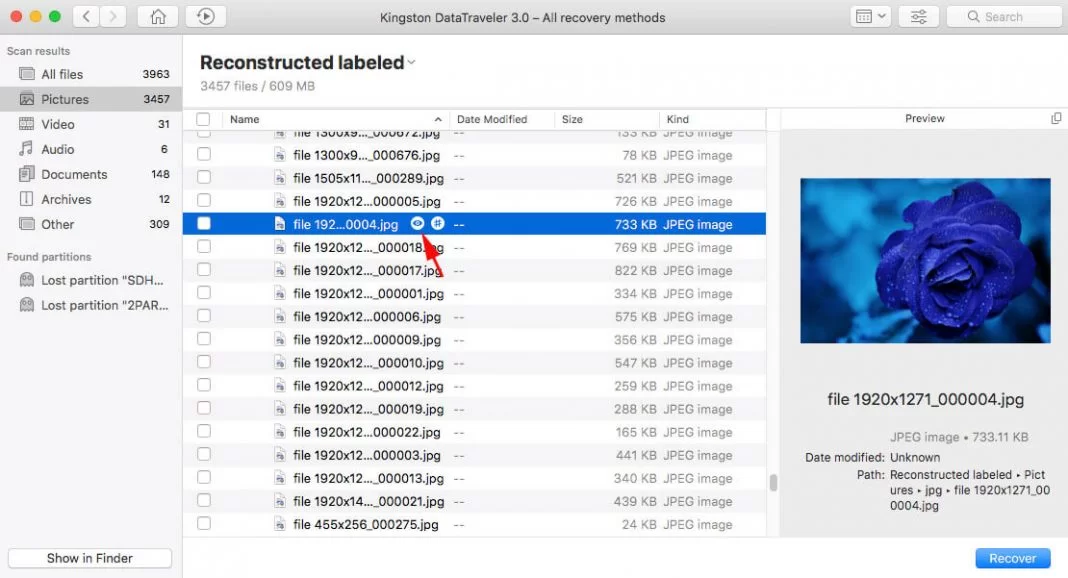
Step 3. Wait for the scan to finish and select all photos that you want to recover. You can preview photos before recovery by clicking the preview button.
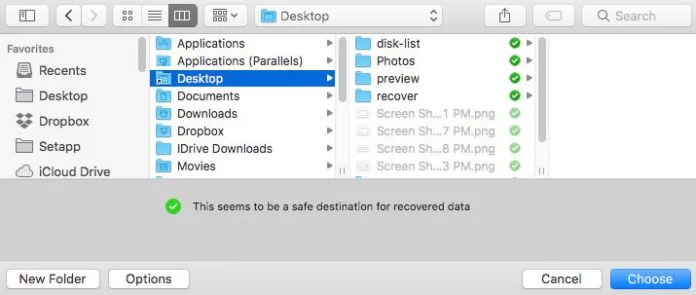
Step 4. Click the Recover button in the top-right corner and specify the recovery destination. Click Choose to begin the recovery process.
Free: PhotoRec
This open-source data recovery tool can undelete all commonly used image file formats for free. While not exactly difficult to use, the fact that it doesn’t have a graphical user interface makes it hard to recommend to regular Mac users who don’t feel comfortable interacting with the operating system using the command-line.
Here’s how to recover deleted photos with PhotoRec:
Step 1. Download and install TestDisk (PhotoRec is part of TestDisk).
Step 2. Launch PhotoRec using the following Terminal command: sudo photorec
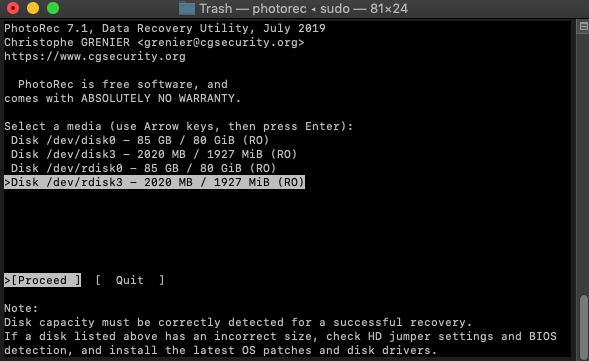
Step 3. Select the drive you want to recover and choose Proceed.
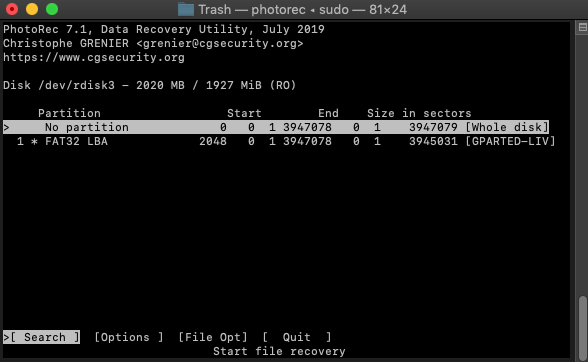
Step 4. Select either a specific partition or the entire drive.
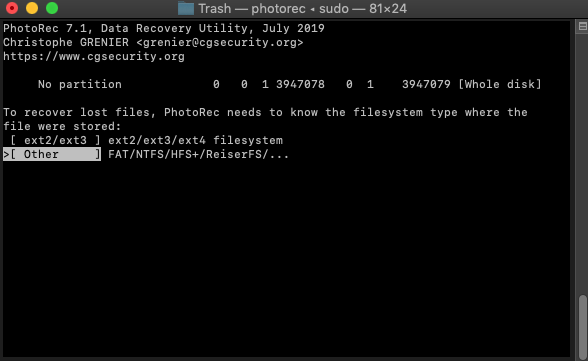
Step 5. Specify the file system type on which your files were stored.
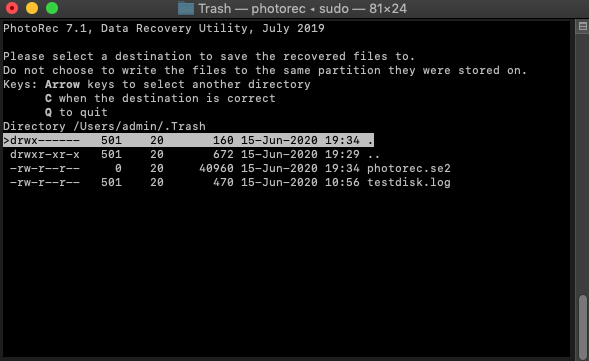
Step 6. Select where you want to save the recovered files and hit C on your keyboard to confirm.
Method 2: Trash
Photos deleted using Finder can be recovered from Trash, a special hidden folder located in your home directory. This is how to recover deleted photos from Trash:
Step 1. Go to Trash by clicking on its icon in the Dock.
Step 2. Select the photos you want to recover.
Step 3. Right-click on any of the selected photos and choose the Put Back option.
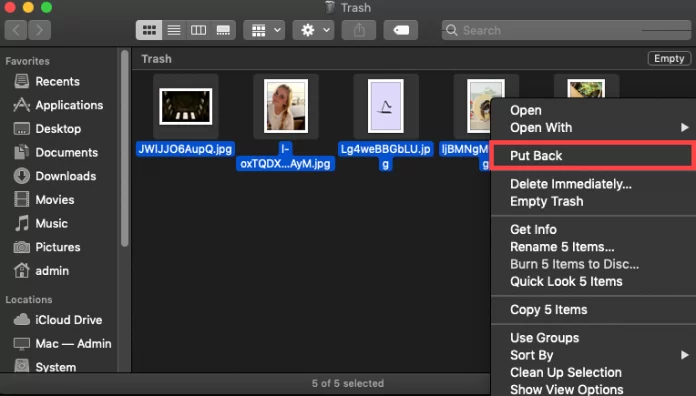
The deleted photos will be moved back to their original locations. Alternatively, you can drag and drop to any folder you want.
If you know the exact name of the deleted photo, you can quickly recover it from Trash using the following Terminal commands:
- cd .Trash (Enter the Trash folder).
- mv filename ../ (Move a specific file to your home folder. Replace filename with the name of the photo you want to recover.)
Method 3: iCloud
iCloud is Apple’s cloud backup service, and you can use it to store your photos and synchronize them across your Apple devices. When you delete a photo from iCloud, it disappears from all devices, but you can still find it in the Recently Deleted folder.
Step 1. Go to: https://www.icloud.com/
Step 2. Sign in with your username and password.
Step 3. Select Photos.
Step 4. Click on Albums at the top.
Step 5. Open the Recently Deleted album.
Step 6. Select the photos you want to restore and click Recover.
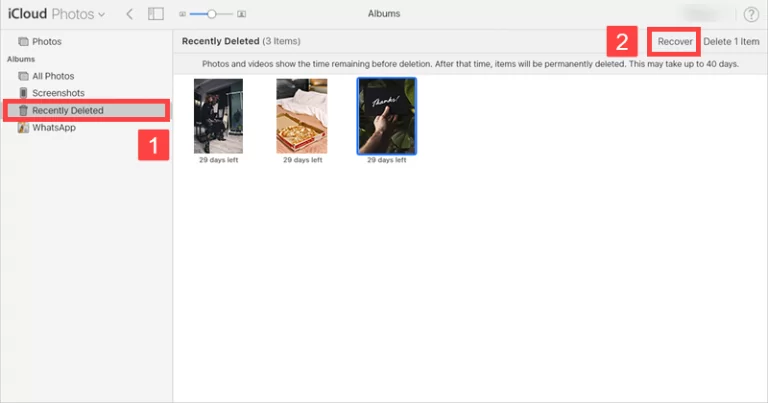
Just like with the Photos app, deleted photos don’t remain in the Recently Deleted album forever. They automatically disappear after 40 days to free up your cloud storage space.
Method 4: Local Backup
Your Mac comes with an excellent local backup app called Time Machine. Even if you don’t remember it, it’s possible that you’ve activated Time Machine in the past and configured it to back up your photos in the background. If that’s the case, you can recover them without any problems.
Step 1. Open the Folder where your photos were stored using Finder.
Step 2. Click the Time Machine icon located in the Menu Bar and choose Enter Time Machine.
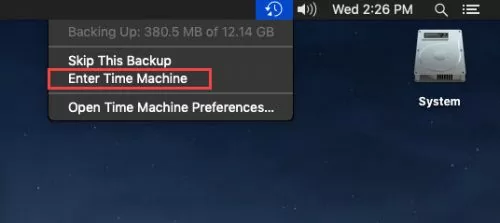
Step 3. Use the arrows on the right to go back in time until you see the deleted photos you want to recover. Click Restore to get them back.

Of course, Time Machine isn’t the only local backup app available for Mac, but it would be beyond the scope of this article to provide step-by-step instructions for all popular backup apps.
Method 5: Photos App
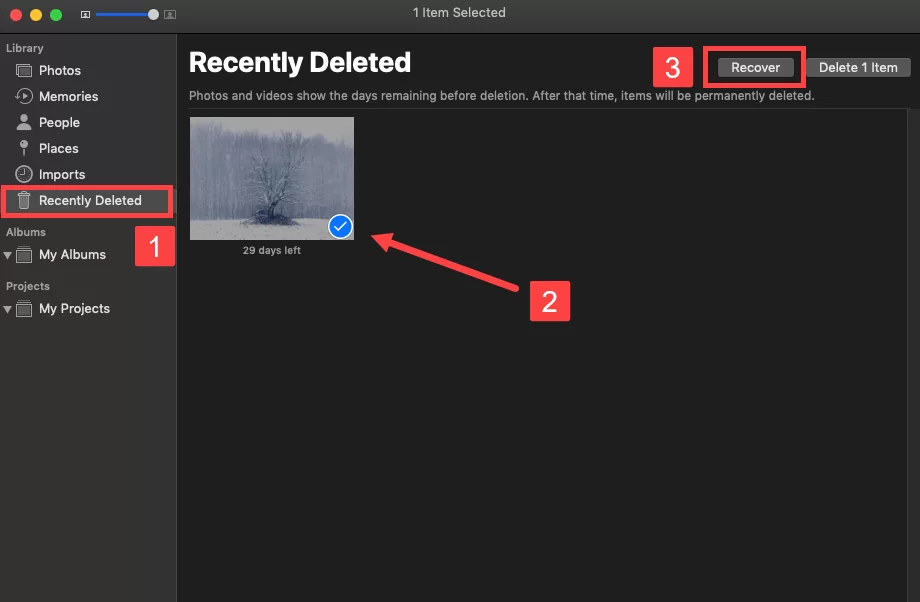
When it comes to organizing photos on Mac computers, the Photos app is the first choice of most users. When you delete a photo from this app, it goes into the Recently Deleted album, where it stays for 30 days. During this 30-day period, you can easily recover it with just a few clicks:
Step 1. Open the Photos app and select Recently Deleted from the column on the left.
Step 2. Select the photo you want to recover and click the Recover button in the top-right corner.
Ngolongtech hopes this article would be helpful for you. In case you have any questions, feel free to leave your comments below. Follow Macwintips for more tips and tricks on Windows and Mac!