Printer stopped working after Windows 10 update 2022. Your printer was working fine before the update. Windows forced an update and now your printer is not working. How to fix it? In this article, Ngolongtech will share with you solutions for “Printer stopped working after Windows 10 update 2022”.
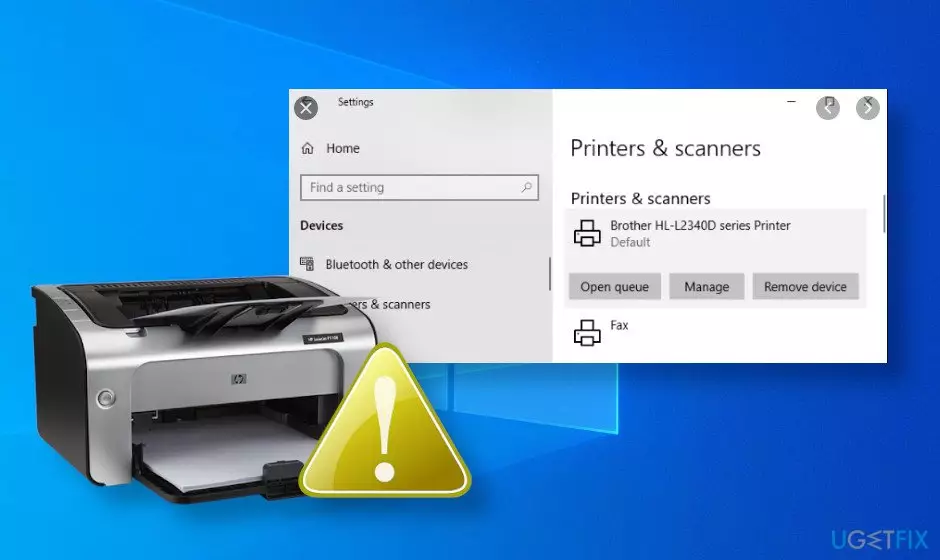
Table of Contents
Fix Printer stopped working after Windows 10 update 2022
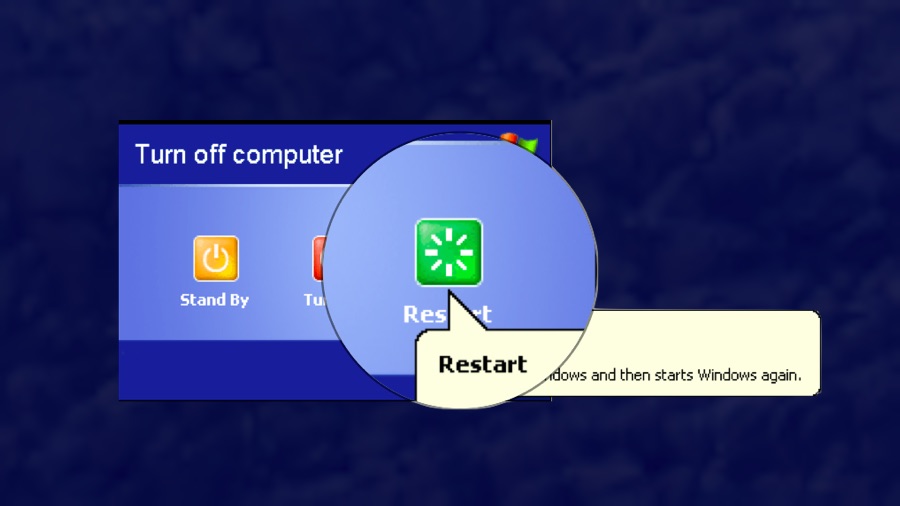
Make sure you have restarted Windows at least once. To Restart, click the lower-left Start button, click and select Restart.
If problems persist, then make sure your printer is compatible with Windows 10.
If your printer is compatible with Windows 10, download and run the Print and Scan Doctor to detect and fix issues.
If problems persist, reinstall the latest printing software.
If you are still facing issues and none of the solutions are working, try using System Restore. To do a system restore, follow Recovery options in Windows 10.
Method 1: Restart The Computer
The first and also the simplest solution to help fix computer errors and hardware errors is to restart the computer. Try restarting your computer and check if the printer is working properly again.
If not available, you can refer to some other troubleshooting solutions below.
Method 2: Check If The Printer Is Compatile With Windows 10
Some printers may not support and not work on Windows 10. So the next solution is to try to check if your printer is compatible with Windows 10 to fix the printer not working error after upgrading. Windows 10 level.
Follow the steps below to check if the printer is Windows 10 compatible:
– Enter control panel into the Search box on the Start Menu.
– On the list of search results, click Control Panel.
– Select Hardware and Sound again.
– Select Devices and Printers . Here you will see a list of devices connected to the printer.
– Check in the Unspecified section if your printer is listed here.
Method 3: Check Power And Connection
Make sure the printer is plugged in with the power plug and turned on. Check that the USB cable connecting the printer to the computer is properly plugged in, and has loose pins.
If you are using a wireless printer, you need to ensure the following criteria:
– Try enabling the wireless connection and make sure the connection is available on the printing device.
– Check the wireless connection on the printer, check whether the computer can connect to the wireless network or not.
If this also does not work, try the next solutions below.
Method 4: Uninstall And Reinstall The Printer
Follow the steps below to uninstall and reinstall the printer and fix the printer not working error after upgrading to Windows 10:
– Enter control panel into the Search box on the Start menu, then on the list of results click to open Control Panel.
– On the Control Panel window, find and click Hardware and Sound. – Select Devices and Printers . Here will display a list of devices connected to the printer. – Find and right-click your printer, select Remove to uninstall.
Reinstall the printer:
– Enter control panel into the Search box on the Start menu, then on the list of results click to open Control Panel.
– On the Control Panel window, find and click Hardware and Sound.
– Select Devices and Printers. Here will display a list of devices connected to the printer.
– Click Add a printer.
– The screen will display a window to scan for new devices. If your printer is on, Windows will automatically scan and find it.
– Finally try to print any document to see if the printer is working or not.
To install or add a printer locally, connect the printer to your computer, then turn on the printer.
Method 5: Update Printer Driver
Sometimes the printer may require the software to work better. If you have just upgraded or updated Windows 10, there is a high chance that the current printer driver is not compatible with the new operating system.
Possible problems including virus attacks, computer problems, etc. can be the cause of printer driver damage.
There are 3 ways to update the printer driver, including:
– Via Windows Update.
– Install device software.
– Manually download and install the driver.
Update printer drivers through Windows Update
– Right-click the Start button located in the bottom left corner.
– Select Device Manager.
– Click Printers to open the list of printers.
– Find and right-click your printer.
– Select Update Driver.
– Select Search automatically for updated driver software.
Install the printer software from the manufacturer
Check the printer hardware for the included hard drive and the hardware to install software for your printer.
Manually download and install the driver
– Visit the computer manufacturer’s home page.
– Check for available new driver updates.
– Find the right driver version for the printer, download and install.
– Follow the on-screen instructions to update the driver.
Alternatively you can double click on the driver and follow the steps below to set up automatic driver installation:
– Right-click the Start button located in the bottom left corner.
– Select Device Manager.
– Click Printers to open the list of printers.
– Find and right-click your printer.
– Select Update Driver.
– Select Search automatically for updated driver software.
In case if the above methods do not work, you can delete the old driver and reinstall the new driver.
– First remove the USB cable connecting the printer to your computer.
– Open Control Panel.
– Click on Hardware and Sound.
– Select Devices and Printers . Here will display a list of devices connected to the printer.
– Find and right-click your printer, select Remove device to uninstall.
– Next, enter Print management in the Search box, on the list of search results click Print Management.
– Select All Printers.
– Find and right-click your printer on the list, select Delete.
– Restart the computer.
– Re-plug the USB cable connecting the printer to the computer.
– Reinstall the printer driver and software.
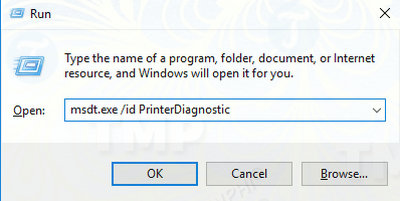
Method 6: Run Printer Troubeshooter
The next solution to fix printer not working after Windows 10 upgrade is to use Printer Troubeshooter to diagnose and fix the problems. Download the Printer Troubleshooter to your computer and install it, then follow the steps below:
Step 1: Open the Run window by pressing Windows + R.
Step 2: Type msdt.exe /id PrinterDiagnostic into it and press Enter to open the Printer Troubleshooter.
Step 3: Select the problematic printer from the list of devices listed.
Step 4: Click Next to run the Printer Troubleshooter.
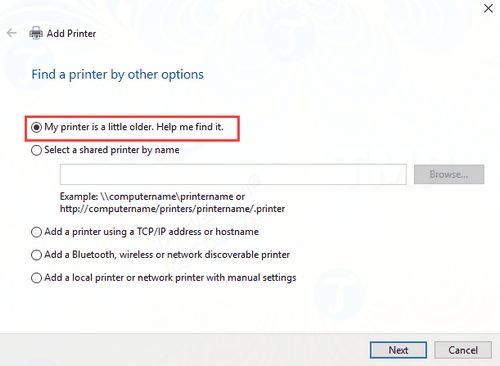
If your printer is not displayed in the list or Windows 10 cannot detect the printer, click the Add a printer/scanneroption and wait for Windows to detect the printer.
If Windows still cannot detect the printer, click The printer that I want isn’t listed => My printer is a little older, help me find it => Replace the current driver, then restart the computer.
The Printer Troubleshooter will check for printer problems, including:
– Print Spooler Service error.
– Printer connection problems.
– Printer driver error.
– The printer is not shared with the HomeGroup.
– Print queue.
Method 7: Install The Printer Driver In Compatibility Mode
Follow the steps below to install the printer driver in Compatibility mode:
Step 1: Right-click the printer driver file, select Properties.
Step 2: Check the box Run this program in compatibility mode for in the Compatibility tab and select Windows version.
Step 3: Select Run this program as an administrator.
Step 4: Click Apply and then OK to save the changes.
Step 5 : Double click on the driver file to install the printer driver and check if the printer is working or not.
Method 8: Restore The System To The Previous Version
The next solution to fix the printer not working after Windows 10 upgrade is to perform a system restore to the previous version.
Step 1: Press Windows + I to open Settings.
Step 2 : Go to Update & Security => Recovery => Advanced startup => Restart now => Troubleshoot.
Step 3: Select the option Go back to the previous build to restore to the previous version of Windows and fix the printer not working after Windows 10 upgrade.
Method 9: Contact The Manufacturer For Support
The final solution to fix the printer not working after Windows 10 upgrade is to contact the manufacturer for support.
Recovery options in Windows
|
Problem |
See this section |
|---|---|
|
Your PC isn’t working well and you recently installed an update. |
|
|
Your PC isn’t working well and it’s been a while since you installed an app, driver, or update. |
|
|
Your PC won’t start or is still loading |
|
|
Your PC won’t start, you haven’t created a recovery drive, and resetting your PC didn’t work. |
|
|
Your PC won’t start and you haven’t created a recovery drive. |
|
|
Your PC won’t start and you’ve created a recovery drive. |
|
|
You want to reinstall your previous operating system. |
|
|
Your PC isn’t working well and you recently installed an app. |
Above are some suggestions for solutions to fix Printer stopped working after Windows 10 update 2022. Nglongtech hopes this will be useful information you can refer to in the process of using. Thanks for reading!
Visit Macwintips.com to update the most practical and useful tips for Mac and Windows!