How to set up and configure DDNS on Netgear router. This guide will help you set up and configure Dynamic DNS (DDNS) on Netgear router. Using the Dynamic DNS built into the router means you don’t have to keep the computer running all the time on the network to access the remote network.

Table of Contents
What is Dynamic DNS (DDNS)?
To know what DDNS is, you first need to understand DNS. DNS stands for Domain Name System. You can find out more in this article: Understanding DNS, What is DNS Lookup? . But in summary, DNS is a mechanism to associate a domain, such as quantrimang.com with an IP address.
DNS is useful because it is easier for users to remember a string than a string. (This is similar to phone contacts, where you only need to remember the names of friends instead of their phone numbers.)
Dynamic DNS, or DDNS, is one of the most useful features of a home WiFi router. It is the basis for hosting many services in your home network. Examples of these services are VPN server or remote desktop connection. At the very least, DDNS lets you manage your router when you leave home using the familiar web interface.
How to set up and configure DDNS on Netgear router
Step 1 : Log into the Netgear router through the default gateway.
Step 2 : Click Advanced and then select Dynamic DNS.
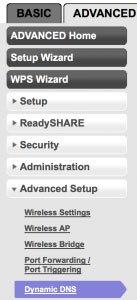
Click Advanced and then select Dynamic DNS
Click Advanced and then select Dynamic DNS
Step 3 : Select Use Dynamic DNS . Select www.No-IP.com from the drop-down menu. Enter your No-IP Host Name, Username and Password (your server name, username and password No-IP).
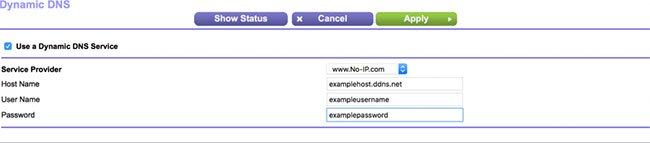
Select Use Dynamic DNS
Select Use Dynamic DNS
Step 4 : Click Apply.
All operations are completed! The Netgear router will now send No-IP updates whenever the IP address changes.