How to fix taskbar Windows 11. The unresponsive taskbar is one of the most annoying problems in Windows 11. Often, users complain that the system icons are pinned and do not work on forums, the Start button does not load the Start Menu when clicking etc. Sometimes, Windows 11 Taskbar may not be clickable after updating Windows. If you are facing Windows 11 Taskbar not working/freezing error or hanging issue. Go to the next section to see the all-in-one guide to fix your Windows 11 Taskbar error.
Table of Contents
How to fix taskbar Windows 11
Before you try the solutions below, check for updates and install any available bits on your Windows 11 device and see if the issue is resolved.
1] Restart PC
The first thing you can try to fix the Windows 11 Taskbar is not working on your computer is to give your Windows 11 PC a quick restart. Restarting Windows PC usually resolves minor issues.
If this action didn’t work for you, try the next solution.
2] Restart Windows Explorer and other essential processes
This solution requires you to restart the Windows Explorer process on your Windows 11 PC.
To restart File Explorer in Windows 11, do the following:
- Right-click on Start to open the WinX Menu
- Select Task Manager
- Locate Windows Explorer process
- Right-click on it
- Click on Restart.
Additionally, while in Task Manager, click the Details tab, and restart the following processes:
- ShellExperienceHost.exe
- SearchIndexer.exe
- SearchHost.exe
- RuntimeBroker.exe
3] Reset Windows 11 Taskbar
This solution requires you to Reset Windows Taskbar to default and see if that helps to resolve the issue.
4] Run SFC and DISM scan
If you have system file corruption, you’re likely to encounter this issue. In this case, you can run an SFC scan and see if that helps. If that didn’t help, you can run a DISM scan to fix bad system image which could also be the cause of the issue at hand.
If you prefer, you can run the SFC and DISM scan in tandem using the procedure below.
- Press Windows key + R to invoke the Run dialog.
- In the Run dialog box, type notepad and hit Enter to open Notepad.
- Copy and paste the syntax below into the text editor.
echo off
date /t & time /t
echo Dism /Online /Cleanup-Image /StartComponentCleanup
Dism /Online /Cleanup-Image /StartComponentCleanup
echo ...
date /t & time /t
echo Dism /Online /Cleanup-Image /RestoreHealth
Dism /Online /Cleanup-Image /RestoreHealth
echo ...
date /t & time /t
echo SFC /scannow
SFC /scannow
date /t & time /t
pause
- Save the file with a name and append the .bat file extension – eg; SFC_DISM_scan.bat and on the Save as type box select All Files.
- Repeatedly run the batch file with admin privilege (right-click the saved file and select Run as Administrator from the context menu) until it reports no errors.
- Restart your PC.
On boot, check if the issue is resolved. If not, proceed with the next solution.
5] Modify Registry
This solution requires you to create/edit the XAML (Extensible Application Markup Language) file in the Registry Editor.
Since this is a registry operation, it is recommended that you back up the registry or create a system restore point as necessary precautionary measures. Once done, you can proceed as follows:
- Press Windows key + R to invoke the Run dialog.
- In the Run dialog box, type regedit and hit Enter to open Registry Editor.
- Navigate or jump to the registry key path below:
HKEY_CURRENT_USER\Software\Microsoft\Windows\CurrentVersion\Explorer\Advanced
- At the location, right-click on the blank space on the right pane and then select New > DWORD (32-bit) Value to create the registry key and then rename the key as EnableXamlStartMenu and hit Enter.
- Double-click on the new entry to edit its properties.
- Input 0 in the Value data field.
- Click OK or hit Enter to save the change.
- Exit Registry Editor.
- Restart your PC.
On boot check if the issue is resolved. If not continue with the next solution.

6] Perform System Restore
If the taskbar was working fine earlier, but recently started giving issues, you can simply perform System Restore to revert your Windows 11 computer to a working state when the taskbar was functioning normally.
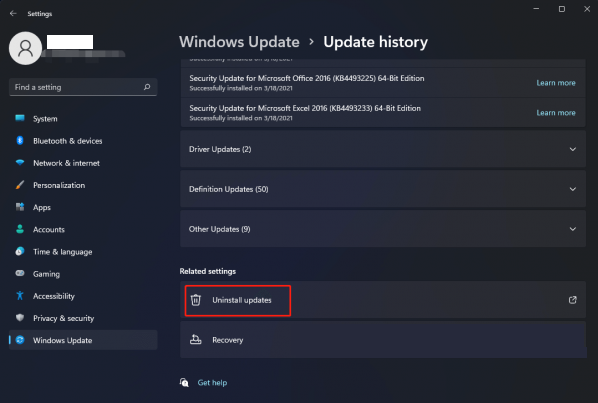
7] Uninstall any recent Windows Update you may have installed
If the issue started after installing a Windows Update then you might want to consider uninstalling the update and see if it helps.
8] Cloud Reset Windows 11
As a last resort, you can reset Windows 11 using the Cloud Reset option to fix the issue.
Epilogue
The launch of Windows 11 is being awaited and installed by many people. However, it is possible that for some update reasons, the taskbar error on Windows 11 does not work. With the above methods will be able to help you solve this error.


