Fix 99% error Laptop cannot catch Wifi on Windows 10. Laptop error can not catch Wifi there are many causes that cause you can not access the Internet. If you are experiencing Wifi problems on a PC or Laptop running Windows 10/8/7 such as losing WiFi, failing to catch Wifi signal and problems related to Wifi. Then, this article will be considered as a “Savior” for you, please refer to the methods I’ve summarized below to find an appropriate way to solve the current problem. of you!
Table of Contents
Cause of error Laptop cannot access Wifi
Some of the most common causes of Wi-Fi errors on laptops are as follows:
You forgot to turn on Wifi on Laptop.
Wifi Driver on an old laptop is not stable, or the laptop has not installed Wifi Driver .
The cause comes from Wifi Router .
Because the VPN software creates fake IP addresses.
Your computer is infected with a virus.
Here are some of the main reasons leading to Laptop error not catching Wifi , you try to eliminate the causes of errors to shorten the time to overcome.
Wifi problems common and common solutions.
Check the feature of Wifi recording / broadcasting on the Laptop
Check if the Wifi feature is enabled on the Laptop, the work is simple but can be a solution to this problem. Each laptop will have a different way to turn on / off Wifi, but most are integrated on the keyboard.
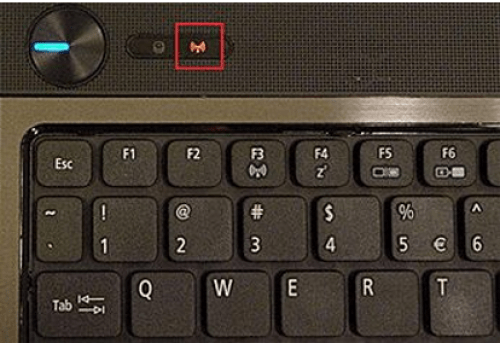
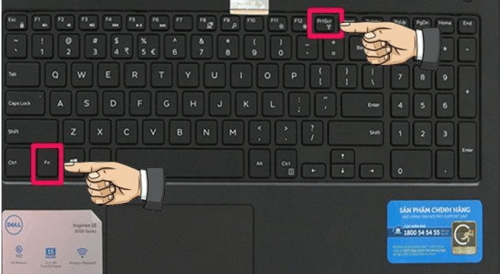
Combination of turning on / off Wifi on Laptop some brands:
Asus Laptop: Fn + F2
Acer Laptop: Fn + F5 or Fn + F2
HP laptop: Fn + F12
DELL Laptop : Fn + PrtScr
Laptop Lenovo: Fn + F5 or Fn + F7
Laptop Toshiba: Fn + F12
Restart the Windows 10 computer
Not just Wifi, restarting your computer is a simple but extremely effective method to handle many small errors on Windows. The reason is that your Laptop has been working for a long time, leading to overheating and problems. In addition, software conflicts, file system errors … also generate errors.
Restart Wifi Modem or Wifi Router
WiFi Router or Wifi Modem devices are similar to computers, when they work for a long time, they will generate heat, resulting in wrong operation. This leads to error Laptop not catch Wifi is natural.
To fix this problem is very simple, you just need to disconnect the Modem power or Wifi Router for about 30 seconds and then plug it back in, then the device will work normally again.
This way I find it quite effective whenever my home Wifi cannot connect.
Forget or delete Wifi network and reconnect
A simple but possible solution to help you connect to Wifi network successfully on Laptop, is to delete the Wifi network and then connect again. Details of how to do it (on Windows 10) are as follows:
Step 1. Press the key combination Windows + I to open the Windows 10 installation center => select Network & Internet (as shown below).
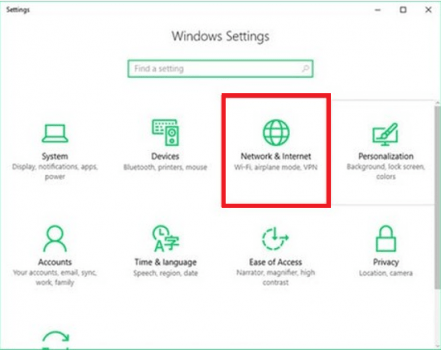
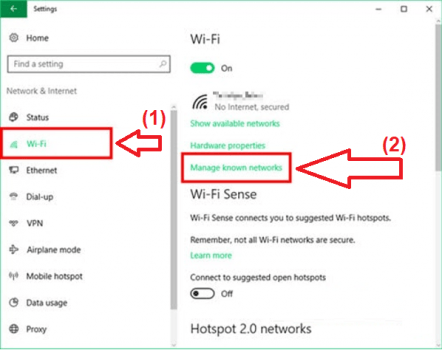
Step 2. In the new interface, select Wifi => continue to select Manage known networks (as shown below).
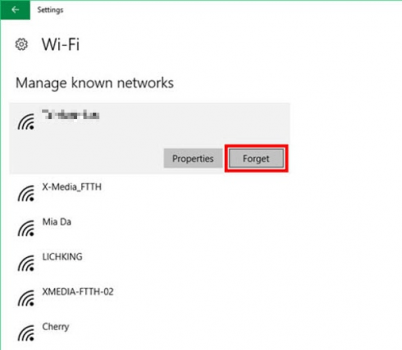
Step 3. Now you choose the name Wifi you want to delete => and click Forget (as shown below).
Step 4. Now you enter the password and connect to the Wifi network as usual.
Rename Wifi password on Router or Wifi Modem
Another way you can apply that is to change the name (SSID) and Wifi password on the modem. For how to do this, you can search online or directly on the manufacturer’s modem manual.
Scan for viruses to fix Wifi on Laptop
Virus is also a cause of Laptop error on Wifi not . If you use Windows 8 and Windows 10, you can use Windows Defender built on the system to scan for viruses. In addition, you can refer to some powerful Antivirus software to install on the computer that you have shared in this article
Laptop has not installed Wifi Driver
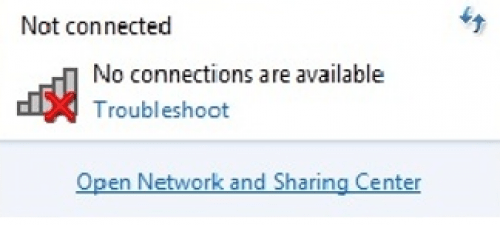
The most obvious manifestation of this case is that the Wifi icon is dimmed and has a red X (as shown below).
This is the result after you install the Wifi Driver for Laptop successfully.
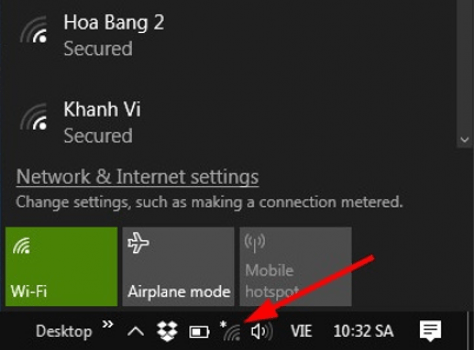
Note : If your Laptop is running Windows 8.1 or Win 10, you need to pay attention to airplane mode (Airplane mode) must be OFF to access Wifi.
Due to the VPN software software
The most obvious manifestation in this case that the Laptop cannot catch Wifi error is not showing the network list when you click on the Wifi icon. The reason is that the VPN software creates a fake IP address which leads to Windows misunderstanding as an error. To fix Wifi Laptop Win 10/8 error you do the following:
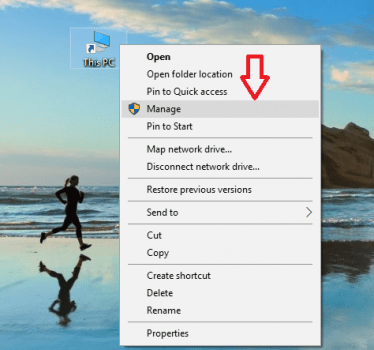
Step 1. Right-click This PC => select Manage (as shown below).
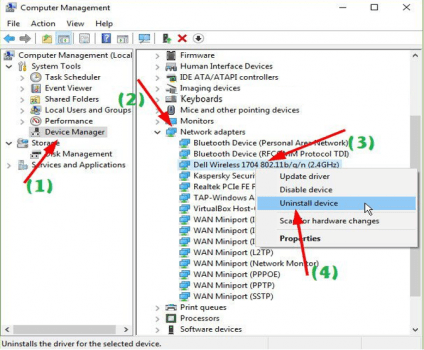
Step 2. Next, click Device Manager => find Network adapters => find and right-click Wireless (wifi network) => select Uninstall device to remove the current Wifi driver (as shown below).
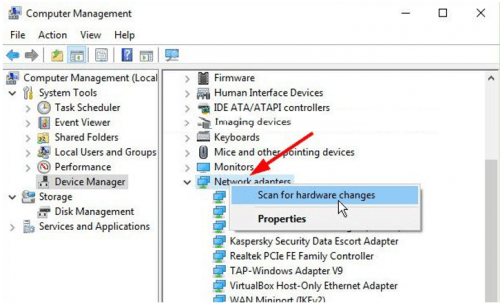
Continue to right-click Network adapters => then select Scan for hardware changes (as shown below) to automatically install a new Driver for Wifi.
Step 3. Now, turn off the VPN software that starts with the system , and restart the computer.
In case you still cannot fix the Wifi error on Laptop after restarting, please continue with the following steps :
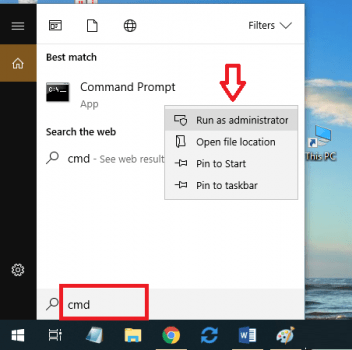
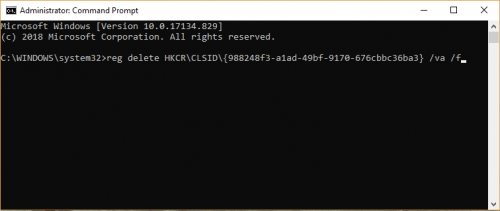
– Go to Start => search keyword cmd => right click on the results found and select Run as Administrator (as shown below).
 – Next, enter each of the following commands in cmd and press Enter .
reg delete HKCRCLSID {988248f3-a1ad-49bf-9170-676cbbc36ba3} / va / f
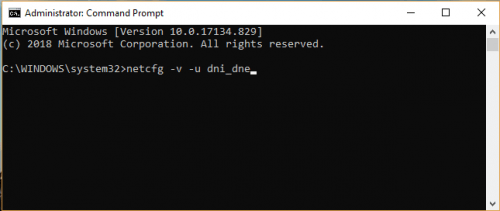
Continue to enter the command below and press Enter .
netcfg -v -u dni_dne
 Now restart your computer and check the results.
Fix Wifi error on Laptop by turning off battery saving mode
Save Power mode on Laptop is one of the reasons leading to Laptop’s failure to access to Wifi . Try turning this feature off and try again, specifically as follows:
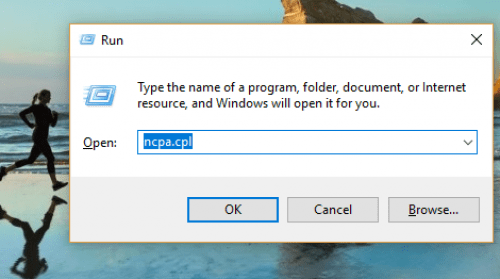
Step 1. Go to Network and Sharing Center by pressing Windows + R to open the Run window => enter the command ncpa.cpl => and then press Enter .
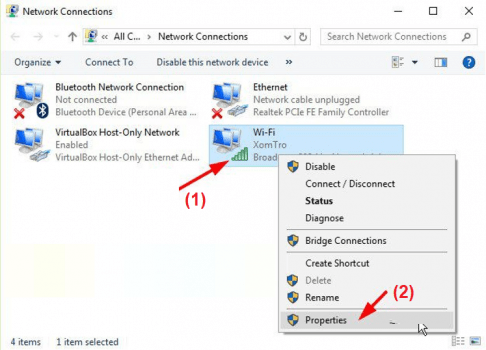
 Step 2. Right-click on the name of the connecting WiFi => then select Properties (as shown below).
 In the Wifi Properties window => click Client for Microsoft Networks => then select Configure …. (as shown below).
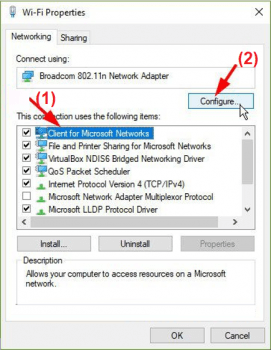 Step 3. Next, select the tab Power Management => uncheck Allow the computer to turn off this device to save power => and click OK to confirm.
Error with yellow exclamation mark on Wifi icon
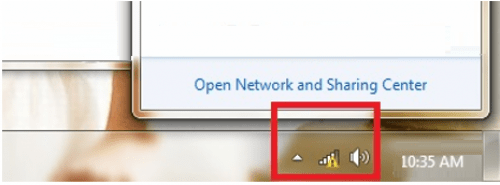 Wifi error yellow exclamation is one of the common network problems. The fix is as follows:
Step 1. You delete the current Wifi network and then reconnect. How to do you refer to section 4 above.
Step 2. Refresh the IP address. Refreshing the IP on a Laptop is also a way to help us overcome the error Laptop cannot catch Wifi . The cause may be due to the computer has the same IP address, the fix is as follows:
– Open Command Prompt by pressing Windows + R => enter cmd => press Enter .
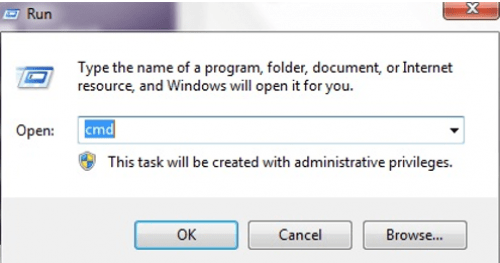 – In the CMD window that appears, enter the command ipconfig / release and press Enter to remove the IP you are using.
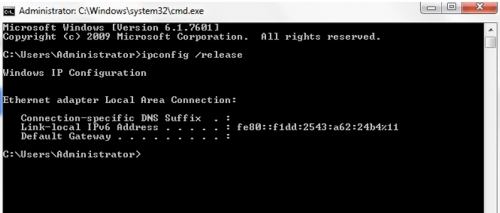 – Next, enter the command ipconfig / renew to set a new IP range for Laptop.
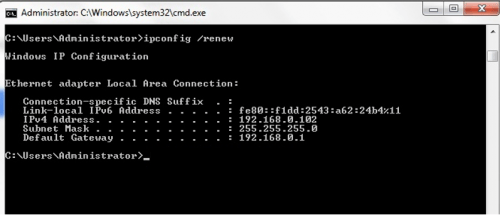 – Finally, restart the computer and re-enter the Wifi network to check the results.
Wifi error Limited
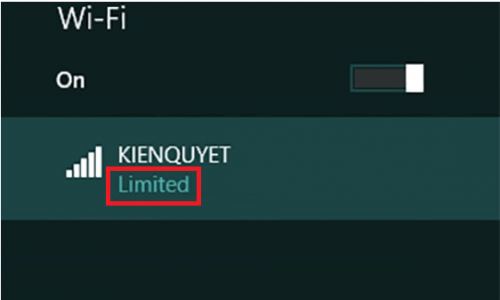 Limited Wifi error is a common problem, at this time the Wifi network is still available but cannot access the internet. The fix is as follows:
Method 1. Restart the computer and reconnect.
Method 2. Delete the network and reconnect (refer to the procedure above).
Method 3. Restart TCP / IP.
You go to Start => search with the keyword cmd => right click on the results found => select Run as Administrator .
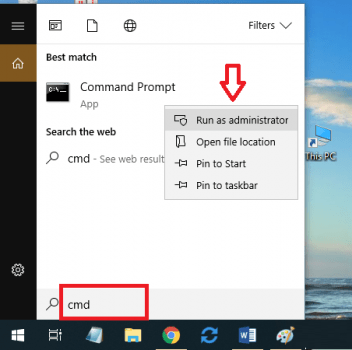 CMD window appears, enter the command netsh int ip reset => press Enter => finally you restart the computer and check the results.
Method 4. Reset TCP / IP Autotunning. Open CMD with Admin rights (as in way 3). Next, enter each of the following commands in the CMD window and press Enter.
netsh int tcp set heuristics disabled
netsh int tcp set global
autotuninglevel = disabled
netsh int tcp set global rss = enabled
netsh int tcp show global
Finally, restart the computer.
Fix Laptop cannot access Wifi on Windows 10
The problem often appears after users upgrade Windows 10, notably the Laptop error can not catch Wifi even though the diver has been fully installed, or the Wifi flickering in use is lost …
Ways to fix Laptop not catching Wifi Win 10
1. Reinstall TCP / IP
This is a common way to fix Wifi errors on Windows. The steps are as follows:
Step 1. You open CMD with Admin rights by going to Start Menu => searching with the keyword cmd => right-click on the results shown => select Run as Administrator .
Step 2. In the CMD interface, enter the following commands and press Enter after each command:
netsh int ip reset
netsh int tcp set heuristics disabled
netsh int tcp set global autotuninglevel = disabled
netsh int tcp set global rss = enabled
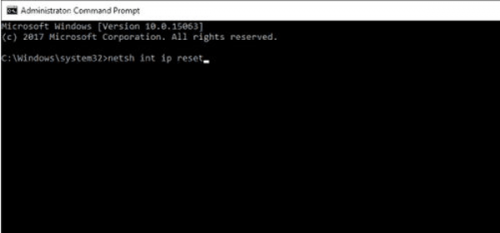 Step 3. Now, reboot the Windows computer and try again.
2. Fix Wifi error Win 10 with the utility available
To fix the error Laptop cannot catch Wifi Win 10, you can use the Internet Connection Troubleshooter utility available on the system. The steps are as follows:
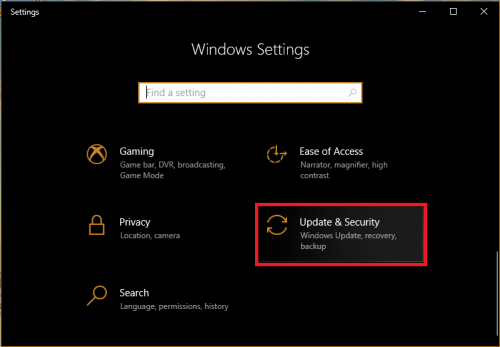
Step 1. Press Windows + I to open Settings => then select Update & Security (as shown below).
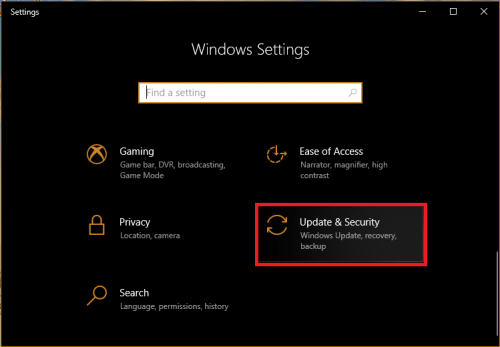
 Step 2. In the Settings interface, click Troubleshoot => then select Netword Adapter => and select Run the troubershooter (as shown below).
 Step 3. Follow the instructions to proceed to fix Wifi error Win 10.
Step 4. Finally, restart the Windows computer.
3. Check DHCP on Windows 10
What is DHCP? In essence, this is a program to assign IP addresses to computers when accessing the network. In any case, the wrong operation of DHCP or the inactivation of the device will prevent the laptop from accessing Wi-Fi. Follow these steps to make sure DHCP is enabled.
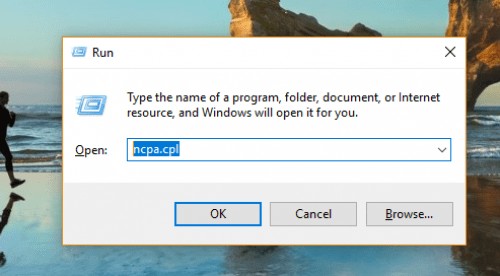
Step 1. You press the combination of Windows + R => enter the command ncpa.cpl => and then press Enter to open the network connection center.
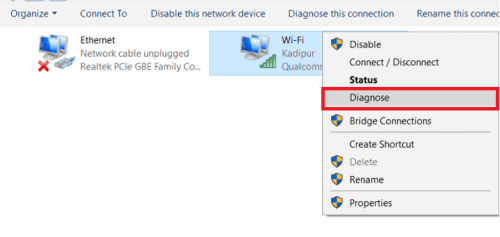
Step 2. In the new window that appears, right-click on the problem Wifi network => select Diagnose (as shown below).
 Step 3. The test will take place, please wait a bit. If the DHCP program is not enabled then it will be reactivated. Now check if your Windows 10 Laptop has captured Wifi.
4. Set the IP address manually
A pretty effective solution to fix laptop not catching wifi win 10, is to set the IP address manually. Proceed as follows:
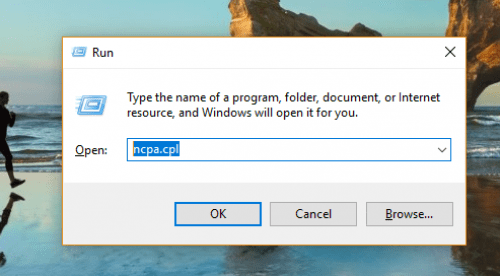
Step 1. You press Windows + R => then enter the command ncpa.cpl => then press Enter to open Network Connections.
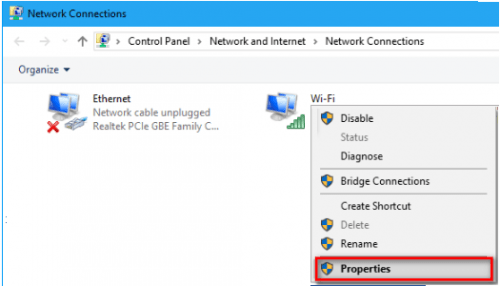
 Step 2. In the Network Connections interface, right-click on the Wifi network => and then select Properties (as shown below).
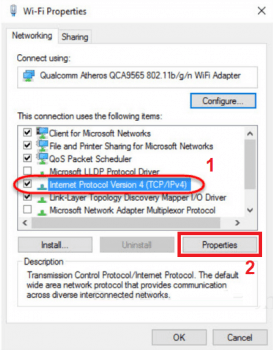
 Step 3. In the next window, click Internet Protocol Version 4 (TCP / IPv4) => then click Properties (as shown below).
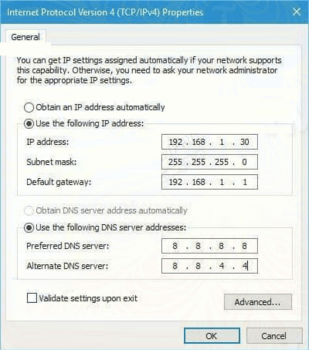
 Step 4. A new window appears, select Use the following IP address => and enter the address in the IP address, Subnet mask and Default gateway boxes (you can refer to the image below).
Then enter the Google Public DNS server address below.
 Step 5. After completing, you click OK and check if the laptop error does not catch wifi win 10 has expired.
5. Reinstall the Wifi Driver Win 10
Normally, the computer with Windows 10 installed will automatically install the wifi driver. But to be sure, you should still check that your computer is installed or updated drivers. Proceed as follows:
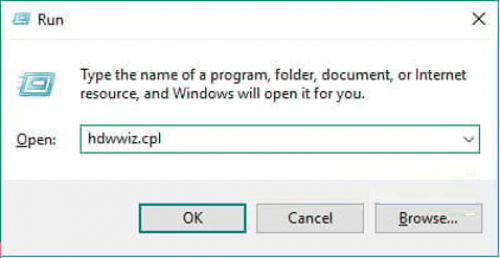
Step 1. You press Windows + R to open the Run window => then enter hdwwiz.cpl => then press Enter .
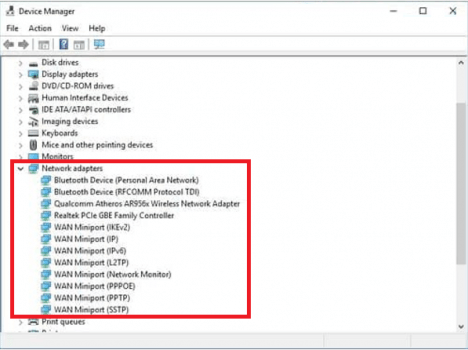
 Step 2. Now the Device Manager window will open, find and double-click Network adapters.
If it is green, the network driver is fully installed, if it appears yellow, it means that the computer recognizes the wrong or missing WiFi Driver.
 To install the Wifi driver for the Laptop, go to its homepage and find and download and install the appropriate driver for the device. If not, you should rely on the help of software that automatically installs and updates drivers for your computer.
6. Setting the internet IP address
Step 1. Right-click the network icon on the Taskbar => select Open network & Internet settings .
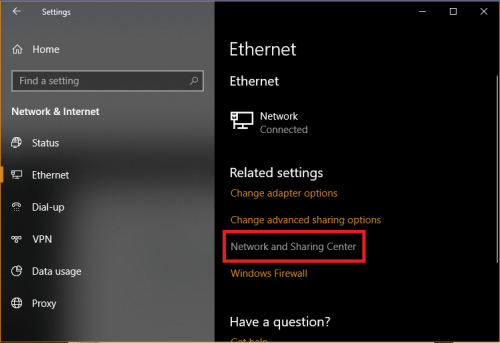
Step 2. A new window will appear, select Network and Sharing Center (as shown below).
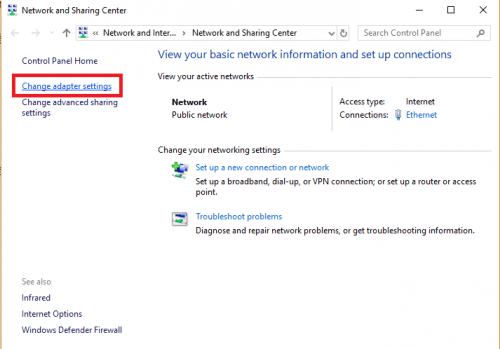
 Step 3. New interface appears, click Change Adapter Settings (as shown below).
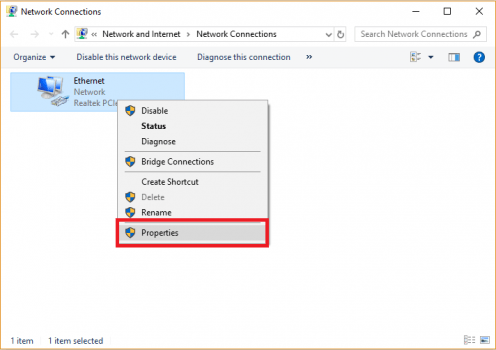
 Step 4. Next interface, right click on Ethernet or Local Area Connection and select Properties (as shown below).
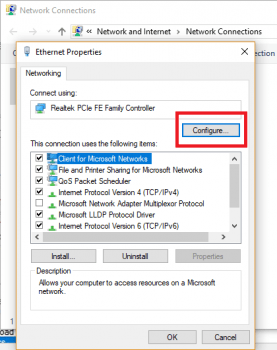
 Step 5. A new window appears, click on Configure (as shown below).
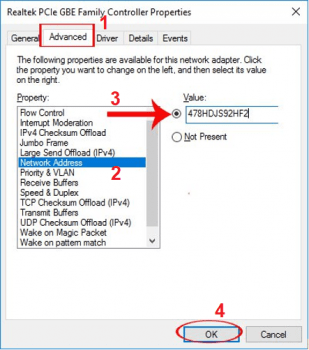
 Step 6. A new window appears, switch to the Advanced tab => then find Network Address in Property => select Value = field, enter the value as shown below and click OK .
7. Fix Limited Wifi Win 10 error
Limited Wifi is one of the most common problems and causes the laptop to not connect to Wifi Win 10. To overcome this phenomenon, please follow these steps:
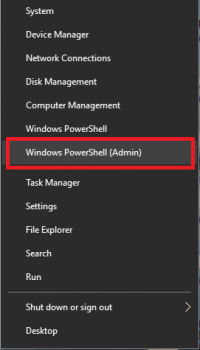
Step 1. Right-click Start Menu => select Windows PowerShell (Admin) .
 Step 2. In the PowerShell window, enter the following command and press Enter (as shown below).
netsh int ip reset C: resetlog.txt
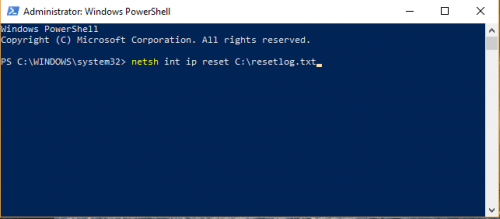 Finally, restart the Windows computer and try to connect to the Wifi network.
Fix Windows 8 Laptop cannot catch wifi
Here is how to fix Wifi error on the popular Windows 8 Laptop, please refer and follow.
1. Laptop Window
Method 1. Set the value for network address
In some cases, a laptop with a WiFi error may be due to an unassigned network address. The fix is as follows:
Step 1. On the Win 8 computer screen, click Start => then select Control Panel => click on Network and Sharing Center => and select Change Adapter Settings to enter Network Connections (as shown below).
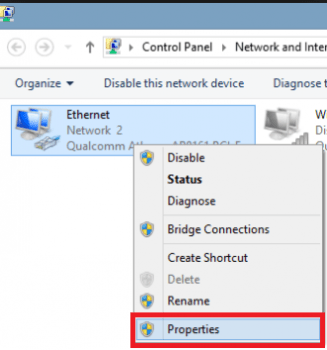
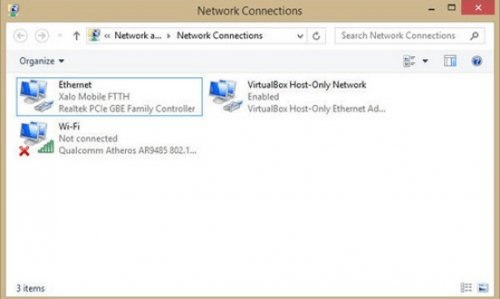 Step 2. Right-click Local Area Connection or Ethernet => then select Properties (as shown below).
 Step 3. A new window appears, click Configure .
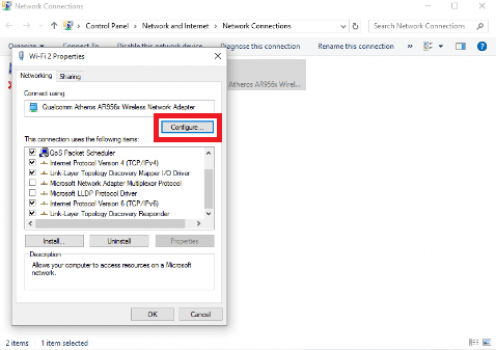 Step 4. A new window appears, select Advanced => tab, then select Network Address => select Value => then enter any 12 characters as shown below.
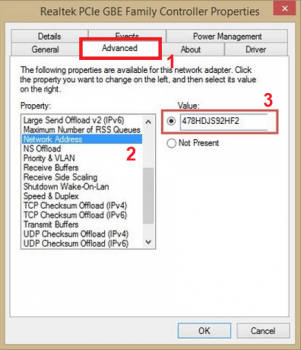 Step 5. Finally, click OK to finish.
Method 2. Install Wifi Driver for Laptop Win 8
Most laptop errors cannot catch Wifi because the Wifi driver is faulty or has not been installed. To fix, follow these steps to install drivers for Laptop Windows 8.
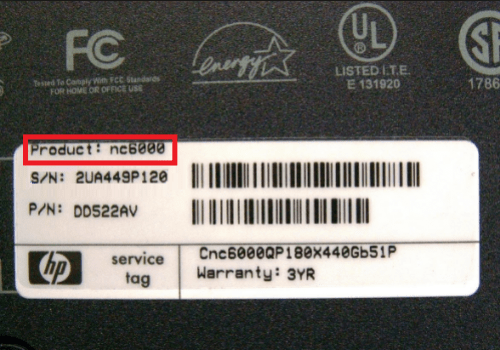
Step 1. You turn the laptop upside down and see the computer name.
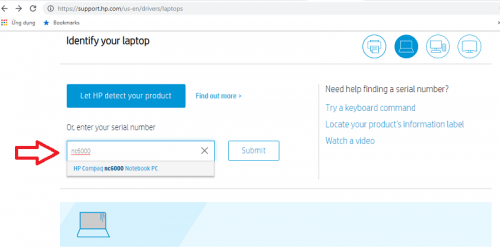
 Step 2. Go to its homepage and search for Diver.
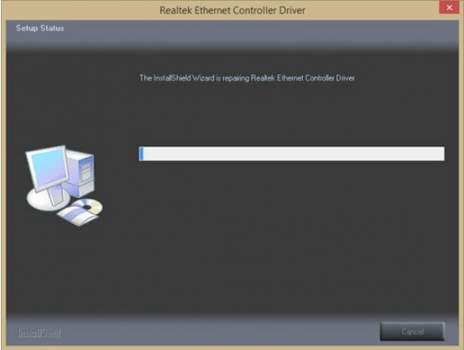
 Step 3. Download and install the Wifi Driver for your Laptop.
 Step 4. Check your Wifi connection, maybe the error is fixed.
2. Laptop Windows 8 has a Wifi Limited error
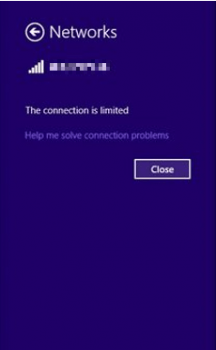 To overcome this phenomenon, follow the ways below. As follows:
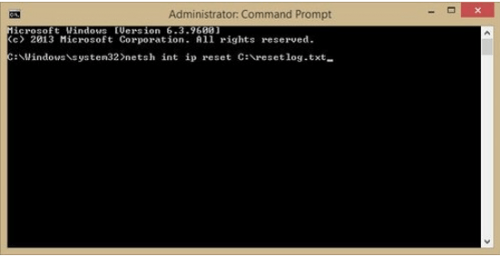
Method 1. Run the netsh.exe command to reset the IP
Step 1. On the Windows 8 Desktop, press the key combination Windows + X + A to open CMD window (Command Prompt).
Step 2. You enter the command below => press Enter => then restart the computer.
netsh int ip reset C: resetlog.txt
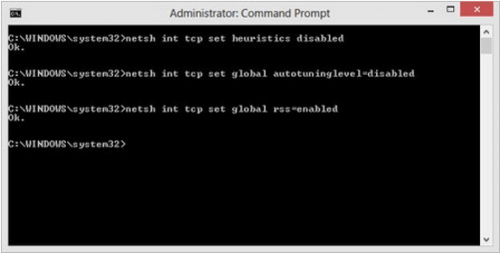
Method 2: Restart TCP / IP
Step 1. Open the Command Prompt by pressing Windows + X + A keys .
Step 2. Next, enter each of the following commands and press Enter after each statement.
netsh int tcp set heuristics disabled netsh int tcp set global autotuninglevel = disabled netsh int tcp set global rss = enabled
Fix Laptop cannot catch Wifi on Win 7
On computers running Windows 7 operating system, if you encounter Wifi problems, you can apply the ways to fix Windows Wifi error above, and refer to the methods listed below.
Stop the network hijacking service Win 7
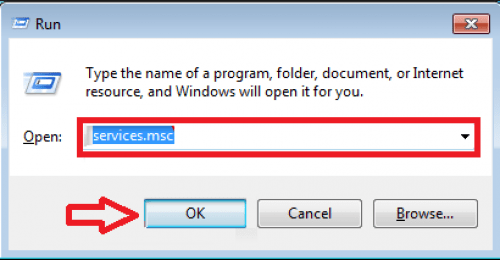
Step 1. Click on Start => then select Run .
Step 2. In the Run window => enter the Services.msc statement then click OK .
 Step 3. You find items in the list.
Id_String2.6844F930_1628_4223_B5CC_5BB94B87 9,762
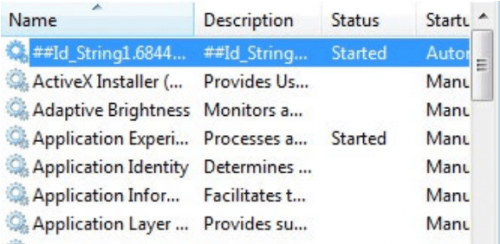 Step 4. Now right-click on it => select Properties => then click Disabled in the drop down window.
Step 5. Click Stop => then Apply => finally restart your computer.
Restart the Wireless Zero Configuration service
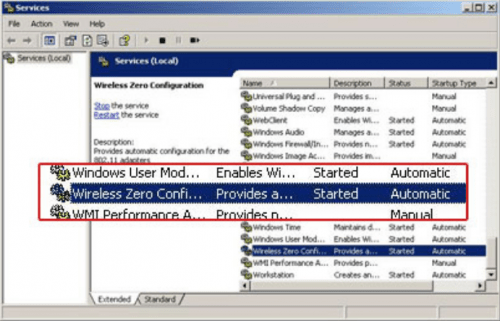
Step 1. Press Windows + R to open the Run => dialog box then enter services.msc command .
Step 2. Go to the Wireless Zero Configuration service => then start it if it is OFF.
Run the IP debugger
Step 1. You press Windows + R to open Run => then enter the command CMD press Enter to open CMD.
Step 2. In the CMD window, enter Ipconfig / flushdns and press Enter and wait for the program to open.
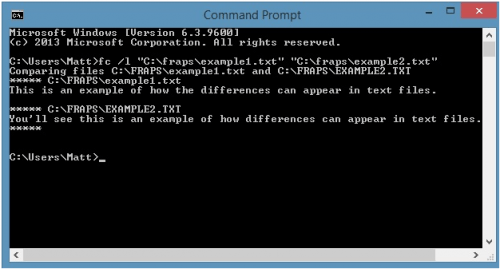
Step 3. Enter ipconfig / release and press Enter and wait for it to finish.
Step 4. Try to connect to Wifi, if it is not then enter Ipconfig / renew and press Enter .
Epilogue
Above is the whole most common cause of Laptop not catching Wifi and how to fix it. All of the Wifi errors on the Windows 10/8/7 Laptop I know are listed, accompanied by a solution. Hope this information you will apply successfully to solve your current Wifi problem.

