
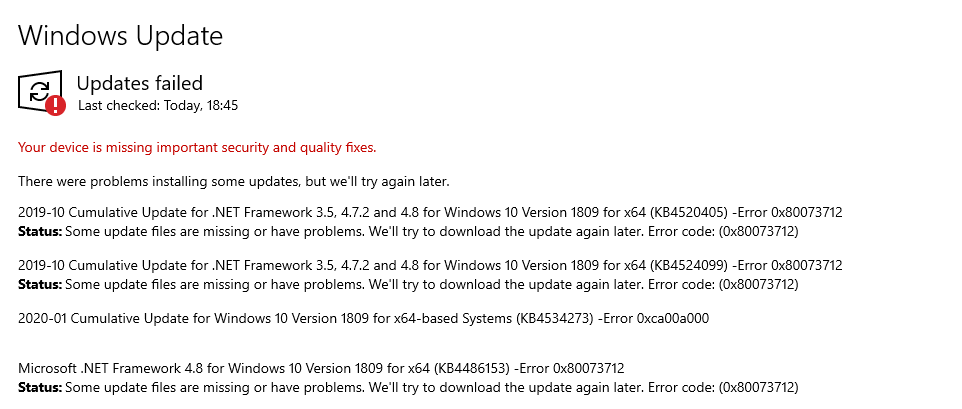
How to fix ERROR_SXS_COMPONENT_STORE_CORRUPT Windows 10 ,.So I want to update my windows 10 to the latest version but whenever I try it tells me it’s getting things ready and when it finishes it then tells me “Some update files are missing or have problems. We’ll try to download the update again later. Error code: (0x80073712)”, I have no idea what to do and I really want help, so I would appreciate any sort of help
Error code 0x80073712 means ERROR_SXS_COMPONENT_STORE_CORRUPT
The component store has been corrupted.
Please perform an In-place Upgrade to fix the problem.
Table of Contents
Resolution for Windows 8.1, Windows 10 and Windows Server 2012 R2
To resolve this problem, use the inbox Deployment Image Servicing and Management (DISM) tool. Then, install the Windows update or service pack again.
-
Open an elevated command prompt. To do this, open Start menu or Start screen, type Command Prompt, right-select Command Prompt, and then select Run as administrator. If you are prompted for an administrator password or for a confirmation, type the password, or select Allow.
-
Type the following command, and then press Enter. It may take several minutes for the command operation to be completed.
ConsoleDISM.exe /Online /Cleanup-image /RestorehealthImportant
When you run this command, DISM uses Windows Update to provide the files that are required to fix corruptions. However, if your Windows Update client is already broken, use a running Windows installation as the repair source, or use a Windows side-by-side folder from a network share or from a removable media, such as the Windows DVD, as the source of the files. To do this, run the following command instead:
ConsoleDISM.exe /Online /Cleanup-Image /RestoreHealth /Source:C:\RepairSource\Windows /LimitAccessNote
Replace the C:\RepairSource\Windows placeholder with the location of your repair source. For more information about using the DISM tool to repair Windows, reference Repair a Windows Image.
-
Type the
sfc /scannowcommand and press Enter. It may take several minutes for the command operation to be completed. -
Close the command prompt, and then run Windows Update again.
DISM creates a log file (%windir%/Logs/CBS/CBS.log) that captures any issues that the tool found or fixed. %windir% is the folder in which Windows is installed. For example, the %windir% folder is C:\Windows.
Resolution for Windows 7 and Windows Server 2008 R2
To resolve this problem, use the System Update Readiness tool. Then, install the Windows update or service pack again.
-
Download the System Update Readiness tool.
Go to Microsoft Update Catalog and download the tool that corresponds to the version of Windows that is running on your computer. For more information about how to find the version of Windows that you installed, see Find out if your computer is running the 32-bit or 64-bit version of Windows.
Note
This tool is updated regularly, we recommend that you always download the latest version. This tool is not available in every supported language. Check the link below to see if it is available in your language.
-
Install and run the tool.
-
Select Download on the Download Center webpage, then do one of the following:
- To install the tool immediately, select Open or Run, and then follow the instructions on your screen.
- To install the tool later, select Save, and then download the installation file to your computer. When you’re ready to install the tool, double-select the file.
-
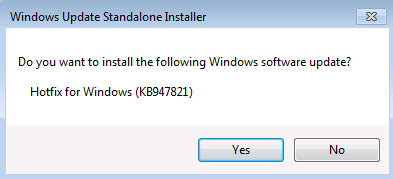
In the Windows Update Standalone Installer dialog box, select Yes.
-
-
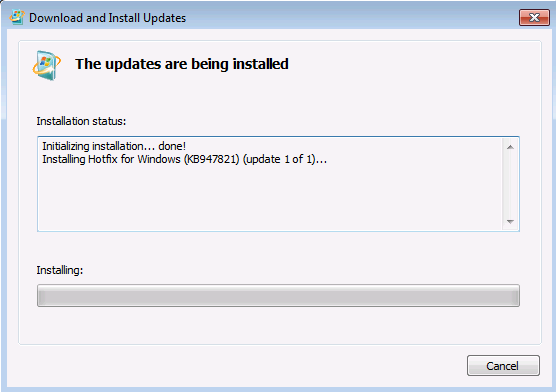
When the tool is being installed, it automatically runs. Although it typically takes less than 15 minutes to run, it might take much longer on some computers. Even if the progress bar seems to stop, the scan is still running, so don’t select Cancel.
-
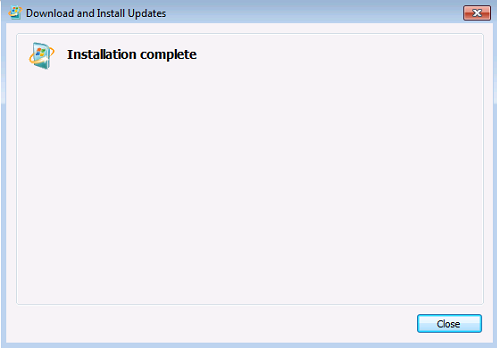
When you see Installation complete, select Close.
-
Reinstall the update or service pack you were trying to install previously.
To manually fix corruption errors that the tool detects but can’t be fixed, see How to fix errors that are found in the CheckSUR log file.
Resolution – Download the package from Microsoft Update Catalog directly
You can also try to directly download the update package from Microsoft Update Catalog, and then install the update package manually.
For example, you may have problems when you try to install updates from Windows Update. In this situation, you can download the update package and try to install the update manually. To do this, follow these steps:
-
Open Microsoft Update Catalog in Internet Explorer.

-
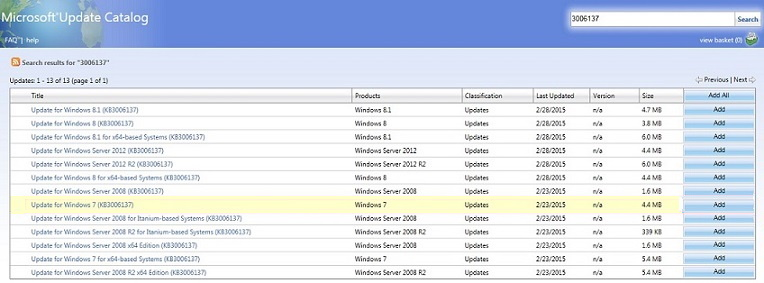
In the search box, input the update number that you want to download. In this example, input 3006137. Then, select Search.

-
Find the update that applies to your operating system appropriately in the search results, and then select Add to add the update to your basket.
-
Select view basket to open your basket.

-
Select Download to download the update in your basket.

-
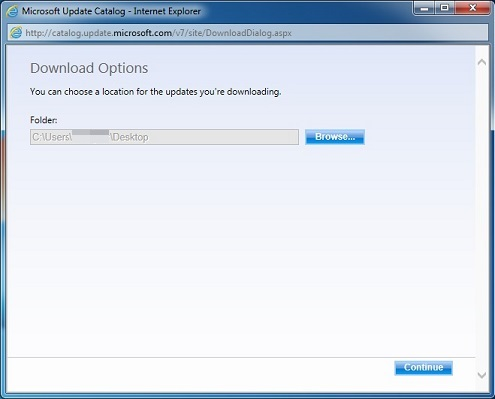
Select Browse to choose a location for the update you are downloading, and then select Continue.
-
Select Close after the download process is done. Then, you can find a folder that contains the update package in the location that you specified.
-
Open the folder, and then double-select the update package to install the update.
If the Windows update or service pack installed successfully, you are finished. If the problem is not fixed, or if System Update Readiness Tool cannot find the cause
How to Do a Repair Install of Windows 10 with an In-place Upgrade
If you’re having problems with Windows 10 on your PC, you could use push-button reset to refresh or reset Windows.
Refresh your PC Fixes software problems by reinstalling the OS while preserving the user data, user accounts, and important settings. All other preinstalled customizations are restored to their factory state. In Windows 10, this feature no longer preserves user-acquired Windows apps.
Reset your PC prepares the PC for recycling or for transfer of ownership by reinstalling the OS, removing all user accounts and contents (e.g. data, Classic Windows applications, and Universal Windows apps), and restoring preinstalled customizations to their factory state.
The options above are great for what they are intended for, but you could also do a repair install of Windows 10 by performing an in-place upgrade without losing anything other than all installed Windows Updates.
You will keep all apps, programs and personal data, just as when you upgrade, as an in-place upgrade repair uses the same basic mechanism as when you upgrade.
- You will only be able to do a repair install of Windows 10 from within Windows 10. You will not be able to do a repair install at boot or in Safe Mode.
- You will need at least around 8.87 GB + what Windows is currently using of free space available on the Windows drive.
- The installation media (ex: ISO or USB) must be the same edition and same or newer build as your currently installed Windows 10. If it’s not, then the repair install will fail.
- The installation media (ex: ISO or USB) must be the same base language (aka: system default language) as your currently installed Windows 10. If it’s not, then you will not keep anything.
- If you have a 32-bit Windows 10, then you must use a 32-bit ISO or USB.
- If you have a 64-bit Windows 10, then you must use a 64-bit ISO or USB.
What to expect when doing a repair install of Windows 10:
- System Protection will be reset to the default of being turned off. It is recommended to turn on system protection after the repair install has finished to have restore points.
- You will lose any custom fonts.
- You will lose any customized system icons.
- You may need to re-establish your Wi-Fi connection.
- You will need to redo Windows updates subsequent to the build you have used for the repair install.
- Windows.old will be created.
- You will need to redo any language downloads including the display language if you changed that.
Starting with Windows 10 build 18298, Microsoft made some adjustments to the design of Windows 10 Setup when running setup.exe from a Windows 10 ISO file.
This tutorial will show you how to do a repair install of Windows 10 by performing an in-place upgrade without losing anything.


