
How to Boost internet speed Windows 11. Since the version of Windows 10, Microsoft has begun to “interfere” with the user’s internet connection speed, by equipping and activating some features about background applications and system updates. Until Windows 11, this situation continues. Therefore, sometimes you will feel that your computer’s internet connection is quite slow, causing a lot of discomfort during use. Fortunately, there are plenty of tips that can dramatically increase internet speed.

Table of Contents
Why is the Internet speed slow?
There are many reasons for slow internet connection. These fixes can be helpful if and when you notice slow internet. However, if it is consistently slower than expected, you should contact your Internet Service Provider (ISP).
Here are the possible reasons for slow Internet connection:
- Too many devices connected to the network at the same time
- Bandwidth is not configured properly
- The longer the distance, the longer the data transmission time
- Weak WiFi signal
- Broken wire or malfunctioning device
- Presence of malware on the system
- Measurement connection established on PC
- Apps or background processes that consume a lot of data
By any chance, if you can identify the problem causing the poor internet connection from the list, go to the relevant fix and do it. If not, follow the steps mentioned above to fix the problem quickly.
How to Boost internet speed Windows 11
Run the Internet Troubleshooter
Go to System, select Troubleshooter, and then click on Other troubleshooters. Launch the Internet Connections troubleshooter and check if you notice any improvements.
Update or Reinstall Your Network Driver
- Launch the Device Manager.
- Then expand the list of Network Adapters.
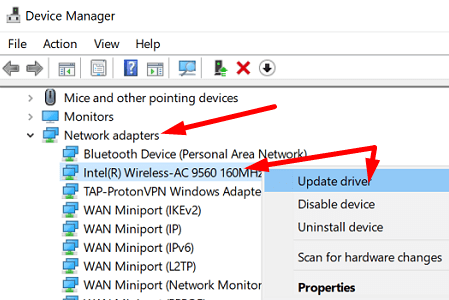
- Right-click on your Wireless drivers and select Update driver.
- Check your Internet connection.
- If the issue persists, right-click again on your wireless driver and select Uninstall driver.
- Restart your computer and check the results.
Reset Your Network Settings
Try resetting your network settings and check if you notice any improvements.
- Go to Settings.
- Select Network & Internet.
- Scroll down to Advanced network settings.
- Then select Network reset.
- Click the Reset now button.
- Click Yes to confirm your choice.
- After you do that, launch Command Prompt with admin rights.
- Enter the following commands one by one, and press Enter after each command:
netsh int tcp set global autotuninglevel=disablenetsh int ip resetnetsh advfirewall resetnetsh winsock resetipconfig / flushdnsipconfig / releaseipconfig / renew
- Restart your computer and check your Internet speed.
If the issue persists, unplug your router and leave it unplugged for two minutes to drain flea power. Plug your router back into the wall outlet, and wait until your computer goes back online.
Disable Your VPN or Use a Different VPN
If you’re using a VPN that’s not perfectly optimized for Windows 11, you may sometimes notice that your connection is a bit sluggish. Disable your VPN, and check if you notice any improvements.
Your VPN can slow down your connection. Let’s not forget that VPN programs encrypt your connection. That should not be a problem for modern computers. However, low-spec computers and old routers may not handle the data encryption process that quickly. Switch to a different VPN service and check if you can speed up your connection.
By the way, if you’re using a dinosaur of a router, you may want to upgrade to a new device that supports faster download and upload speeds.
Tweak Your Bandwidth Settings
- Navigate to Settings.
- Select Windows Update.
- Go to Advanced options.
- Then scroll down to Delivery Optimization.
- Disable the option that says Allow downloads from other PCs.
- Scroll down to Advanced options.
- Tweak your bandwidth download and upload settings.
Close background programs that use too much data
Certain apps run in the background and consume a certain percentage of bandwidth, thus slowing down internet speed. Since these apps are not actively used, it can be difficult to determine the cause of this slow network.
In addition to slowing down the Internet, these applications also slow down the system, which makes terminating them all the more necessary. Here’s how you can fix that.
First, right-click the ‘Start’ icon on the Windows Taskbar or press WINDOWS+ X to launch the Quick Access / Power User menu. Then select ‘Task manager’ from the list of options. Alternatively, you can hold CTRL+ SHIFT+ ESC to launch the Task manager.
Navigate to the ‘Performance’ tab and click ‘Open Resource Monitor’ at the bottom of the Task Manager.
This will open the Resource Monitor window. Navigate to the ‘Network’ tab and look for higher value programs in the ‘Send’ and ‘Receive’ columns. These programs affect internet speed by taking up most of the bandwidth.
Right click on the task you want to end and select ‘End Process’ from the context menu.
Do not terminate every process on the list. Some are very important for Windows operation, and you may be working on several processes, such as Google Chrome. If you are actively using the process, it is likely consuming maximum bandwidth. Therefore, it is essential to make an informed decision when terminating processes on Task manager.
Turn off apps running in the background
Many applications run in the background and perform tasks that are not exactly related to the current job. These applications not only consume bandwidth but also consume system resources. While there’s no harm in allowing them to work in the background, it would be wise to disable them, in case they cause trouble. Besides, you can always run them manually, on demand.
While you can disable all background apps on Windows 10 once and for all, Windows 11 doesn’t offer the same functionality. Here you will need to turn them off individually. Here’s how you do it.
Launch the ‘Settings’ app as discussed earlier. Navigate to the ‘Apps’ tab on the left and select ‘Apps and Features’ on the right.
Find apps you don’t want running in the background. Click on the ellipsis next to it and select ‘Advanced options’ from the menu.
Next, click the drop-down menu under ‘Allow this app to run in the background’.
Select ‘Never’ from the drop-down menu to disable apps running in the background.
Similarly, you can also disable other apps. However, you may want to analyze the apps that are important to your work first and enable them (if needed).
Scan your computer for viruses and malware
PCs infected with malware or viruses may have problems with internet speeds. Overcome this is relatively simpler than the other methods in this guide. All you need to do is scan your PC for viruses and malware with reliable antivirus software. We recommend using Windows Security; an antivirus program built into Windows that provides the same level of security as any other third-party antivirus.
To scan your PC for viruses and malware, press WINDOWS+ S to launch the ‘Search’ menu. Type Windows Security in the text field at the top and click on the relevant search result to launch the application.
Select the ‘Virus and threat protection’ application under Windows Security.
You will find a button to run ‘Quick Scan’. However, we plan to run a full system scan. So, to view and choose from other scan styles, click ‘Scan Options’.
Next, select the ‘Full Scan’ option and click ‘Scan now’ at the bottom to start scanning.
The scan should ideally begin immediately, with its progress visible on the screen. You can continue to work on the system while the scan runs in the background. Once done, you will receive notification of any malware or viruses detected, along with appropriate action against the same.
Check if malware/virus detection and removal improves internet speed. If not, move on to the next fix.
We hope it helps!


