
How to Back Up Windows 11. Create a system backup on your Windows 11 PC and use it to restore your PC if you experience serious problems. In this article, Ngolongtech will introduce you How to Back Up Windows 11.
Table of Contents
Turn on Windows backup
When Windows backup is turned on, Windows backs up the settings you choose across all your Windows 11 devices that you’ve signed in to with your Microsoft account.
To turn on Windows backup and choose your backup settings, select Start > Settings > Accounts > Windows backup.
The following items can be backed up:
-
OneDrive folder syncing
Turn on OneDrive folder syncing to start backing up your files and folders right from Settings.
-
Remember my apps
Windows will remember the apps you have installed and help you restore them from Microsoft Store on your new devices.
-
Remember my preferences
You can back up preferences including passwords, language, and other Windows settings. If you turn on Other Windows settings, Windows also syncs some device settings (for things like printers and mouse options), File Explorer settings, and notification preferences.
Note: The Remember my preferences settings are available for a work or school account if it’s allowed by your organization. For more info about how Azure Active Directory and Enterprise State Roaming work to synchronize user and app settings to the cloud, see Enterprise State Roaming overview.
How to Back Up Windows 11
The operating system does happen from time to time but it is certainly possible to run into some major problems that can only be resolved by a fresh install of Windows. Therefore, to protect users from this not so great experience of reinstalling windows and losing all their data, Microsoft has equipped a feature called ‘Restore Point’.
Restore Point or Restore Point basically records the current state of your Windows machine including your System settings and personal files, so you can revert to it if you have major problems after major update or reconfigure file system.
However, by default Windows does not create a Restore Point for you because it is disabled in the operating system and it could be because the System Restore Point takes up a large amount of disk space, or it could be something completely different.
Whatever the reason, if you’re planning to update, reconfigure your file system, or just want to keep your computer in top shape to recover from if you run into problems; This guide will serve you well.
Open System Restore Settings on a Windows 11 PC
Well, the first step is to access the ‘System Restore’ setting.
To do so, launch the ‘Settings’ app from the Start Menu. Alternatively, you can also press the Windows + I keyboard shortcut to open it.
Then click on the ‘System’ tab from the sidebar present on the ‘Settings’ screen.
Then scroll down and find the ‘About’ box from the list present on the right part of the screen and click on it.
Next, click on the ‘System Protection’ option present on the ‘Related Links’ tab on the screen.
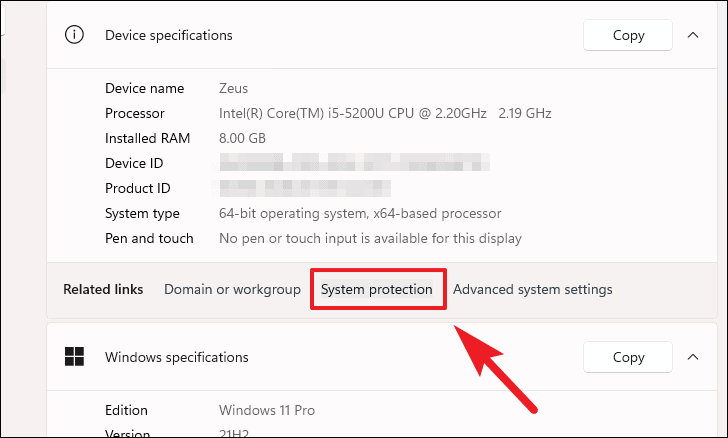
This action will open the ‘System Properties’ window on your Windows PC.
You should now be able to see the ‘System Restore’ setting present on the ‘System Properties’ window.
Enable System Restore for Windows 11 PCs
Since System Restore is disabled by default, you need to enable it first before you can create a System Restore checkpoint for your PC.
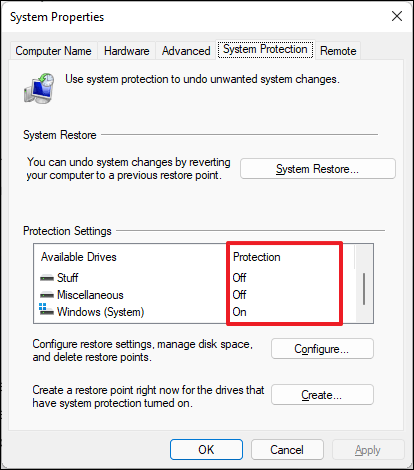
Now, on the ‘System Properties’ window, you will be able to see the current protection status of the drive in the ‘Protection settings’ window. If System Restore is enabled for the drive, the ‘Protection’ column will list it as ‘On’. Otherwise, the drive will be listed as ‘Off’.
To enable the ‘System Restore’ function, click on your preferred drive from the ‘Protection Settings’ section and then click on the ‘Configure’ button present below it.
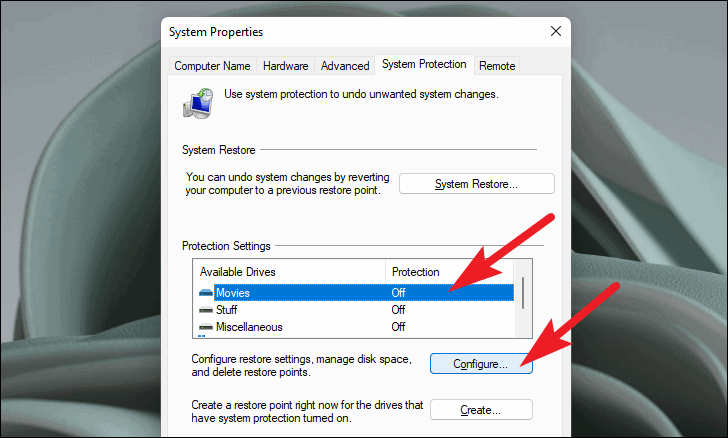
This will open another ‘System Protection’ window on your desktop.
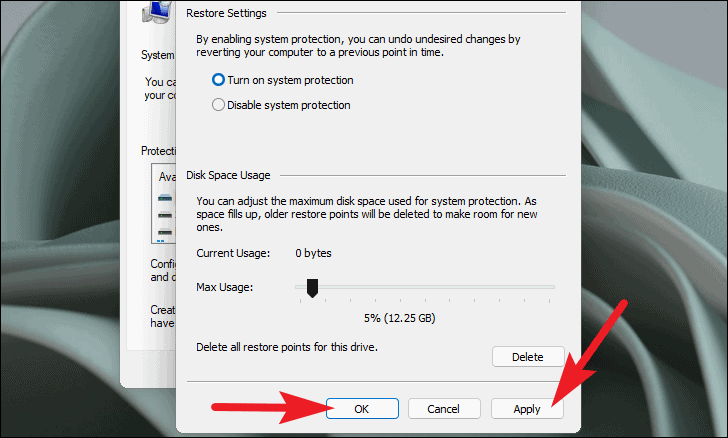
Next, click the radio button in front of the ‘Enable system protection’ option to enable System Restore. Then drag the slider included under ‘Disk Space Usage’ to adjust the amount of space you want to allocate to a System Restore point.
Then click the ‘Apply’ button to confirm the changes and click the ‘OK’ button to close the window.
System Restore is now enabled on your selected drive. Windows now automatically creates a System Restore Point whenever you install an app or update your PC.
Note: There is no way to enable System Restore globally. Therefore, if you want to enable the functionality for all drives, you will have to repeat the process for all the respective drives.
Manually create a system restore point
Normally, Windows automatically creates a System Restore checkpoint when it detects system changes. However, you can also create one manually in case you are making some changes to the system configuration yourself.
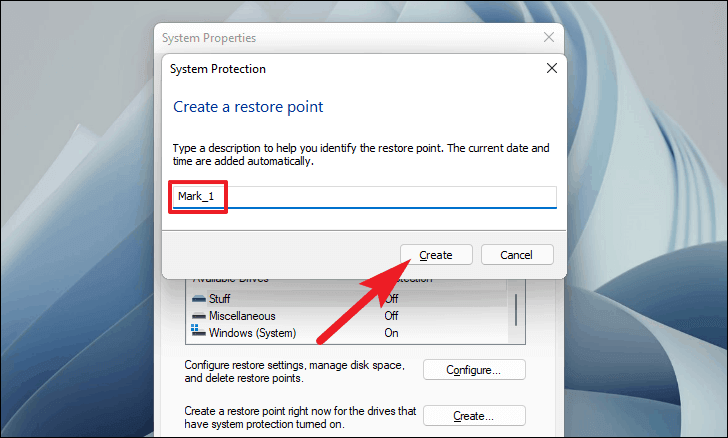
To create a System Restore manually, click on your preferred drive listed under ‘Protection Settings’ on the ‘System Properties’ window. Then click the ‘Create’ button.
Then give your restore point an appropriate and contextual name; as it will help you realize this point if you have multiple restore points at the time of using the System Restore function. Then click the ‘Create’ button.
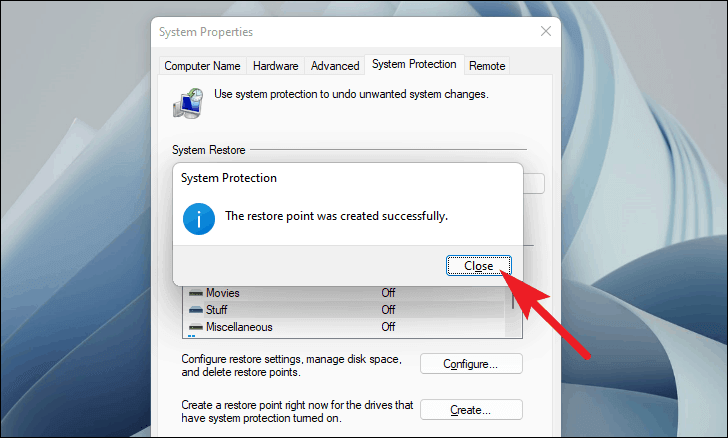
Your system will take a few minutes to create a System Restore point, wait while the process runs in the background.
Once the System Restore point is successfully created, Windows will notify you of the same. Click the ‘Close’ button to close the window.
Now if and when something goes wrong with your PC; you can revert to your current system state using the System Restore checkpoint you just created.
Restore your PC with the system recovery checkpoint
Now that you’ve created a System Restore point for your PC, it’s important that you know how to restore it if your machine starts to behave abnormally. You can restore your PC using a checkpoint in two ways, so let’s get started.
Restore using system recovery settings
If you can still log into your machine and still be able to perform basic tasks, then this option will work best for you.
To do so, first go to the ‘System Restore’ settings window as shown in one of the previous sections of this article.
Now click on the ‘System Restore’ button present on the System Restore settings window.
This action will open a new ‘System Restore’ window on your Windows PC.
Then click the ‘Next’ button from the ‘System Restore’ window on your desktop.
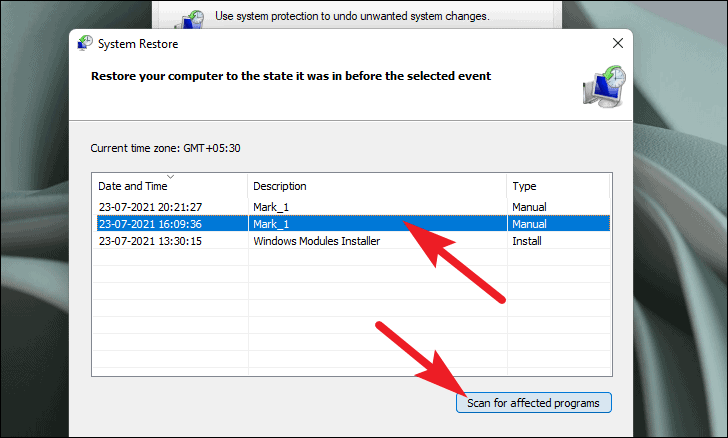
Then, click to select a System Restore point from the list. Then click the ‘Scan for affected programs’ button if you want to see the programs/apps to be restored. Then click the ‘Next’ button to continue.
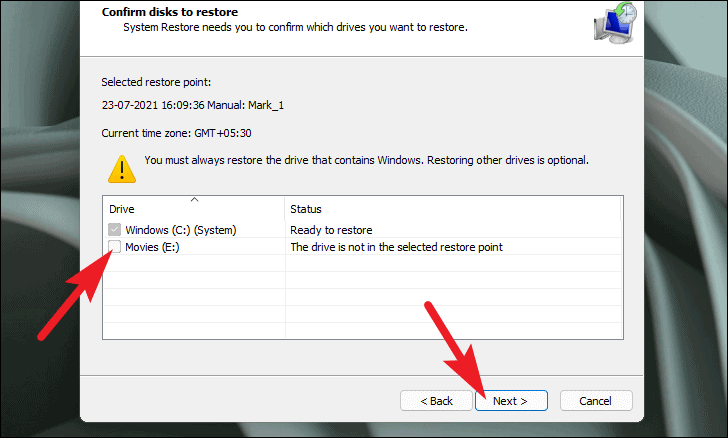
Now, if you have ‘System Restore’ enabled for multiple drives, you will have the option to select that drive by clicking the checkbox before the drive in the list. However, restoring any drive other than the Windows installation drive is purely optional.
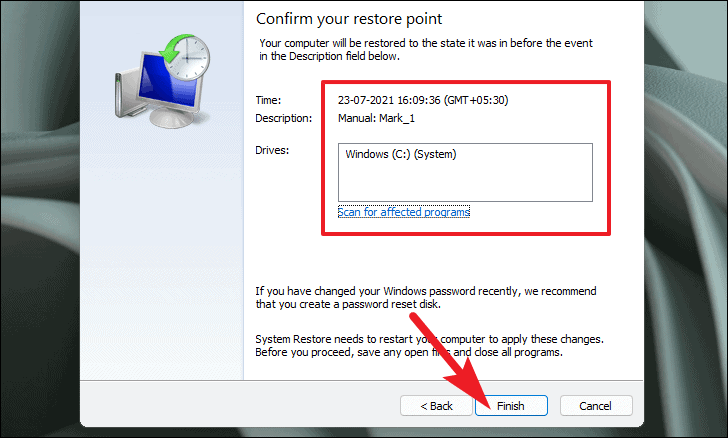
Then on the next screen you will be able to see information regarding the ‘Restore Point’ from which you are restoring your computer. Next, carefully read the instructions displayed on the screen and click the ‘Finish’ button to begin the ‘System Restore’ process.
Your Windows machine will now reboot and restore your PC to its best working state.
Restore using the Windows recovery environment (WinRE)
In the event that you are unable to log in or access the System Restore settings; there is still a way you can restore your PC using the created System Restore checkpoint.
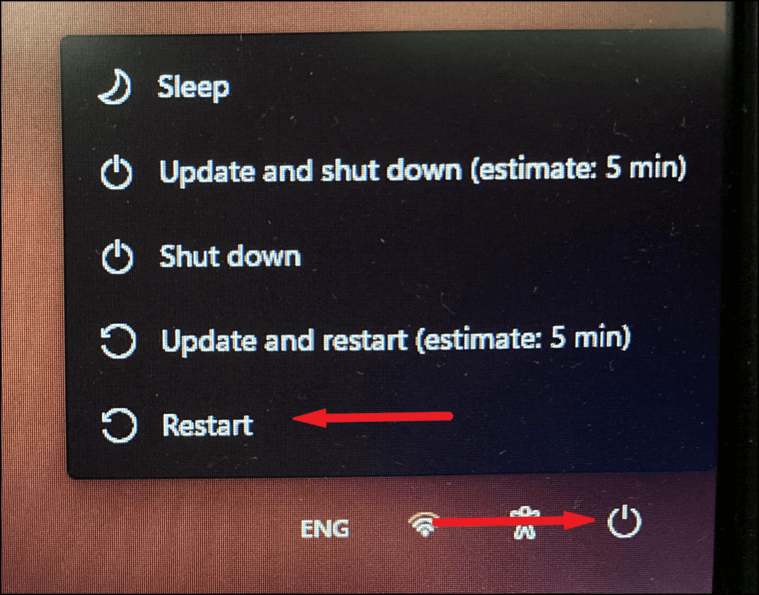
To boot your Windows machine into recovery mode, click on the ‘Power’ icon located at the bottom right corner of the screen. Now press the Shift key on your keyboard and click the ‘Restart’ option from the overlay menu to boot into WinRE.
After the Windows Recovery Environment screen loads up, click on the ‘Correct’ option present on the screen.
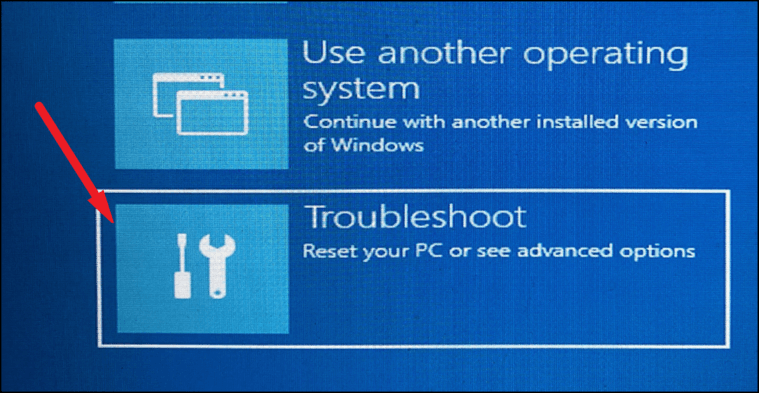
Then, click on the ‘Advanced options’ box from the ‘Fix’ screen.
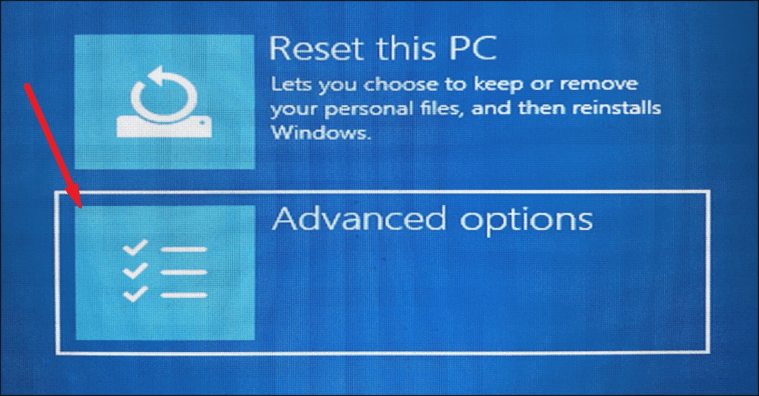
Next, select the ‘System Restore’ option from the list present on the ‘Advanced options’ screen.
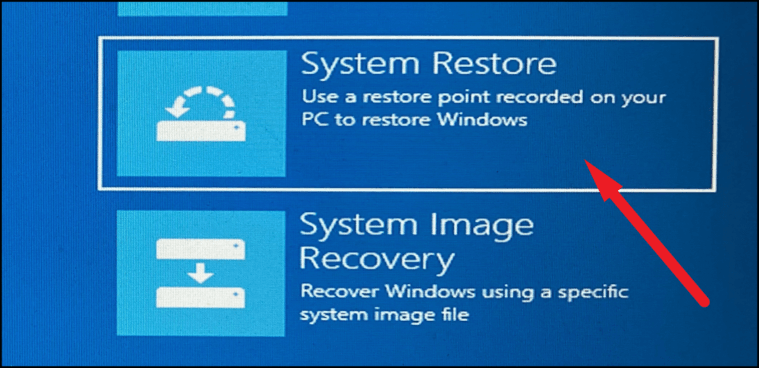
Then a ‘System Restore’ window will appear on your desktop.
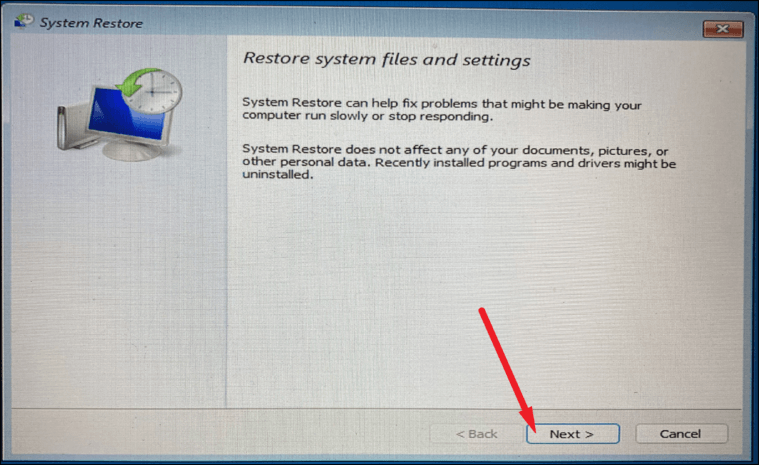
Now click the ‘Next’ button from the ‘System Restore’ window.
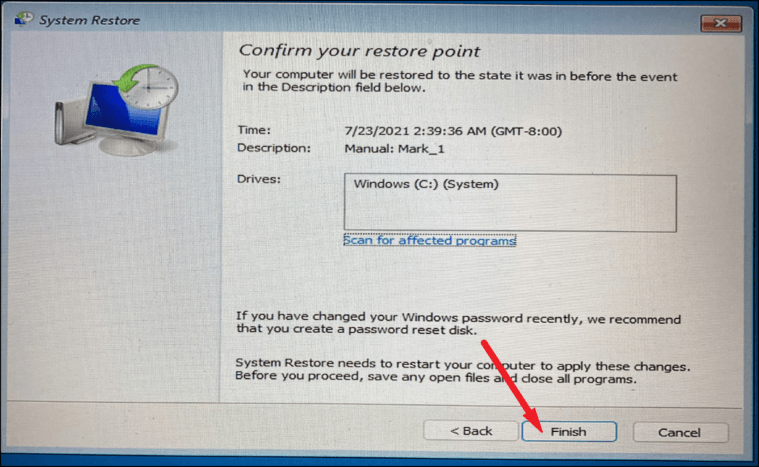
Then select a System Restore Point from the list and click the ‘Next’ button. You can also click the ‘Scan affected programs’ button to see a list of programs that will be affected by the recovery process.
Then, if you have ‘System Restore’ enabled for multiple drives, you will have the option to select that drive by clicking the checkbox before the drive in the list. However, restoring any drive other than the Windows installation drive is completely optional.
Now, on the next screen, click the ‘Finish’ button to start the ‘System Restore’ process.
Your system will now be restored to the state when the selected checkpoint was created.


