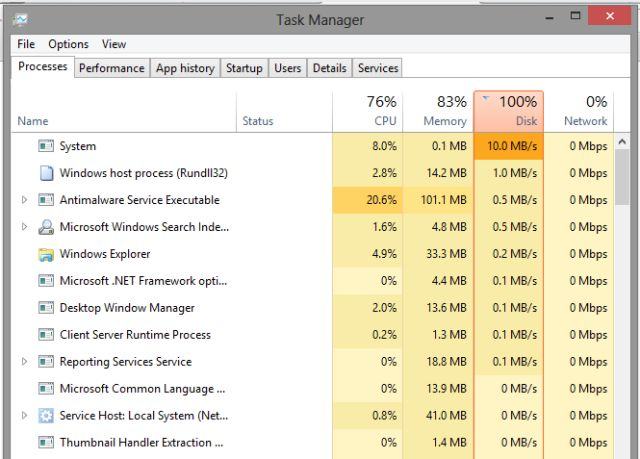
Guide to limit CPU usage of Windows Defender, stop worrying about lag lag when playing games. Needless to say, every time Windows Defender starts scanning for malware in your computer, it will eat up quite a lot of CPU resources. If you do not use or just use basic applications such as surfing the web, watching movies, this is not a problem. However, if you are playing games, games that require high hardware resources, then lag will be an inevitable phenomenon.

Therefore, today I will show you how to limit the CPU usage of Windows Defender again with just a simple command line with PowerShell of Windows 10.
Step 1: Click on Windows and type PowerShell , then select Run as Administrator .

Step 2: When the PowerShell window appears, copy and paste the following line:
Set-MpPreference -ScanAvgCPULoadFactor 50

At this point I will have to explain a little so that you understand how to use. By default, Windows Defender can use up to 50% of your CPU, and this is the number 50 at the end of the code above. You can change this number to a different number depending on the% CPU you want Windows Defender to use.
You can also raise this number to more than 50%, but nobody wants Windows Defender to use more than 50% CPU. But you also can’t adjust this number to as low as 0.
This 50% figure as I mentioned above, it means that Windows Defender can use up to 50% CPU and this maximum usage usually occurs when you perform Full scan tasks (scan) worm) or Windows automatically starts when your computer is running in idle mode.
You should also note that limiting the CPU resource usage does not affect the performance of Windows Defender. This means that all virus scanning and removal, etc., are still fully and effectively implemented by Windows Defender. Limiting CPU resources only makes the scan take longer to complete. For example, usually a Full scan will take somewhere 10 minutes to complete, but now it takes up to 15-20 minutes depending on the% CPU that you allow Windows Defender to use.
Compared to turning off Windows Defender, the CPU usage limit is better. If you feel that your computer is slowing down every time Windows Defender starts scanning, especially those who are still using traditional HDDs, this is the trick you should try.
Thank you for watching!