
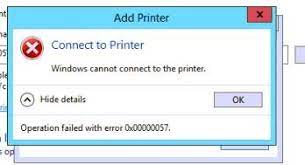
How to fix windows cannot connect to the printer access is denied windows 11, windows cannot connect to the printer access is denied in windows 10, windows cannot connect to the printer access is denied error 0x0000011b, windows cannot connect to the printer access is denied windows 11, windows cannot connect to the printer access is denied windows 7, windows cannot connect to the printer, access is denied server 2012 r2, windows cannot connect to the printer access is denied server 2019, windows cannot connect to the printer windows 10 64-bit, windows cannot connect to the printer access is denied server
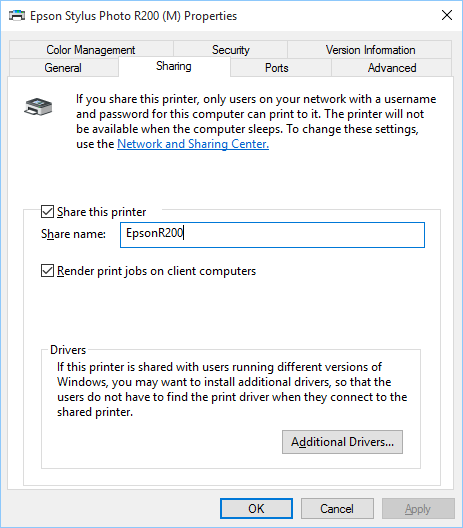
1. On the computer to which the printer is connected (in our case it was the Windows 10 laptop), share the printer as usual, and when sharing it, set up the share name that is easy to type in. For example, in our case the long name of the printer was “Epson Stylus Photo R200”, but we shared it with the name EpsonR200: (using a simple name like that should make it easier to enter it later on)
2. On the computer from which you want to connect to this printer (in our case it was the Windows 2000 computer) use the built-in Add Printer wizard and choose the ‘Add Local Printer’ option. (If your computer runs Windows 10, you can find this wizard on the Devices – Printers and Scanners page of the Windows Settings window)
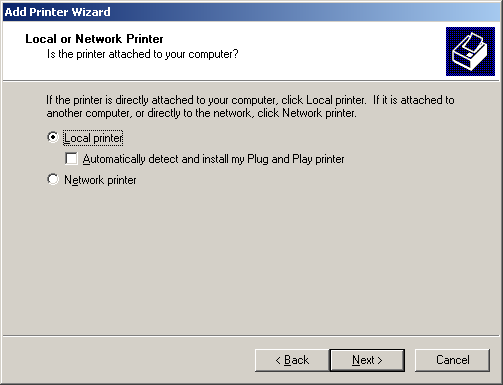
3. Press Next, and on the next page choose the ‘Create a new port’ option and make sure the ‘Local port’ option is selected:
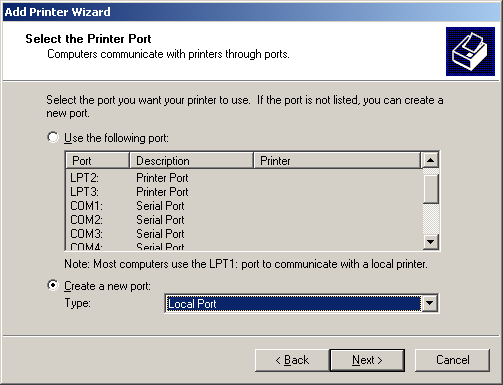
4. When you press Next, Windows will prompt you to enter the port name. Enter the UNC name of the shared printer, in the format: //computername/sharedname . In our case, the computer name of the Windows 10 laptop was laptop, and we had previously set up the shared name of the printer as EpsonR200 (see Step 1 above), so we entered the port name as:
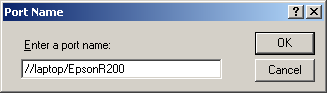
If you don’t know the network name of your computer, you can find it out as follows: right-click on the This PC folder (or Computer) in Explorer or some other file manager, and choose Properties from the shortcut menu. On that page, look for the ‘computer name’ text. That’s the name you need to enter instead of ‘laptop’ in our example. Be sure to use the name of the computer that has the printer attached to it, not the one from which you are trying to connect to the printer through the network!
Next, Windows will probably ask you to select the printer make and model, install its drivers, etc. Keep providing the information that the wizard requires, according to your specific printer. When done, Windows should add the new printer to the computer, and you should be able to use it to print files. The procedure described above worked for us, hopefully it will work for you, too.
Happy printing!
Let me fix windows cannot connect to the printer access is denied windows 11
To resolve this problem yourself, restart the Print Spooler service after you enable the Internet Printing Client feature.
-
Enable the Internet Printing Client feature on the computer. To do this, follow these steps:
-
Click Start , type Programs and Features in the Start Search box, and then press ENTER.
-
Click Turn Windows features on or off.
-
In the Windows Features dialog box, expand Print Services, click to select the Internet Printing Client check box, and then click OK.
-
-
Restart the computer or restart the Print Spooler service. To restart the Print Spooler service, follow these steps:
-
Click Start , type Administrative Tools in the Start Search box, and then press ENTER.
-
Double-click Services.
-
Right-click Print Spooler, and then click Restart.
-
-
Try to install the Internet printer again.
For troubleshooting steps and an automatic fix for common printer problems in Windows, please see the following Microsoft web page:


