
Fix: Windows 11 search bar not working. The search bar seems to be prompted a lot since it comes to Windows 11. Specifically, users can’t use it to search for anything. Of course, there are other ways to search on Windows 11. However, for those who already get used to searching by Windows search bar, it is quite annoying. Check out these methods to fix the error: Windows 11 search bar not working.
Table of Contents
Restart Your PC
When Windows Search stops working, the first thing to try is to restart your PC. This resets many temporary items on your computer and gives Search a fresh new chance to launch.
To restart your Windows 11 PC, open the Start menu, select the Power option, and choose Restart.
When your PC boots back up, access Search and see if it functions.
Update Your PC
Often, the reason any Windows feature doesn’t work on your PC is that you’re using an old version of the Windows operating system. If you haven’t updated your PC’s software in a long time, you should do that to fix any issues, including Search ones, on your machine.
On Windows 11, all you need is an internet connection to download and install system updates:
- Open the Settings app by pressing Windows + I keys at the same time.
- In Settings, from the sidebar on the left, choose Windows Update.
- In the Windows Update screen on the right, select the Check for updates button.
- Download and install the available updates.
Relaunch Windows Search
Your Windows 11 system uses a process called SearchHost to provide search services. This process remains suspended when you’re not using Windows Search. But, as soon as you launch Search, this process comes into action.
It’s possible there’s a minor glitch with this process that’s causing Search not to work. In this case, restarting the process might fix your issue.
- Open the Power User Menu. Do this by either pressing Windows + X keys at the same time or right-clicking the Start menu icon.
- From the Power User Menu, select Task Manager.
- On the Task Manager window, select the Details tab at the top.
- In the Details tab, find the SearchHost.exe process.
- Right-click the SearchHost.exe process and choose End task from the menu.
- Select End process in the prompt that opens.
- Relaunch Windows Search by selecting the magnifying glass icon on the taskbar.
Roll Back a Windows 11 Update
If Search stopped working after you installed a Windows update, chances are that the installed update is the culprit. In the past, there have been updates that caused many system features to break.
Luckily, in Windows 11, you can roll back an installed update and this should fix your issue.
- Launch the Settings app by pressing Windows + I keys simultaneously.
- In Settings, from the sidebar on the left, choose Windows Update.
- On the Windows Update screen, select Update history.
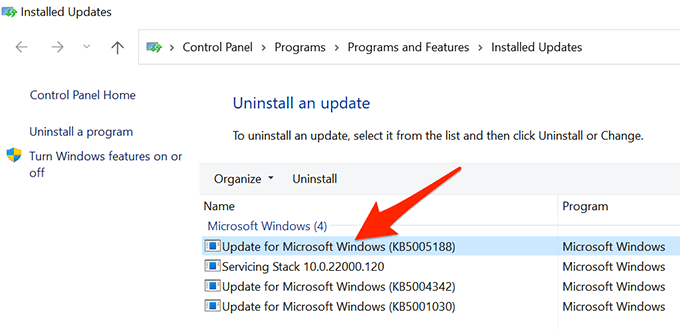
- Scroll down the Update history page and choose Uninstall updates.
- In the Installed Updates window that opens, select the most recent update in the list. Then, select Uninstall at the top.
- In the prompt that opens, choose Yes.
- Restart your PC and check if Search works.
Change Windows Search Settings
If you’re experiencing an issue where Windows 11 Search works but it doesn’t scan all the files stored on your computer, there might be an issue with the Search configuration.
You can take a look at your Search configuration, make required changes, and that should likely fix your search-related problems.
- Press the Windows + I keys simultaneously and Settings will open.
- In Settings, select Privacy & security from the left sidebar.
- In the pane on the right, choose Searching Windows.
- Select Find my files on the screen that opens and you’ll have a Classic and an Enhanced option.
- If you select Classic, Windows will only scan your Documents, Pictures, Music, and Desktop folders. If you choose Enhanced, Windows will scan your entire PC.
- If you want Search to look for files across your entire PC, choose the Enhanced option.
- Review the Exclude folders from enhanced search section as this contains the list of folders that Windows Search will not scan. Remove any folders from here that you want to be included in your searches.
Restart the Windows Search Service
It’s worth restarting the Windows Search service if you still can’t use the Search feature on your PC. This allows Search to reload from scratch.
- Press the Windows + R keys at the same time to open Run.
- In the Run box, type services.msc and press Enter.
- On the Services window that opens, find Windows Search and double-click this service.
- The Windows Search Properties window will open. Here, select the Stop button. Then, select the Start button to relaunch the Windows Search service.
- Close the Services app.
- Check if Windows Search now works.
Rebuild the Windows Search Index
To help you quickly find files and other items on your PC, Windows 11 uses a search index. Sometimes, this index has issues, which in turn, cause Search not to work.
It’s worth rebuilding this search index when you have issues with your computer’s search option.
- Open the Settings app by right-clicking the Start menu icon and choosing Settings.
- Select Privacy & security in the left sidebar of the Settings window.
- Select Searching Windows in the pane on the right.
- Scroll down the screen and choose Advanced indexing options.
- At the bottom of the Indexing Options window, select Advanced.
- In the Index Settings tab, from the Troubleshooting section, select the Rebuild button.
- Select OK in the prompt that opens.
- When your index is rebuilt, open Windows Search and see if it functions.
Use Windows Search Troubleshooter
Windows 11 comes with various troubleshooters, one of which is Search and Indexing troubleshooter. You can use this to find and fix issues with Windows Search.
- Press the Windows + X keys at the same time and choose Settings from the menu.
- Select System from the left sidebar in Settings.
- Scroll down the System page and choose Troubleshoot.
- Select Other troubleshooters.
- Next to Search and Indexing, select Run.
- On the Search and Indexing window, select the issues you’re experiencing with the search feature. Then, at the bottom, select Next.
- The troubleshooter will find issues with Search and offer help to fix those issues.
Reset Your PC
If nothing else works, your last resort is to reset your PC. This resets your custom setting options and brings those options back to their default values.
Before you begin the reset process, you can choose whether you’d like to keep your files or you’re happy with your files being deleted.
To reset a Windows 11 PC:
- Access the Settings app on your PC.
- Select System > Recovery in Settings.
- Choose the Reset PC button next to Reset this PC.
- Select either Keep my files or Remove everything.
- Follow the on-screen instructions to finish resetting your PC.
We hope it works! Good luck!


