How to fix stop code fltmgr.sys windows 11. The fItmgr.sys file, also known as the Microsoft File System Filter Manager file, is responsible for ensuring that the data on the hard drive is readable and correct. If your operating system fails to read the data on your hard drive due to a problem with the fItmr.sys file, you may experience a blue screen of death (BSOD) error that lists fItmr.sys as the culprit.
These problems are usually caused by a damaged/outdated driver or a hardware problem. Below, the article has listed some troubleshooting methods that you can try to fix this discussed blue screen error.

Table of Contents
How to fix stop code fltmgr.sys Windows 11
1. Check for hardware problems
Before proceeding with this method, you should restart your PC . There have been cases where the error occurred because the file fItmr.sys was not initialized correctly. If the problem also occurs after booting, proceed with the steps below.
The first thing you should do is check your computer for any faulty hardware that might be causing the problem. If the error started occurring after you moved old hardware components to new ones, that could be causing the problem.
You can try switching back to the old hardware or try the new hardware on a different device.
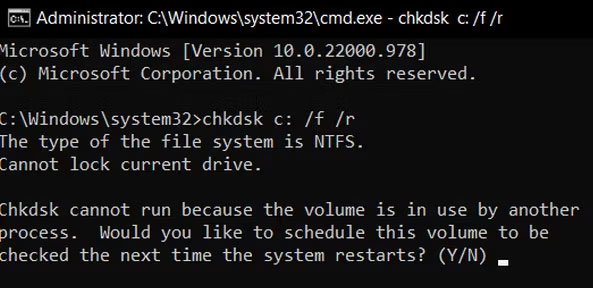
Another thing you can do is run a CHKDSK scan , which can analyze the hard drive for errors and fix those identified. Follow these steps to do that:
2. Fix device driver
If the problem is not with the hardware, then the next thing you should check is the device driver. Unfortunately, this error code doesn’t specify which driver might be the problem, so you need to update all important drivers.
You can do this manually using Device Manager , or you can use a third-party utility that can scan your system for outdated or corrupted drivers and then update/install reset them.
If you choose to do it manually, you can see instructions on how to update drivers in Windows . If the problem started happening after you updated/installed the driver, you can downgrade or uninstall the problematic driver and see if that helps.
However, if you want to delegate this work to a third-party tool, here are some options to consider:
- DriverFix – This tool will scan the system for outdated/corrupt drivers and recommend updates that are officially released by the manufacturer. All you need to do is give the tool access to the necessary files and it will automatically install the driver for you.
- Driver Easy – It is another simple tool that will identify drivers that need to be updated or reinstalled. There are two versions; free and paid.
- Ashampoo Driver Updater – This program scans your hardware and drivers, then installs the latest updates of any outdated drivers that may be hidden in the system.
3. Undo recent changes
If the error started appearing after you made certain changes to the system, then you can try to undo those changes and check if that fixes the problem.
The first thing you should do is uninstall recent Windows updates. Microsoft updates can sometimes be buggy and cause new problems in the system instead of solving existing problems.
If uninstalling recent updates didn’t do the trick, then the next thing to do is to check if any new or old third-party apps are causing the problem. To do this, first launch Windows into Safe Mode .
This mode launches Windows with just a basic set of drivers and programs, making it easy to determine if background apps are the culprit.
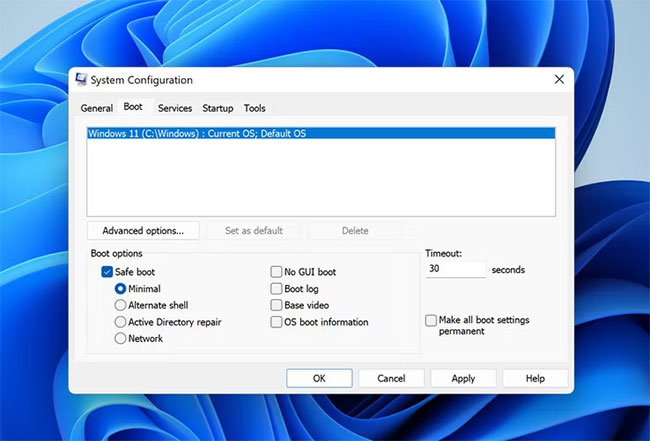
After you are in Safe Mode, check to see if the problem reappears. If not, you can try to uninstall any recently installed apps as they are most likely the culprit.
If you are unsure about the applications, navigate to the Services tab in the System Configuration dialog box .
Now divide the services into two parts and enable all the services in the first section. Wait to see if the error reappears. Keep narrowing until you find the culprit.
4. Contact Microsoft Support
If the methods listed above do not fix the problem for you, then you can report the problem to the official Microsoft support team. Hopefully they will assist you in determining the exact cause of the problem and suggest you the appropriate fix. In addition, you can also use the Event Viewer utilityon Windows to check the BSOD log file to identify the culprit yourself.
Hopefully one of the methods listed above solved your problem. The article strongly recommends that you update your device drivers all the time to avoid such problems in the future. Regularly installing available system updates is also important, as they contain bug fixes and protect your system.
Video on How to fix stop code fltmgr.sys Windows 11
Above are some suggestions for solutions to fix top code fltmgr.sys Windows 11. Hope this will be useful information you can refer to in the process of using. Thanks for reading!
Thank you for reaching Microsoft Community.
fltmgr.sys or Microsoft File System Filter Manager is a system file needed by the Windows operating system to run smoothly. This kind of error usually occurs if the system file is corrupted or missing. Since you mentioned already that booting to Safe mode or other Recovery tools would also prompts you with the error making us unable to perform troubleshooting, that would leave us with the last option which is to perform a clean installation of Windows on the device using the Surface Recovery Image through USB Recovery. This option will reimage the entire device and reload Windows including the drivers and firmware. It is the most complete form of Reset and it will wipe out everything on the device. You will need also a 16GB/32GB of flash drive that must be formatted into FAT32 prior to downloading the Recovery Image. See the steps below for guidance.
USB Recovery:
How to Download, Create and Use a USB recovery drive
To download the Recovery Image:
-
You’ll another working device running on Windows.
-
Visit the page to Download the recovery image for your Surface
-
Sign in with your Microsoft Account
-
From the list of Surface devices available, select the device that you need a recovery image for
Please note that while you will only be presented with devices that are currently registered on your account, you will also be presented with the option to get an image for a different type of device. If you try to use this option, you will be prompted to enter the serial number for that device -
Download the recovery image using the button on the page
-
When the download bar pops up at the bottom of your screen, save the file in a location you will be able to find it.
Format USB Drive:
-
Note: Formatting a recovery drive will erase anything that is already stored on your USB drive. Make sure to transfer any important data from your USB drive to another storage device before using it to create a Surface USB recovery drive.
-
Insert your USB drive into the USB port of your PC.
-
From the desktop, open File Explorer
-
Tap and hold or right-click on the USB drive and choose Format
-
Select FAT32 as the file system and enter a Volume label to name the USB drive, such as RECOVERY, and then tap or click Start
-
Tap or click OK to erase the contents of the USB drive
-
Tap or click OK when the format is complete
Create a recovery drive:
-
On your Surface or PC, open recovery image that you downloaded by double-clicking it or right click then select Extract and then Extract all.
-
Select the USB drive you formatted earlier for the location and click Extract.
Use a USB recovery drive to reset your Surface:
-
Shutdown the Surface
-
Insert the USB recovery drive into the USB port
-
Press and hold the volume-down (-) rocker
-
Press and release the power button
-
When the Surface logo appears, release the volume-down (-) rocker
-
Surface will start the recovery software on the USB recovery drive
-
When prompted, choose your language options and keyboard layout
-
Select Troubleshoot
-
Select Recover from a Drive. Choose Remove Everything and Fully Clean the Drive. Recovering this PC.
-
If prompted, select Repartition the drives
-
If prompted for BitLocker Key, tap Skip this Drive
Kind regards,
Marrion