
Fix “Setup was unable to create a new system partition or locate an existing system partition” error
If you receive this error message: “Setup was unable to create a new system partition or locate an existing system partition” while installing Windows 7, 8/8.1, 10, then don’t miss the following article.
Today’s article will give you step-by-step instructions on how to fix this problem and start installing Windows 7, but the process on Windows 10/8/8.1 will be the same. Follow the steps provided below to fix this problem.
How to fix the “Setup was unable to create a new system partition or locate an existing system partition” error when installing Windows
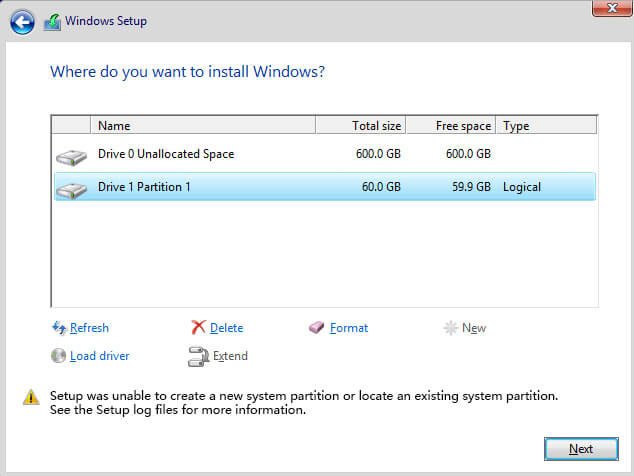
Table of Contents
Method 1:
This happened to me as well.
To fix this:
1 Go to Disk Management:
Windows 7:
Start > Right click Computer > Manage > Disk Management
Windows 8:
Right click the Start button at the bottom left corner > Disk Management
2 Right click the partition you want to install Windows 8 on.
3 Click Erase.
It should now say ‘unallocated’ with a black line on it.
4 Now boot back into the Windows 8 Setup, select the unallocated partition, and click Install.
Hopefully that fixes your problems. If not, please let me know.
Method 2
Here is possible solution:
- Boot windows installation from USB drive
- Press Shift+F10
- In console type diskpart.exe and press enter. In this program execute following:
- select disk=0. Disk 0 is your destination drive, so be careful, all information on this drive will be removed.
- create partition primary size=xxx, where xxx – is the size of new partition
- select partition=1
- active
- format fs=ntfs quick
- assign
- exit, now you have bootable drive C
- Navigate to USB flash drive, in my case: cd d:
- Copy all files from USB drive to C: drive: xcopy d: c: /e /h /k
- Go to boot folder: cd boot
- Make you C: drive bootable with following command: bootsect /nt60 c:
- Put off USB drive from computer and restart them.
- Install Windows
- Remove unnecessary menu item from bootscreen:
- Run cmd.exe as Administrator
- See boot menu list bcdedit
- Find Windows Setup and copy identifier
- Run bcdedit /delete {identifier}
- PROFIT!
Original:
Method 3:
Fix “Setup was unable to create a new system partition or locate an existing system partition” error when installing Windows
1. First, make sure that any external hard drives are unplugged from the computer. If you are installing windows via a bootable CD or USB, leave them as is.
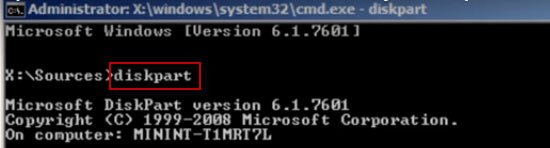
2. Now press Shift+F10 to open Command Prompt.
3. In the Command Prompt window, type “diskpart” and press Enter.
1.735 / 5.000
Kết quả dịch
4. Then, type “list disk”. This step will list all the hard drives connected to this PC. For example there is only one drive (you should also have only one drive). We will install Windows on this hard drive.
5. We need to select the hard drive by typing “select disk 0“. You can choose a different partition if you want.
6. Now type “clean” to wipe all data on the drive.
7. Once done, type “create partition primary size-10000″.
8. Now type “format fs=ntfs quick“.
9. Once done, type “assign” then press the Enter key.
10. Then type “active” and press Enter.
11. Now enter “list volume” to list the partition or drive. It will show the partition you just created.
12. Now, we will copy the contents of the Windows boot CD drive to drive C.
13. Type Exit and then press Enter.
14. Go to the CD drive by typing “cd e:” and pressing Enter.
15. Now type “xcopy e:c:/e/h/k”, then press Enter. It starts copying the installation files from the CD drive to the C drive. It will take some time to copy.
16. Once done, type “exit” and press Enter. Now close all opened windows and then restart the computer once. After rebooting, the machine will start installing Windows.
17. Now you have the option to create a partition for the allocated space.
Once Windows is installed, you need to edit the boot loader. To remove this black screen from the boot process, follow the steps below.
1. To do that run Command Prompt with admin rights.
2. Type the command bcdedit and then press Enter.
3. Locate the content “Description” and “Identifier”.
4. Type “bcdedit /delete (74253dcc9-effasdrc50-3582tvple-5263tlpt-5223thpf)”, then press Enter.
5. Restart the computer. This time, you won’t get a black screen anymore.
Setup was unable to use the existing system partition because it does not contain enough free space, lỗi setup was unable to create the directory error 5: access is denied, Setup was unable to create the directory error 123, we couldn’t create a new partition or locate an existing one, Setup was unable to create the directory error 5, If the partition you’ve chosen contains files from a previous Wi,ndows installation, Cài Win báo lỗi Setup was unable to create, The system partition and boot partition are not at the same disk WinToHDD


