Fix Premiere Pro 2022 audio not playing. Audio loss is a very annoying and frequent problem when working with Adobe Premiere Pro. The cause of this situation is mostly due to incorrect audio settings or incompatible codecs. So what do we need to do if we, unfortunately, experience audio loss in Premiere Pro? Don’t worry, Ngolongtech will help you answer this question in the article below. Follow along and choose the right method for you! Good luck!
Table of Contents
Fix Premiere Pro 2022 audio not playing
1. Turn off the NewTek NDI output
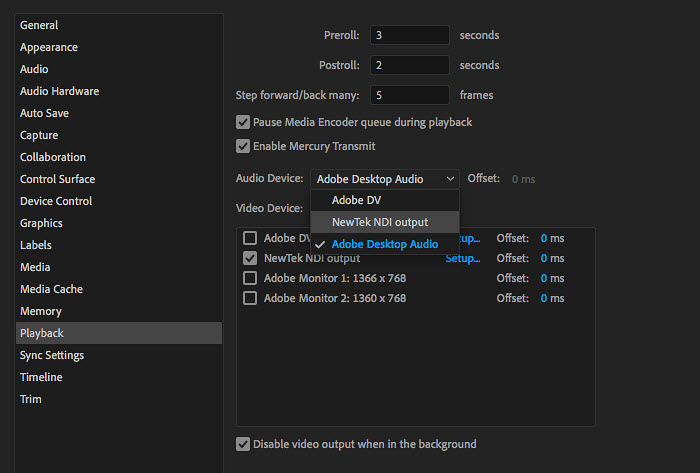
If you have installed NDI tools on your computer to help export IP NDI video directly from Adobe Premiere or After Effects, this could be the cause of the audio loss issue in Premiere Pro because when the drive NDI is set as default and audio is routed to it then audio is going nowhere because there is no endpoint. To fix it you need to adjust the playback settings back to Premiere Pro with the steps below:
Step 1: In Premiere Pro software select Edit > Preferences > Playback
Step 2: In the Audio Device section , select Adobe Desktop Audio or Adobe DV again.
2. Adjust the sound settings
Except for the above reason, wrong sound settings can also be the cause of audio loss in Premiere Pro. This usually happens when there is frequent switching between headphones and speakers. So when you have this problem, try following the steps below to adjust the sound settings in Adobe Premiere Pro!
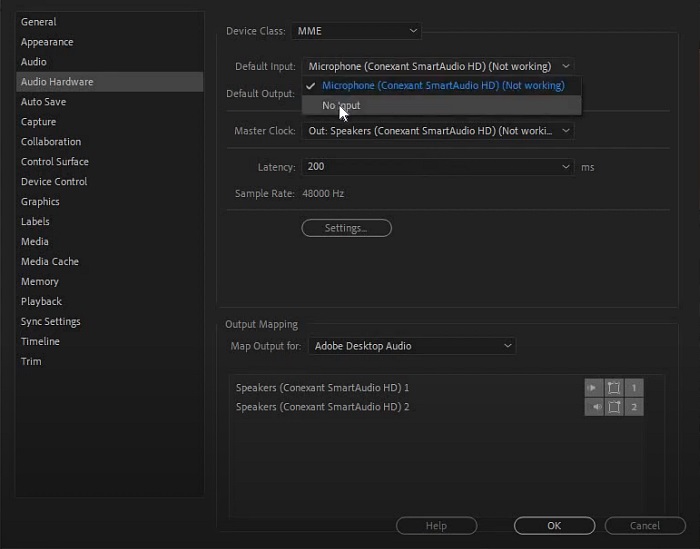
Step 1: Select Edit > Preferences > Audio Hardware
Step 2: In the Device Class section, select ASIO driver (if available in the list). If not, choose Premiere Pro WDM Sound (Premiere Pro CS6) or MME (Premiere Pro). Then select the correct device you need in the Default Output and Default Input sections and then click OK
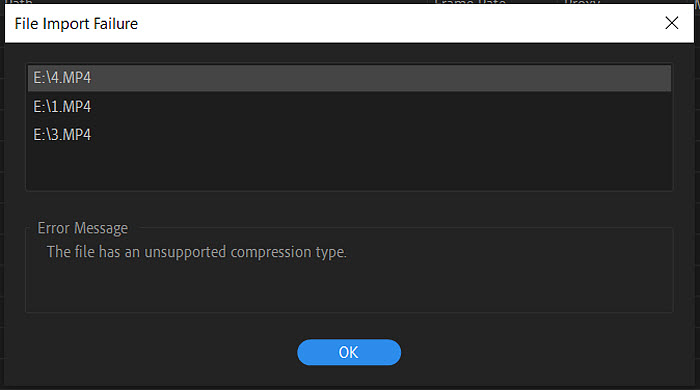
3. Incompatible Format or Codec
If you’ve completed the steps above and still don’t hear sound, your video may contain a Codec that isn’t supported by Premiere Pro. To fix this, transcode the video to one of the supported formats using a third-party tool. If the codecs used to create the clips are not available as QuickTime components, use other software to transcode them using a different audio encoding format and then import the transcoded files into Adobe Premiere Pro.
Troubleshooting sound playback issues (no sound) in Premiere Pro
Issue: No sound during playback in Premiere Pro
There is no sound during playback (preview) in Adobe Premiere Pro on Windows or Mac OS.
To fix this problem, you must first determine which clips have no sound during playback.
Determine which clips have no sound
Perform the following steps (which create a test clip of color bars with a 1-kHz tone) to determine which clips are missing sound during playback.
-
Create a project.
-
Choose File > New > Bars and Tone.
-
In the New Bars and Tone window, click OK.
-
In the Project panel, double-click Bars and Tone. The Bars and Tone clip opens in the Source Monitor.
If Bars and Tone clip doesn’t open in the Source Monitor, then drag the clip to the Timeline.
-
Click the Play button in the Source Monitor (or play the clip from Timeline). If you do not hear the tone, then go to Sound is missing from all clips. If you do hear the tone, then go to Sound is missing from some clips.
Sound is missing from all clips
If sound is missing from all clips in all projects, then do the following tasks in order:
1. Choose a system default audio device and check its volume.
Your computer could have more than one device that can play back audio (e.g., an internal speaker, external speakers, or headphones). Set your preferred device as the system default sound playback device, and then verify that its volume is not muted or set low.
WINDOWS
Use the Control Panel to check your default audio device and its volume setting.
MACOS
-
Open an Adobe Premiere Pro project that contains audio clips, video clips with audio, or a Bars and Tone clip.
-
Choose Premiere Pro > Preferences > Audio Hardware.
-
Choose an audio device:
Premiere Pro: Choose the audio device you want to use from the Adobe Desktop Audio menu. Or click the Settings button to open the Settings dialog box, and choose your default audio device.
-
Click OK.
-
Play a clip. If you still do not hear sound, then go back to Step 2 and try a different audio device.
2. (Windows) Adjust the audio hardware driver settings in Adobe Premiere Pro.
-
Open an Adobe Premiere Pro project that contains audio clips, video clips with audio, or a Bars And Tone clip.
-
Choose Edit > Preferences > Audio Hardware.
-
In the Default Device (Premiere Pro CS6) or Device Class (Premiere Pro) pop-up menu, choose an ASIO driver (if one is listed).
Otherwise, choose Premiere Pro WDM Sound (Premiere Pro CS6) or MME (Premiere Pro)
-
Enable your preferred device by clicking the Default Output menu and choosing a device.
For best results, enable the device that you chose as the system default playback device in Task 1.
-
Click OK to close the Preferences window.
-
Play a clip. If you still do not hear sound, then go back to Step 2 and try a different driver.
For more information on Premiere Pro audio drivers and audio hardware preferences, see Audio hardware preferences.
3. (Windows) Update the driver for your sound card, or install an ASIO driver.
If you don’t hear sound after completing the tasks above, then the driver for your computer’s sound card could be out-of-date. Many sound card manufacturers frequently update their software drivers. Contact the manufacturer of your sound card or the manufacturer of your computer for an updated driver, or download one from the manufacturer’s website. When you have updated the driver, repeat the solutions above.
If no ASIO driver is installed and one is available for your sound card, then download and install the ASIO driver.
Sound is missing from some clips
If sound is missing only from certain clips or only from clips in a certain project, then do the following tasks in order:
1. Check for disabled audio tracks
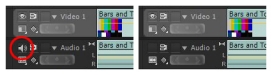
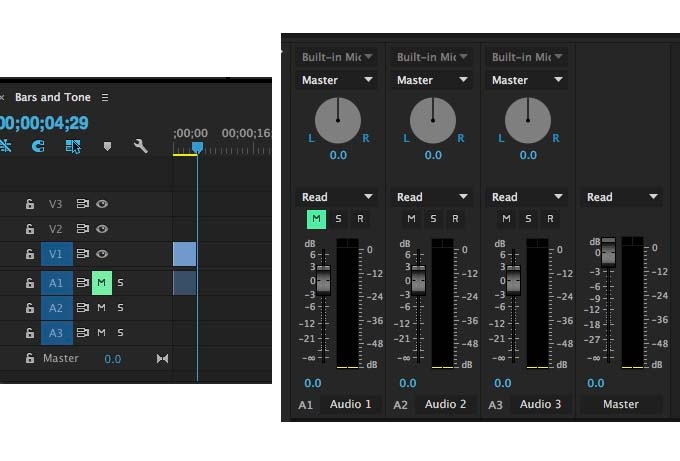
In the Timeline panel, look at the box at the far left or far upper left of each audio track’s header. If no speaker icon appears in this box, then the track is disabled. To enable a disabled audio track, click in the box. A speaker icon appears.
In the illustrated example below, the speaker icon (circled) indicates that the Audio 1 track is enabled. On the right side, the empty box indicates that the Audio 1 track is disabled:
2. Check for muted or low track volume.
Use the Audio Mixer or Timeline panel to determine if an audio track is muted or has low volume, and to increase the volume if necessary.
Premiere Pro: Do one of the following:
- Open the Audio Mixer, choose Window > Audio Clip Mixer > [Sequence Name] or Window > Audio Track Mixer > [Sequence Name].
- In the Timeline panel, look at the box at the left.
If the M next to any of the tracks is highlighted, the audio is muted. Click M to turn sound on.
3. Check for muted, low-volume, or disabled clips.
Verify that individual clip’s volume is not muted or low. For instructions, see Monitor clip volume and pan using Audio Clip Mixer.
Also verify that individual clips are not disabled. For instructions, see Enable or disable a clip.
4. Check for clips with incompatible codecs.
If you completed the steps above and you still don’t hear sound, the problematic clips could have been encoded with an incompatible codec. Codecs are algorithms for compressing audio and video data. Many different codecs exist. Sometimes, Adobe Premiere Pro can’t decode files that were encoded with a poorly designed codec or a codec that is not installed on your computer.
You can download third-party codecs from codec publishers’ websites. If the codec used to create the clips isn’t available as a QuickTime component, use other software to transcode them with a different audio-encoding format. (Try MPEG Streamclip or QuickTime Player with the QuickTime Pro upgrade.) Then, import the transcoded files into Adobe Premiere Pro.
To troubleshoot codec issues (on both Windows and Mac OS), see Troubleshoot file formats and codecs.
5. Missing audio or video in the footage
Sometimes, when you import the footage the footage may missing audio or video. To know more about this issue, see the KB article, No sound during playback.