Windows 11 slow: How to improve Windows 11 performance. Here are some tips and tricks to increase the performance and speed of your Windows 11 PC.
1. Restart the computer
This is a temporary fix for the problem but will be useful when you are unable to perform other fixes due to slow performance. When you restart your computer, its performance will improve significantly.
Additionally, you can use this as a workaround in critical situations where time is of the essence. Just restart the computer and complete the task at hand.
2. Run Performance Monitor
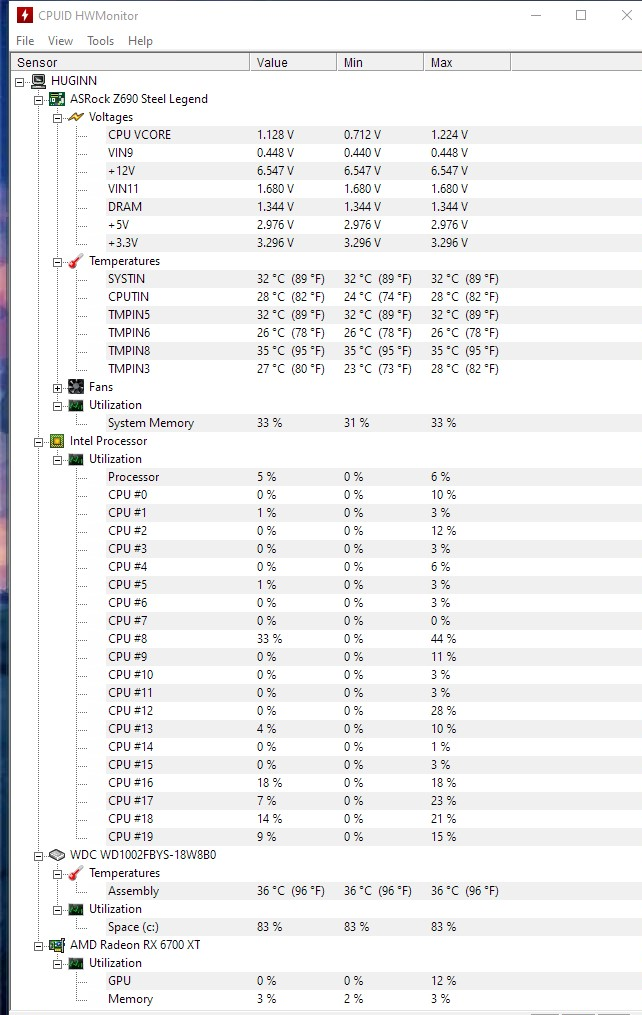
A built-in Windows tool, Performance Monitor, allows you to diagnose system performance and identify applications or programs that are slowing down the system. Apps do more than that but here we will focus on this aspect. You can conveniently explore other features to get the most out of the built-in tool.
Note: This is not a fix, but will help you form a strategy to optimize system performance.
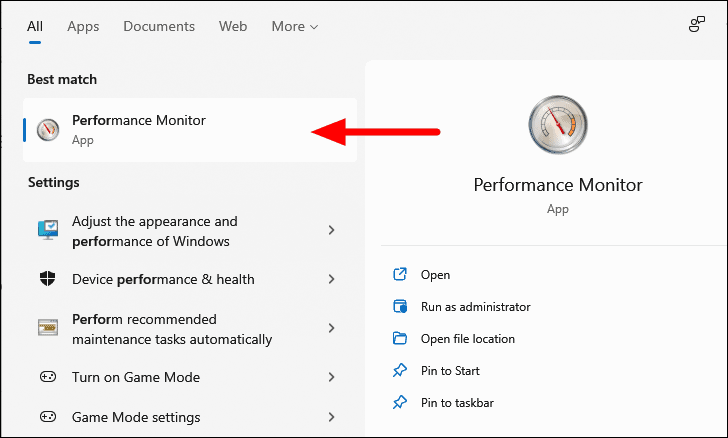
To run the Performance Monitor app, press WINDOWS+ S to launch the ‘Search’ menu, type ‘Performance Monitor,’ in the text field at the top and click on the relevant search result to launch the app .
In the Performance Monitor, click ‘Monitoring Tools’ in the navigation pane on the left.
Next, double-click ‘System’ in the list of options on the right.
You will now find two options, System Diagnostics and System Performance. Right click on ‘System Performance’ and select ‘Start’ from the context menu.
The tool will now run a performance test to assess how different applications, processes, and services affect the system. It will be a short process, about 60 seconds for the test and a few more seconds to aggregate the results. The current status of the test will be listed in the ‘Status’ column.
Once checked, select ‘Reports’ from the left navigation pane and then double click ‘System’ on the right.
Next, select ‘System Performance’ as we ran a performance test before.
If you have run the test before, you will find all the reports listed here with the date and time for each mentioned in the ‘Date’ column. Select one of the tests that you ran earlier.
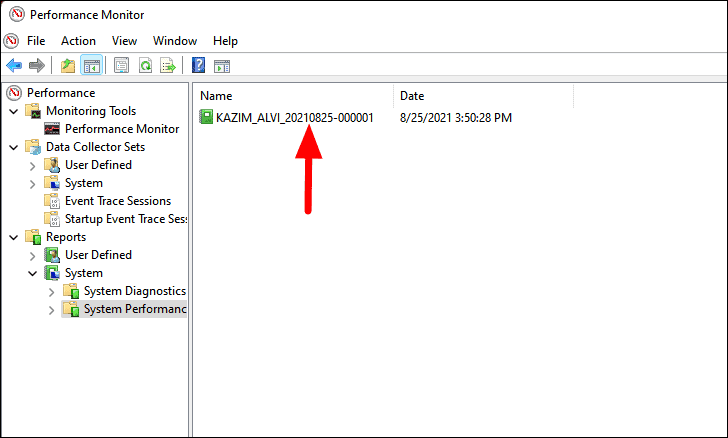
For those who are new to the different processes, refer to the ‘Summary’ section to determine which process is consuming the maximum system resources. It will be mentioned next to ‘Top Process Pool’.
You can also see detailed performance reports on various parameters below the summary. Navigate through the different sections to get a better understanding of performance.
This will give you insight into what is causing the system slowdown and thereby help you form a strategy to optimize system performance.
3. Terminate system-storage applications and processes
This method will immediately clear a lot of system resources and improve its performance. You can view applications and processes that are currently running in the background and consuming significant resources in Task Manager and terminate unwanted applications and processes.
To terminate applications and processes, right-click the ‘Start’ icon on the Taskbar or press WINDOWS+ X to launch the Quick access menu and select ‘Task manager’ from the list of options. Alternatively, you can press CTRL+ SHIFT+ ESC to launch the Task manager directly.
Next, select the unwanted apps or background processes that are consuming a lot of resources and click ‘End Task’ at the bottom.
Note: Make sure you do not terminate important background processes or services as it may adversely affect system performance.
Terminating unwanted applications and background processes will significantly increase system performance.
4. Turn off the startup program
If there are many programs that load at startup, it will affect the startup speed of Windows and then slow down the system. You should keep those startup programs to a minimum and add only the important ones.
To disable startup programs, launch Task manager as discussed earlier and navigate to the ‘Startup’ tab from the top.
Next, select the program that you want to disable loading on startup and click ‘Disable’ at the bottom.
Similarly, turn off other unwanted programs to speed up your PC.
5. Change Power Plan mode
Power Plan plays an important role in system performance and speed. Changing it to ‘High Performance’ can significantly improve performance, although the system may run out of power sooner than before. That is a sacrifice you will have to make.
To change the source scheme, search for ‘Control Panel’ in the ‘Search’ menu and click on the relevant search result to launch it.
Next, click the ‘View By’ drop-down menu and select ‘Large icons’ from the list of options.
Next, locate and select ‘Power Options’.
You will now find the current power plan listed here. Click ‘Show additional plans’ below it.
Next, tick the ‘High Performance’ checkbox to select a power plan.
This will improve the performance of the system.
6. Free up disk space
A system that is running low on storage will slow down. If that’s the case with the system, just follow these methods to delete unwanted files from your PC.
Delete temporary files
While executing tasks, some applications will create temporary files that can take up significant storage space if not deleted regularly. Ideally, these files should be deleted by the application after the task is completed, but that is not always the case. Therefore, you should delete them periodically to improve system performance.
To delete temporary files, press WINDOWS+ R to launch the ‘Run’ command, type ‘%temp%’ in the text field and click ‘OK’ or press ENTER to open the folder containing the temporary files.
In the launch ‘Temp’ folder, press CTRL+A to select all files, then right click on any file and select the ‘Delete’ icon in the context menu to delete the .
You may be asked to provide administrator permissions to delete some files. If that is the case, tick the ‘Do this for all current items’ checkbox and click ‘Continue’ to delete all such files.
After the temporary files are deleted, navigate to the desktop, right click on ‘Trash’ and select ‘Empty Trash’ from the context menu. This will delete the files from the system.
After deleting temporary files, some storage space will be cleared and system performance will be improved afterwards.
Run Disk Cleanup
Disk Cleanup is a built-in application that scans the hard drive for temporary files and lists them. Then you can easily delete such files. This is a quick way to delete a large number of temporary files or those that are no longer needed.
To free up hard drive space through the Disk Cleanup application, search for ‘Disk Cleanup’ in the ‘Search’ menu and click on the relevant search result to launch the application.
First, you will be asked to select the hard drive you want to clean. Select the hard drive from the ‘Hard Drive’ drop-down menu and click ‘OK’ to continue.
It will now scan the selected hard drive for files that can be deleted and list them under various categories. Tick the checkbox next to the ones you want to remove and click ‘OK’ at the bottom. Also, the space to be deleted will be mentioned next to ‘Total hard drive space you get’.
Click ‘Delete file’ in the confirmation box that appears.
You can also delete system files via ‘Disk Cleanup’.
To delete System Files, instead of clicking ‘OK’ before, select ‘Clean up system files’.
Next, select ‘Drive’ for which you want to scan system files.
Disk Cleanup will now scan the selected hard drive for unwanted files that can be deleted. Tick the checkbox next to the ones you want to remove and click ‘OK’ at the bottom.
Finally, click ‘Delete file’ in the confirmation box that pops up.
Automatically delete unwanted files with Storage Sense
Storage Sense, a feature provided by Windows, facilitates the automatic deletion of unwanted files. You can set this up and not have to worry about periodically deleting files.
To set up Storage Sense, right-click the ‘Start’ icon on the Taskbar or press WINDOWS+ X to launch the Quick Access menu and select ‘Settings’. Alternatively, you can press WINDOWS+ I to directly launch the ‘Settings’ app.
In the ‘System’ tab, select ‘Storage’ on the right.
Next, click on ‘Storage Sense’ under ‘Storage Management’.
Now click on the on/off button under ‘Automatic User Content Cleanup’ to enable Storage Sense.
You can also configure the cleaning schedule by selecting the desired option from the three drop-down menus.
If you want to delete unwanted files immediately, scroll to the bottom and select ‘Run Storage Sense now’. Now it will delete temporary files on the system.
You can easily clean up hard drive space using the first two methods while the third method will ensure automatic regular cleaning.
7. Turn off Animations
The animations or visual effects provided by Windows seem to affect its performance and slow down the system. Therefore, you should disable some extraneous animations to speed things up.
To disable animations or visual effects, search for ‘View advanced system settings’ in the ‘Search’ menu, then click on the relevant search result.
Next, click ‘Settings’ under ‘Performance’.
Now select ‘Custom’ and uncheck the checkboxes for the animations or visual effects that you want to disable. Once selected, click ‘OK’ at the bottom to apply the changes.
8. Run Malware Scan
A system infected with malware or viruses will also start to lag and slow down. Running a malware scan using the Windows Security application will help determine if it is a virus or malware that is slowing down the system. If a violation is found, appropriate action will be taken.
To scan for malware, search for ‘Windows Security’ in the ‘Search’ menu and click on the relevant search result to launch the application.
In the Windows Security app, click the ‘Virus and threat protection’ option.
Next, click ‘Scan Options’ to see other types of scans available.
Now select the ‘Full Scan’ option and finally click ‘Scan now’ at the bottom to start the scan.
It will take some time for the scan to complete. In the meantime, you can continue working on the system. Once the scan is complete, you will be notified of any malicious files or viruses detected and action taken.
9. Defragment the hard drive
Fragmentation here refers to the distribution of files far apart on the hard drive instead of being stored close together. In this case, Windows will take longer to locate the file, thus affecting the system speed. Data fragmentation occurs over time as you frequently access files and make changes to them.
Although Windows will sometimes defragment the hard drive, you can do it manually to optimize system performance immediately.
Note: If you are using SSDs, skip this step, as they do not need to be defragmented.
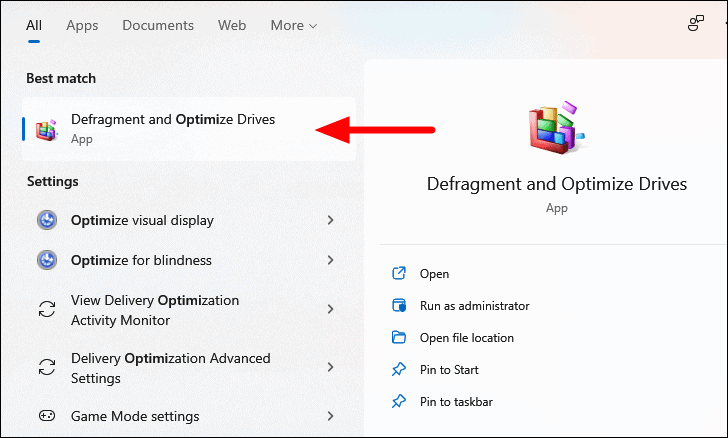
To defragment the hard drive, search for ‘Defragment and Optimize Drives’ in the ‘Search’ menu and click on the relevant search result to launch the application.
Now select the hard drive that you want to defrag and click ‘Analysis’ at the bottom to check the current fragmentation status.
Once the analysis is done, the status will be listed in the ‘Current Status’ column.
It will then analyze the hard drive, re-locate the data, defragment it, and finally merge it.
Once done, check the hard drive for fragmentation and defrag them. You should now notice a small increase in system performance.
10. Update Windows to the latest version
You should update your system with the latest version of Windows. With each update, Microsoft releases a series of new features along with bug fixes that can enhance the speed of the system.
To update Windows, launch the ‘Settings’ app as discussed earlier and click the ‘Windows Update’ tab on the left.
Next, click ‘Check for updates’ on the right to find any available Windows Updates. If available, they will be downloaded and installed on the system.
After the update, you will notice a slight increase in system performance. However, it can also backfire in which case you will have to uninstall the Windows update.
11. Increase the virtual RAM file
File Page is virtual memory used by the system to temporarily store program files, in case the RAM (Random Access Memory) is running full or said program has been idle for a while. This helps to increase the performance and speed of the system. One thing you must know is that loading a program from the hard drive / Page file will take longer than loading it from RAM. All of this can be understood with a simple example.
Let’s say you have a lot of files open and your RAM starts to fill up. Now, instead of terminating programs, the system will move less active programs from RAM to the Page. You may notice a program takes longer than usual when you zoom in on it after you have minimized it for a long time. This is because it is loaded from the Page.
Although Windows usually takes care of the Page file, you can manually increase the file in case the system slows down or slows down.
Note: Never move the Page file from an SSD (SSD) to an HDD (Hard Drive), as SSDs are relatively faster and transferring files to HDD may slow down the system rather than increase its speed.
To increase the Page file, search for ‘View advanced system settings’ in the ‘Search’ menu and click on the relevant search result to launch the application.
In the ‘Advanced’ tab of ‘System Properties’ that opens by default, click ‘Settings’ under ‘Performance’.
In the ‘Performance Options’ window, navigate to the ‘Advanced’ tab.
Next, click ‘Change’ under ‘Virtual Memory’.
You will notice the various options grayed out. That’s because Windows is now managing the Page. To make changes to the Page file, uncheck the ‘Automatically manage paging file sizes for all hard drives’ option.
Next, select the ‘C:’ drive, the drive where the Page file is currently stored, select the “No paging file” option and click “Set”. This will delete the paging file from the system hard drive.
Click ‘Yes’ on the warning box that pops up.
Now select a data drive, select the ‘Custom Size’ option and enter the value for the Page file in the sections provided. Leave the ‘Initial Size’ and ‘Maximum Size’ values unchanged. Finally, click ‘Place’ at the bottom to create a Page file on the data drive.
Note: You should keep the size of the Page file 1.5 – 2 times that of the physical memory (RAM). For example, if the system has 8 GB RAM, create the file Page 12 – 16 GB. You can easily check the RAM on your system.
After creating the Page file, click ‘OK’ at the bottom to save the changes.
You will now be asked to restart your computer to apply the changes. Restart it immediately and you should see a spike in system performance even when running a lot of programs.
12. Problems with Driver
Running an older driver version can also slow down the system. Additionally, Windows may have installed a new generic driver during the update process and replaced a third-party driver that you installed manually. While in the second case you can simply update the driver, the first requires a more extensive approach of uninstalling the generic driver and then installing the already existing driver.
The display driver is the most important when it comes to system performance and speed, so we’ll cover it in the following sections. After you understand the process and concept, you can also try it with other drivers.
Update drivers
There are basically three ways to update the driver, Device Manager, Windows Update, and manually download and install a driver from the manufacturer’s website. We will guide you through each method.
First, let’s see how you can update the driver through Device Manager.
To update the driver, search for ‘Device Management Software’ in the ‘Search’ menu and click on the relevant search result to launch it.
Now, find ‘Display Adapter’ and double click on it to see available adapters. Next, right click on the adapter and select ‘Update driver’ from the context menu.
You will now see two options, either let Windows search for the best available driver on your system or locate and install a driver manually. You should choose the first option, i.e. ‘Automatically search for drivers’.
If Windows can’t find a better driver on the system, that doesn’t necessarily indicate that the driver isn’t available. There may still be one in Windows Update.
Let’s see how you can install and update drivers through Windows Update.
To update the driver, launch the ‘Settings’ application by pressing WINDOWS+ I and select the ‘Windows Update’ tab from the left.
Next, click on ‘Advanced options’ on the right under ‘More options’.
You will now find several options listed here to customize the update settings. Click ‘Update Options’ under ‘Additional Options’.
Note: You can see if an update is available next to ‘Optional updates’. If not available, you can skip this method and move on to the next method.
Now, click ‘Driver updates’ to see available updates.
All available driver updates will be listed, tick the checkbox related to the display adapter and click ‘Download and install’.
If prompted, restart the computer to apply the changes.
In case the driver update is not found in the Windows Update section, you can still look for the update on the manufacturer’s website. Driver updates are only available through ‘Windows Update’ if the manufacturer sends them to Micorosft. However, many manufacturers upload these updates to their official website for users to download. Our last resort is to check for updates on the manufacturer’s website.
See how you can download and install driver updates from the manufacturer’s website.
Before you go to the manufacturer’s website to download the latest driver update, it is imperative that you determine the current driver version. To do that, right click on the adapter shown in the Device Manager and select ‘Properties’ from the context menu.
In the Properties window, navigate to the ‘Driver’ tab and note down the driver version.
Now go to Google or any other search engine of your preference and search for driver updates using ‘Manufacturer Name’, ‘Operating System’ and ‘Driver Name’. Find and select the official manufacturer’s website from the search results and verify if an update is available using the driver version you noted earlier.
If an update is available, download it. Now, navigate to the driver update file download folder and double click on it to launch the installer. Next, follow the on-screen instructions to complete the installation.
You will now install the latest drivers.
Uninstall the generic driver and reinstall the desired driver
If you believe it is a generic driver that slows down the system after an update, you can easily reinstall the desired driver. Since you are already using a third-party driver, we believe it is safe to assume that you are familiar with the installation process. Therefore, it will only take the driver uninstallation process and you can reinstall the desired driver afterwards.
To uninstall the driver, right click on the device in ‘Device Manager’ and select ‘Uninstall Device’ from the context menu.
In the warning box that pops up, select the ‘Attempt to remove driver for this device’ checkbox and click ‘Uninstall’ at the bottom.
Now you can install the desired driver for the device. Refer to the method of manually updating the driver in the last section for help with downloading and installing the driver, if needed. Also, if you can’t find the desired driver, just restart your computer and Windows will automatically reinstall the last installed driver.
13. Uninstall programs that you no longer use
If you install too many programs on your computer, it can potentially fill up your hard drive in addition to storing system resources in case they are set to load at startup. While we have discussed how to disable programs from loading at startup, now let’s see how you can uninstall those that you no longer need.
To uninstall a program, press WINDOWS+ R to launch the ‘Run’ command, type ‘appwiz.cpl’ in the text field and click ‘OK’ at the bottom, press ENTER to launch the ‘Programs and Calculators’ window power’.
You will now have a list of programs installed on your computer. Select the one you want to remove and click ‘Uninstall’.
Select the appropriate answer in case the confirmation box pops up.
14. Keep browser extensions to a minimum
If you have installed a lot of browser extensions, that can also lead to system slowdown. For those who spend a lot of time in the browser, too many extensions can eat up memory and affect productivity. Therefore, you should uninstall the extensions that are no longer needed.
The extension removal process is similar for most browsers, so we’ll take the case of Chrome, Edge, and Firefox into account. With an understanding of the concept and process, you should be able to uninstall extensions for all other browsers.
Google Chrome
To uninstall an extension on Chrome, click the ‘Extensions icon near the top right corner and select ‘Manage Extensions’ from the menu that appears.
Now click ‘Remove’ below the extension you want to remove.
Finally, click ‘Remove’ in the confirmation box that appears to uninstall the extension.
Microsoft Edge
To uninstall an extension in Edge, click the ‘Extensions’ icon next to the address bar at the top and select ‘Manage Extensions’ from the menu.
Next, click ‘Remove’ below the extension you want to uninstall.
Finally, click ‘Delete’ in the confirmation box that pops up at the top.
Mozilla Firefox
To uninstall an extension in Firefox, click the ‘Applications Menu’ option that resembles the hamburger icon near the top right corner.
Next, select ‘Settings’ from the list of options in the menu.
Now click on ‘Extensions & Themes’ near the bottom left corner.
All the extensions added to Firefox will be listed here. Click the ellipsis next to the ellipsis you want to uninstall and select ‘Remove’ from the menu.
Finally, click ‘Delete’ in the confirmation box that pops up at the top.
15. Increase physical memory or RAM
For now, we have seen all possible software modifications that you can make to increase system performance and speed. However, all of this won’t help if the system is running low on RAM. Therefore, you should equip the maximum RAM that can be supported or install at least a decent amount on your PC.
You can determine the maximum RAM supported by your PC from the manual that came with it or by looking up the model on the manufacturer’s website. RAM is pretty cheap these days and it won’t cost you much to increase one. Also, with the boost it will give to performance and speed, investing in RAM is a wise choice.
When upgrading RAM, we recommend that you consult an expert or go to a service center to install RAM, as it is a complicated process.
With the above methods, you can easily increase the speed and performance of your system without having to change too many settings or make significant changes. If these don’t work, you can always go with the last method and increase the RAM installed on the system.


