How to show USB hidden files. When you use a USB to copy data from one computer to another, the USB can be attacked by a virus. And once the virus has attacked the USB drive, it can hide any data on your USB drive. So in this article, Ngolongtech will show you how to show hidden files and folders on USB drives.
Table of Contents
How to show USB hidden files in Windows
Show hidden files with File Explorer Options
Step 1: Plug the USB Pendrive into your computer and wait for a few seconds until your computer screen shows the USB Pendrive.
Step 2: Go to Control Panel on your computer, switch the view to Category and select Appearance and personalization.
Note: This method applies to both Windows 10/8/8.1/7 operating systems.
Step 3: At this interface, find and click Show hidden files and folders in the File Explorer Options section.
Step 4: In the File Explorer Options window that appears, navigate to the View tab, scroll down to the Hidden files and folders section and click the Show hidden files, folders, and drives option .
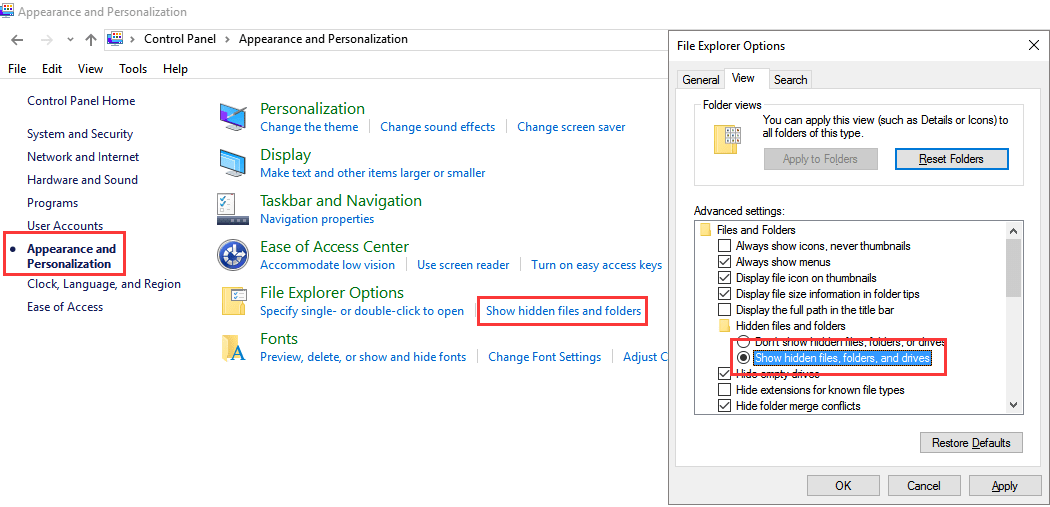
Step 5: Click Apply and then click OK. You can now see hidden files and folders on your USB pendrive.
Show hidden files from menu bar in File Explorer
First, you plug the USB pendrive into your computer and wait for a few seconds until your computer screen shows the USB drive.
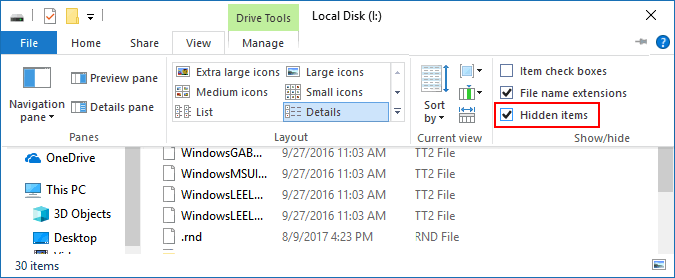
Next, open the USB folder as File Explorer , navigate the menu bar to the View tab , check Hidden items to display hidden files and hidden folders on the USB.
Show hidden files using Command Prompt
Another way you can use is to use the Attrib command in Windows Command Prompt to show hidden files and folders in your USB.
First plug the USB Flash Drive or Pen Drive into the computer. Check if the name of your USB drive appears.
Next, press the Windows+ key combination Rto call the Run command window , enter cmdand press Enter to open the Command prompt .
Or you can also go to Start and enter the phrase cmdin the search bar, the same result.
Now the Command Prompt window appears on the screen , here you enter the following command and press Enter:
attrib -h -r -s /s /d G:*.*In this case, it Gis the USB drive you want to show hidden files. Please change this value according to your computer.
Check if the USB has displayed the file you want.
Show hidden files using Smadav Antivirus
Smadav is one of the effective offline antivirus programs. The program can automatically detect and scan your USB drive every time you plug it into your computer. In addition, Smadav is also one of the ways to show hidden files on your computer and USB drives, protecting your computer from virus attacks.
Step 1: Download Smadav Antivirus to your computer and install it.
Step 2: Plug your USB drive into the computer and wait for a few seconds until your USB drive appears on the screen.
Step 3: Right-click your USB drive and a popup menu will appear on the screen.
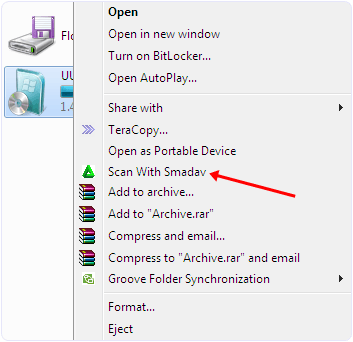
Step 4: At this menu, select the option Scan with Smadav , and your USB drive will begin to be scanned.
Step 5: After the scan is finished, click the Hidden tab.
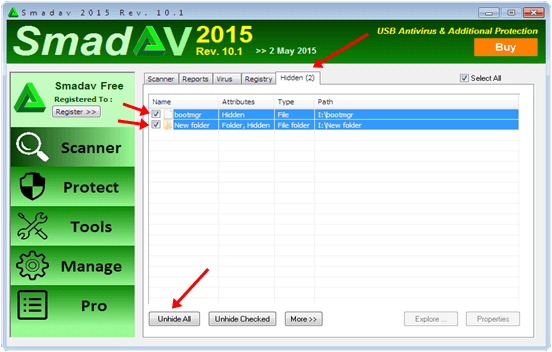
Step 6: On the Hidden tab , select the file you want to display or check all options.
You can now see hidden files and folders on your USB pendrive.
Show hidden files using EaseUS Data Recovery Wizard
Another software you can use is EaseUS Data Recovery Wizard. This program can recover, show hidden files, hidden folders from USB Flash Drive, Pen Drive, memory card, external hard drive… very fast and easy to use.
Step 1: Connect your USB Flash Drive, Pen Drive, hard drive to your computer and then launch EaseUS Data Recovery Wizard.
Step 2: Hover over the USB drive you want to show hidden files and click Scan.
Step 3: Wait for the scanning program to complete and then select the hidden files you want to recover. To inspect the file, double-click the file to preview its contents.
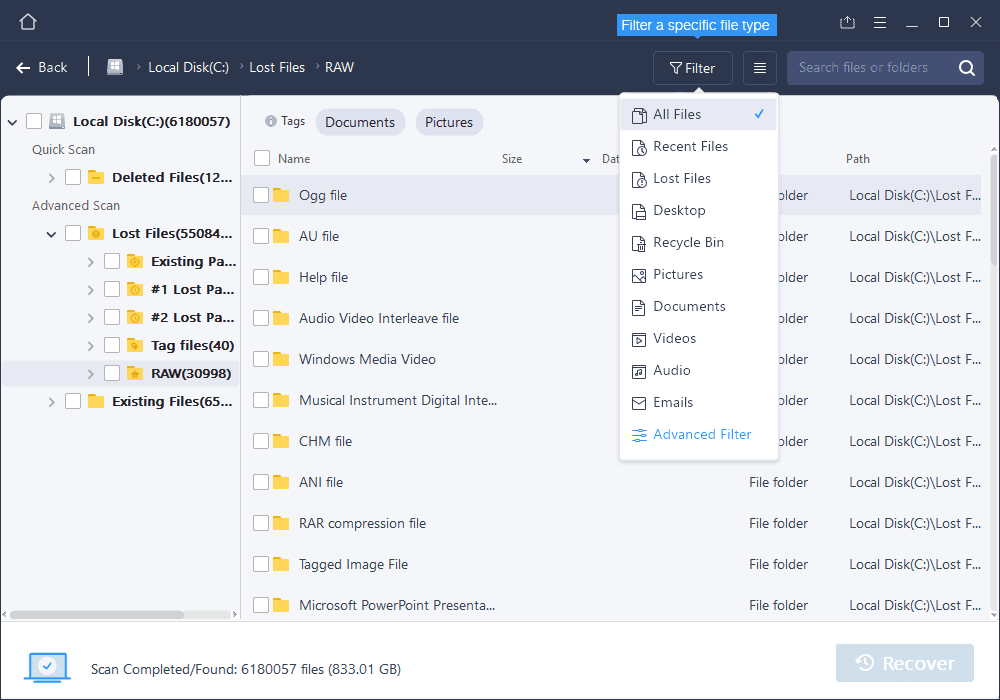
Step 4: After selecting, click Recover to show the hidden files on the USB again.
Above, Ngolongtech has guided you several ways to show hidden files in USB. Please comment down below your contributions or questions!
Good luck!

