
Fix Remote Desktop can’t connect to the remote computer for one of these reasons. Remote Desktop allows you to connect to your computer remotely using the RDP protocol. For example, if you are at home and need access to your office computer, you can use the Remote Desktop feature to remotely access your office computer from home. Remote Desktop is built on the same technology and uses the same protocols as Windows Terminal Services. Ngolongech will show you some ways to fix Remote Desktop problems.
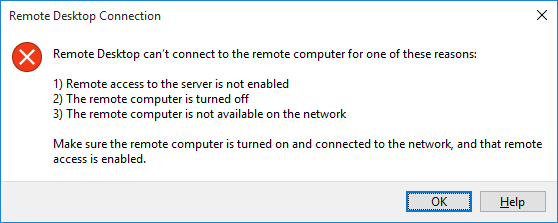
Table of Contents
Fix Remote Desktop can’t connect to the remote computer for one of these reasons
1. Unable to connect to a remote computer
Not being able to connect to a remote computer is a common problem. First, check the network settings to see if both computers are connected to the network. If so, check the IP address or name of the console Windows Remote Desktop Connection requires.
You need to make sure to find the correct IP address for the remote computer. On the remote computer, you can access https://www.whatsmyip.org/and copy the address. If not near the remote computer, ask someone to find the IP address and send it to you.
Similarly, to find out the remote device’s computer name, go to Start Menu > Control Panel > System and look at the computer name and workgroup.
2. Remote connection is not allowed
Another common problem is that the remote connection is disabled on the end device you are reaching. You can change this setting on the System. To the right of the computer and workgroup name, select Change Settings to open the System Properties menu, then select the Remote tab .
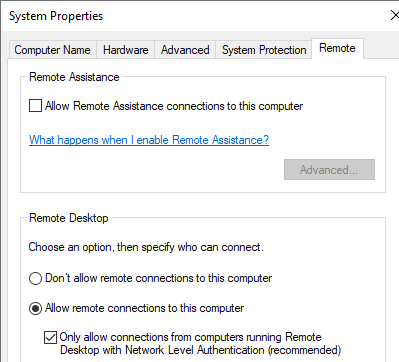
Windows 10 offers the same Remote Desktop Connection options as older versions of Windows. In Remote Desktop, there are two options:
-
Allow remote connections to this computer (Allow remote connections to this computer).
-
Allow connections only from computers running Remote Desktop with Network Level Authentication (recommended) (Allow connections only from computers running Remote Desktop with Network Level Authentication (recommended).
When allowing remote connections, you also have the option to only accept remote connections with Network Level Authentication. Network Level Authentication is an authentication method that completes user authentication before you establish a full Remote Desktop connection and the login screen appears.
It provides an extra layer of security against malware. However, if you are having trouble making a remote desktop connection after enabling Network Level Authentication, turn it off.
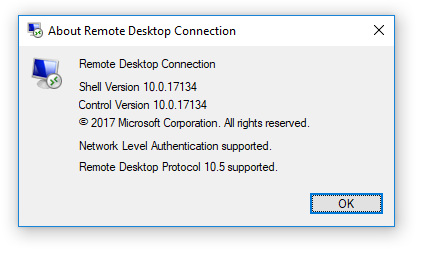
You can check if your version of Remote Desktop supports Network Level Authentication by clicking on the top left of the dialog box above and selecting About.
3. Remote Desktop Connection for Windows 10 Home Using RDP Wrapper Library
Windows 10 Home users often have difficulty making a Remote Desktop connection. Why is that? The reason is because Windows 10 Home doesn’t actually support incoming connections. You can only make Remote Desktop connections to other computers (not computers running Windows 10 Home edition) but cannot connect in the opposite direction. However, there is a simple software-based way to overcome this problem, which is to use the RDP Wrapper Library.
The RDP Wrapper Library uses the built-in Windows Terminal Service and adds a new firewall rule to allow remote desktop connections. In addition, RDP Wrapper Library also provides a remote connection management interface for you to easily manage. (because Windows 10 Home has no built-in solution).
Here’s how to enable remote desktop connections on Windows 10 Home using the RDP Wrapper Library.
Step 1 . Visit the website https://github.com/stascorp/rdpwrap/releasesto download the file RDPWINst.zip.
Step 2 . After the download is complete, right-click the file and extract it to a new folder. For example, using 7-Zip, you would choose 7-Zip > Extract to RDPWrap-v1.6.2 .
- Top best file decompression and file compression software today
Step 3 . Open the new folder, then run bat .
Step 4 . Once the installation is done, run bat .
Step 5 . Now, run the exe to make sure the process is working.
Step 6 . You can use the exe to manage advanced configuration settings.
4. Cannot copy text from remote computer
You can use Remote Desktop Connection to copy text from one terminal to your own device. If copying text doesn’t work, you need to enable Clipboard redirection to be able to use it on the remote computer.
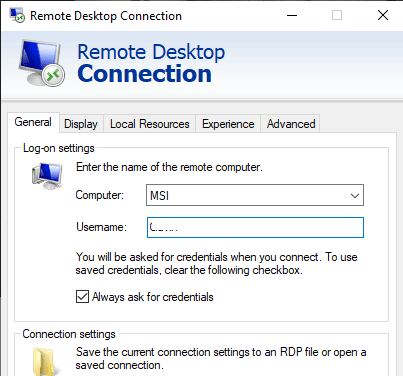
Open the Remote Desktop Connection dialog box by typing remote in the Start menu search bar , selecting the appropriate result. Then select Show Options , go to the Local Resources tab , under Local devices and resources check the Clipboard box .
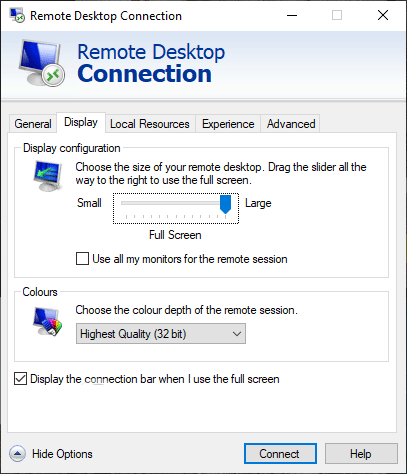
5. Incorrect remote window size
Incorrect window size is another common Remote Desktop connection problem. When creating a remote desktop connection, the window is too big, too small, or doesn’t match the settings you entered. There are two ways to fix this error. The first way is that you can force the Remote Desktop connection to use a specific size via Run. Press Windows + R , then type.
mstsc.exe /h:X /w:X. exe / h : X / w : X
Here, X is the height and width of the Remote Desktop view you want. Remote Desktop will remember this setting for future remote viewing settings.
The second way is to adjust the size on the Remote Desktop Connection client. It has a handy screen resolution slider, from 640×480 size to full screen.
6. Clear credentials to re-establish remote desktop connection login
Sometimes, Windows Remote Desktop Connection feels “confused” when your or remote system’s login information is different from the last time it was connected. You can delete and replace the current login to fix this problem.
On the Remote Desktop Connection client, go to the Advanced tab , select Settings and select Automatically detect RD Gateway server settings .
7. How to save remote desktop connection customization settings
If you frequently connect to several different servers or clients, saving a custom configuration for each Remote Desktop will save you quite a bit of time. You can set the optimal width, height, color settings for each server or end device.
Open the Remote Desktop Connection dialog box, select Show Option. You will see an option Connections settings, select Save As, specify a save location, then select Save to create a remote desktop connection file (.RDP).
Now, browse to the Remote Desktop Connection configuration file. You can edit the configuration file using a text editor such as Notepad or Notepad++. Right click on the configuration file and select Open with… , then choose your text editor.
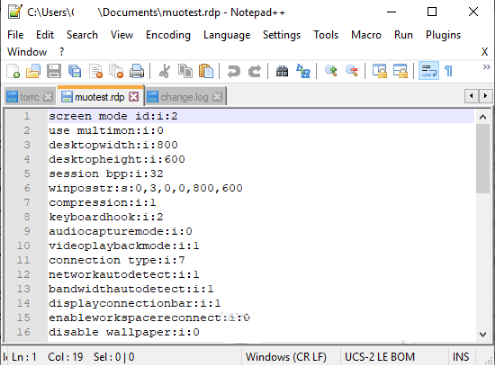
The first four lines show your remote connection screen size options (multi-monitor mode possible). You can edit screen mode to set up a remote window session in screen mode. For example “id:i:2” sets up full screen where “id:i:1” establishes remote connection appears in windowed mode.
If screen mode is set to “2” for full screen, the screen width and height dimensions will automatically match the client screen size. However, if using monitor mode 1, you can use the screen width and screen height settings with a specific window size.
After confirming your settings, add the following string to the end of the file:
smart sizing:i:1: i : 1
Smart sizing allows you to change the display settings without damaging the configuration files while activating the Remote Desktop connection.
8. Shortcut to connect remote desktop
Here are some handy Remote Desktop connection shortcuts. These shortcuts work when accessing Remote Desktop using the Run dialog box.
- Start Remote Desktop in full screen mode: mstsc /f
- Start Remote Desktop in Admin Mode: mstsc /admin
- Set up a Remote Desktop session that matches the local virtual desktop: mstsc /span
- Set up a Remote Desktop session in accordance with Client Layout: mstsc /multimon
- Open the .RDP file to edit, change the connection file name before running the command: mstsc /edit “connection file”
You can use Remote Desktop shortcuts after connecting Remote Desktop.
- Switch the Remote Desktop client between full screen and windowed mode: Ctrl + Alt + Pause
- Set up Remote Desktop in full screen mode: Ctrl + Alt + Break
- Take a screenshot of an active Remote Desktop window: Ctrl + Alt + Minus
- Take a screenshot of the entire Remote Desktop: Ctrl + Alt + Plus
- Restart remote desktop: Ctrl + Alt + End
Although Remote Desktop has always worked quite well, it is sometimes difficult to establish an initial connection. In this article, we have introduced you to some Remote Desktop problems fixers and some handy keyboard shortcuts when using this feature.
Wishing you success!


