
Fix 21h2 feature update error 0xc1900223 on Windows. Question: “I’ve been having lots of problems trying to get the Windows 10 21H2 Update to install. I’ve also tried multiple restarts but again, no success. Looking for some advice on how to overcome this problem.”
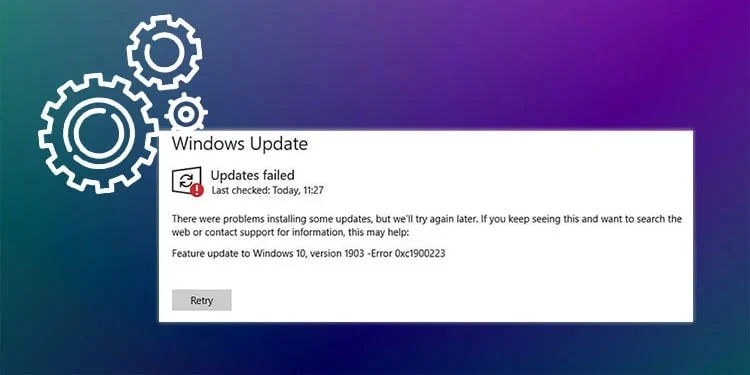
Table of Contents
Why can’t I install Windows 10 21H2 on PC?
Windows 10 21H2 was released on November 16, 2021. If your device is running Windows 10, versions 2004 and higher, you can go to Start > Settings > Update & Security > Windows Update to check for updates and update to this latest version of Windows 10. Now, Windows 10 21H2 is widely available. You decide to download and install it on your computer.
But some users report that they can’t install Windows 10 21H2 on their computers via Windows Update. Usually, users also receive some error codes like 0xc1900101, 0xc1900223, Etc.
This is a very common issue. When you can’t install Windows 10 21H2 or can’t download Windows 10 21H2, you should not give up. The methods we will introduce in this article can help you successfully get Windows 10 21H2 update on your desktop computer or laptop.
Fix 21h2 feature update error 0xc1900223 on Windows
Here is how to fix Windows Update error 0xc1900223 in Windows 11/10 –
1]Check Internet connection
Many Windows update problems are caused by weak and unstable internet access. Ensures a fast, reliable connection and does not create any disturbances. Also check that the metered connection is not enabled and disable if it is.
Turn off the measured connection
For Windows 10
- Click on the available Wi-Fi icon on the right side of the Taskbar and then select Properties from under the Network name.
- When the related settings page appears in a separate window, scroll down a bit and turn off the toggle for Set as metered connection.
For Windows 11
- Press – Windows + I.
- From the left column, select – Network & internet.
- Scroll right and click – WiFi.
- Click the Properties option of your connected network.
- Search for Metered connection and turn off the toggle present next to it.
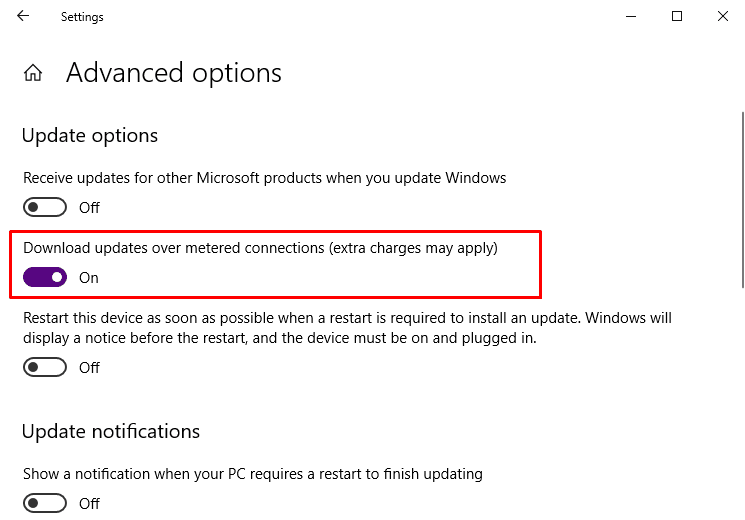
Download updates over metered connections
In the absence of problems with additional charges, you can use a metered connection to download Windows updates.
For Windows 10
- Launch the Windows Settings app (Win+I) and click Update & Security.
- Go to the right pane and click Advanced options .
- Next, turn off the toggle for Download updates over metered connections (extra charges may apply) .
For Windows 11
- Open the Settings app.
- Select – Windows Update from the left sidebar.
- Switch to the right pane and click – Advanced options.
- Turn on the toggle switch set for Download updates over meter connections.
2]Run DISM and SFC tools
Sometimes corrupt system files block the normal update process and stop the Windows 10 or 11 installation with error 0xc1900223. To solve this problem, you need to restore the health of your PC by executing the required command lines. Here is how –
- Press Win+R .
- Type cmd.exe in the text field and press Ctrl+Shift+Enter on your keyboard.
- Type the following line after the cursor blinks and press Enter –
DISM.exe /Online /Cleanup-image /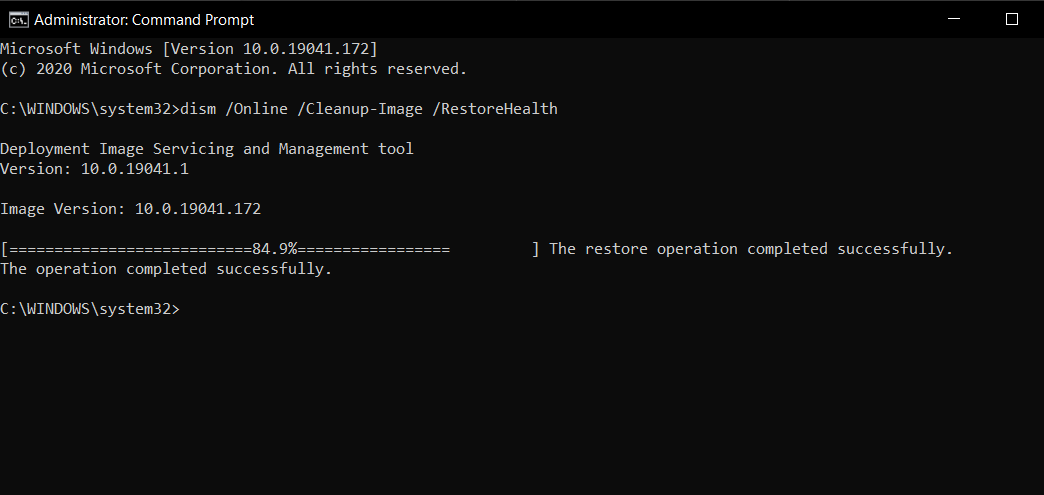
sfc /scannow
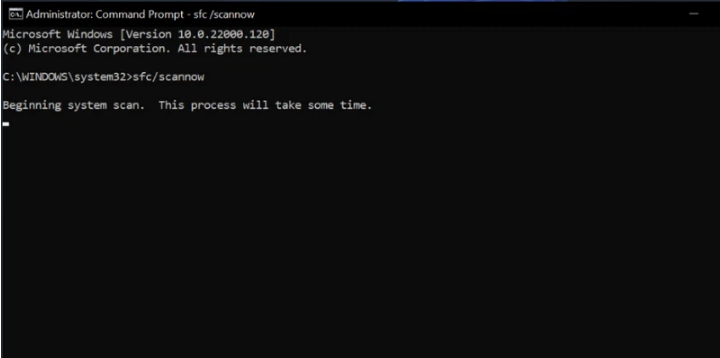
- Wait until the process finishes completely, reboot and then check for error 0xc1900223.
SFC / Scannow, DISM.Exe, CHKDSK Windows 10
3]Make sure the device has enough space
To receive the update, the PC must have at least the required space in the drive where the files will be installed. Make sure that space exists in your system. If not or you doubt then delete temporary and unnecessary files. Complete this task using Disk Cleanup by following these steps:
- Click the search icon on the Taskbar and type cleanup.
- Hit Enter.
- When the Disk cleanup wizard appears, click – OK.
- Type Clean up system files from the bottom up.
- For the next pop-up, click – OK.
- The time it finishes calculating how much space you can free, click OK to get rid of the junk heap. Uncheck Download and Recycle bin if any necessary files exit there.
4]Using the Windows Update troubleshooter
Windows Update error 0xc1900223 usually goes away by running the Windows Update troubleshooter. This built-in utility will analyze the problem at first and then solve it automatically.
For Windows 10
- Press Win+I and then click Update & Security .
- Select Troubleshoot from the left column and switch to the right.
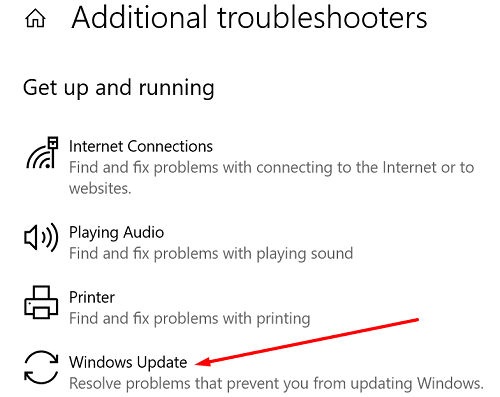
- From the right, click – Additional troubleshooters .
- Click Windows update and then select Run the troubleshooter .
- The tool will immediately start scanning for the culprit causing Windows Update Error 0xc1900223 and suggest the same workaround. Click Apply a fix and then follow the instructions displayed on the Wizard.
For 11 Window
- Right click on the Start button and select – Settings.
- From the right pane, scroll down a bit and select – Troubleshoot.
- Click – Other troubleshooters.
- Hit Run now next to the Windows update.
5] Reset Windows Update Components
Unfortunately, if the troubleshooter doesn’t work to fix Windows update errors, it’s possible that the component itself is damaged. In such case, reset the same solution thoroughly. Here is how –
- Press Win+S and type cmd.
- When the results show up, click Run as administrator .
- Click Yes if UAC prompts.
- On the Command Prompt window, type the following line and press Enter after each line –
net stop wuauserv
net stop cryptSvc
net stop bits
net stop msiserver
- Then copy-paste the commands below and press enter as before –
ren C:WindowsSoftwareDistribution SoftwareDistribution.old
ren C:WindowsSystem32catroot2 Catroot2.old
- Finally, you need to run the following commands one by one –
net start wuauserv
net start cryptSvc
net start bits
net start msiserver
Once done, go to the Windows Update settings page and Check for updates.
6] Scan your entire system
Attacks with malware or viruses can damage update-related components further leading to Error 0xc1900223. Windows security application becomes the savior in this situation. Here is the method –
For Windows 10
- Right click on the Start button and select Settings.
- After the Settings app appears, click Update & Security.
- Select Windows Security from the left pane and scroll to the right.
- Click Virus & threat protection.
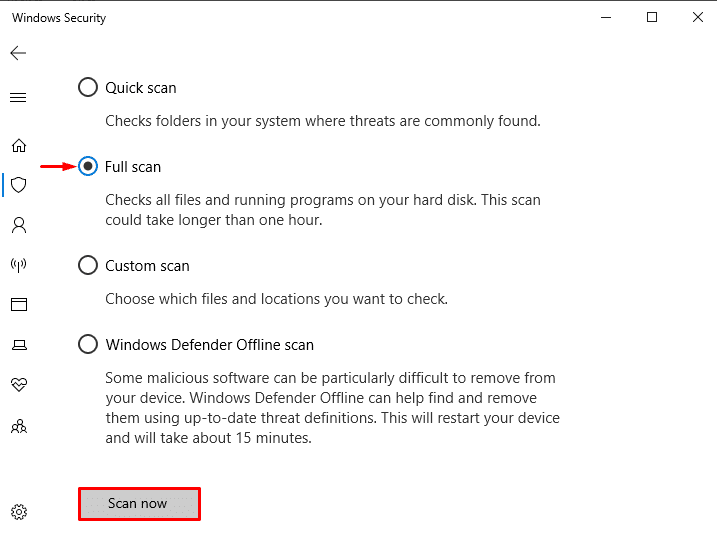
- When Windows Security pops up, tap Scan options from the right pane.
- Click on the radio button resolved by Full scan and click Scan now.
- Once the scan is complete, remove malware if found by following the on-screen instructions.
For Windows 11
- Press – Windows key + I .
- From the left column, select – Privacy & Security .
- Scroll right and click – Windows Security .
- When on the next page, select – Virus & threat protection .
- From the middle column of the window that appears, click – Scan options .
- Select the radio button set before Full Scan and then click – Scan now .
7]Set security suite not working
Sometimes the built-in security suite itself or third-party antivirus software gets the wrong impression when downloading updates and ends the update incomplete with Windows Update Error 0xc1900223. Therefore, you can turn them off for a while to check if the problem goes away.
Turn off Windows Defender Firewall
- Press Windows and R together.
- Type the control in the text field press Enter.
- Set the view by of the Panel to Small icons.
- Locate and click Windows Defender Firewall .
- Next, click the Turn Windows Defender Firewall on or off link from the left column.
- Select the radio button assigned to Turn off Windows Defender Firewall (not recommended) for both Private network settings and Public network settings .
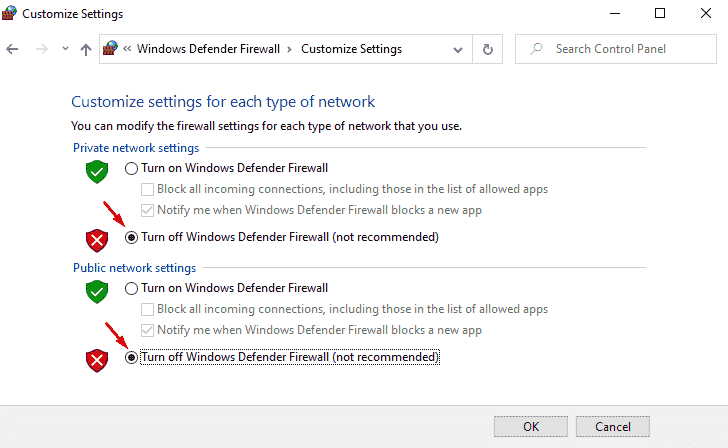
Note – Don’t forget to undo the same after installing Windows 10 or 11.
Turn off third-party anti-malware programs
- Click the arrow icon from the Notifications area.
- Right-click the third-party antivirus icon and select Disable . While the option may be different for other anti-malware programs, it will involve disabling or stopping.
8] Remove additional hardware to fix Windows Update error 0xc1900223
Hardware accessories such as additional hard drives, SD cards, printers, scanners and similar peripherals are essential these days. While it may sound odd, some people have reported that these external accessories are generating error 0xc1900223. And only after the same disconnect did the update start working fine. So try once to solve the problem.
9]Check date and time
Sometimes conflicts occur between systems and Date and Time updates. To fix it –
- Open Control Panel and make sure the Type View is Small icons.
- Search for Date and Time and click the same.
- Switch to Internet Time and click Change settings .
- Next, check the box next to Synchronize with an Internet time server and click Update now.
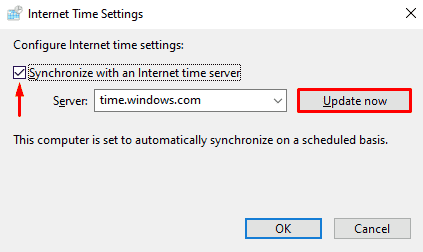
- Finally, click OK and reboot the system.
10]Using Windows Update Assistant
We are mainly used to get the latest version of Windows in an automated process. Since it is generating error 0xc1900223 recently, take the help of Windows update assistant to download the upgrade manually.
To get this done, navigate to the official Microsoft website and click Update now.
Then wait until the process is finished.
11]Install the update using the Media Creation Tool
When nothing works to fix error 0xc1900223, wait a few days and try to get the update later. Alternatively, get the help of the Create Media tool for immediate use. Follow the instructions –
- Launch a web browser and go to the Official Microsoft Website (for Windows 10). In the case of Windows 11, go to its download page and follow for this version.
- Scroll down to reach the Create Windows 10 installation media area.
- Select Download tool now .
- Once done, go to Downloads and double click on the file you just got.
- If UAC launches, press Yes .
- Once the Windows 10 Setup wizard appears, click Accept .
- Select Create installation media (USB flash drive, DVD, or ISO file) for another PC and type Next .
- See Language, Version and Architecture for your computer selected by the system. If everything is fine, click Next .
- Click the radio button that connects to the ISO file and click Next .
- Then set the folder where you want to store the copy of the file and click Save .
- The download will start shortly, and once it reaches 100%, click Finish .
- Finally, you’re ready to install a recent version of Windows 11 or 10.
Hopefully, Ngolongtech has helped you with the problem you are facing. If you find the article useful, please like and share to support us. If you have any questions or comments, let us know in the comments section below.


