How to show disk space in Windows 10/11. In addition to checking the Windows computer configuration such as RAM and CPU parameters, it is equally important to see the hard drive capacity. The user will then know the amount of hard drive in use and the free space of the hard drives on the computer or laptop.
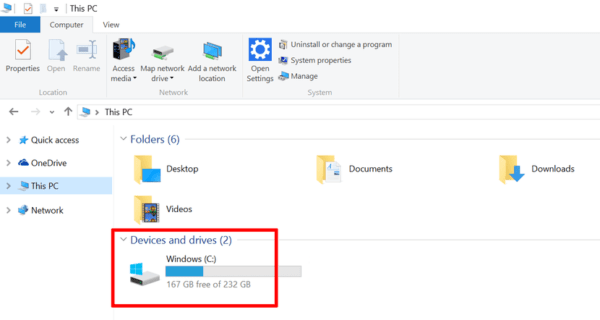
Table of Contents
How to show disk space in Windows 10/11
Method 1: Select the Options box
Step 1: Press Win + E button and File Explorer will open.
Step 2: Go to the top right of the window in File Explorer and the view expands.
from the tile select list .
Note: – For Windows 11 users
Now select This PC on the left and right side, in the Devices and drivers section you will see the disk space usage bar.
But if not, try the following solutions to fix the problem.
Method 2: Reset Folder View in File Explorer Preferences
By default, the first method to try would be to reset the folders in File Explorer Preferences. Follow the instructions below to reset the folders and see if it helps you show the disk usage bar again on your Windows 11 PC:
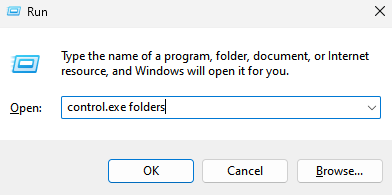
Step 1: Press the hotkey – Win + R on your keyboard at the same time.
This will open the Run command window.
Step 2: In the run command search bar, type the control.exe folders and click OK to launch the File Explorer Options dialog box.
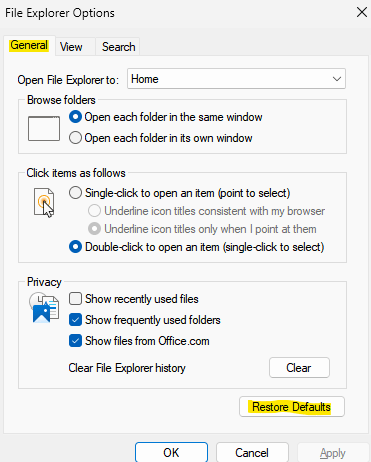
Step 3: Now General Click on the tab and under Privacy Restore Defaults.
Step 4: Now, Start Tab view and click Restore Defaults
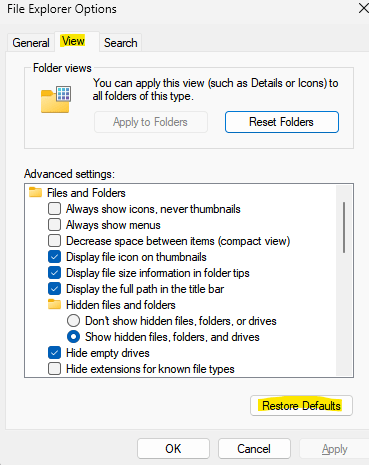
When done, press apply and then ARROW to apply changes and exit.
Now go back to This PC folder in File Explorer and check if you can now see the disk space usage bar in the driver.
Method 3: Change Registry Editor settings
Editing registry editor settings is useful in most cases when some solutions don’t work. However, before making any changes to the registry settings, make a backup of the registry keys. This will help you recover any data that you may have lost in the process.
Now, here’s how to make changes in the registry editor that can fix the missing disk space usage bar issue on your Windows 11 PC:
Step 1: Move the cursor to the Start button on the Taskbar, right-click it and select Run.
You will now see the Run command window.
Step 2: In the Run command window, type regedit in the search bar and press Enter on your keyboard.
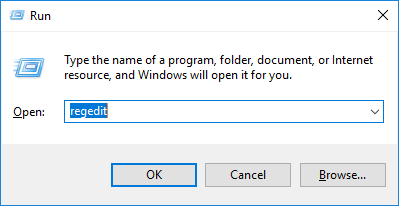
Step 3: In the Registry Editor window that opens, navigate to the following path:
HKEY_CLASSES_ROOTDrive
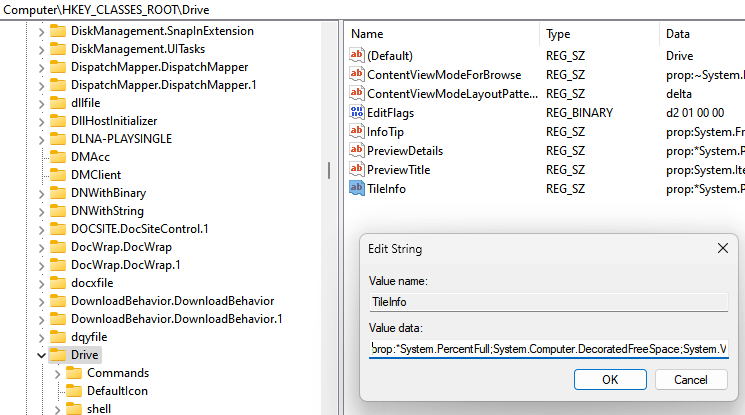
Now go to the right side of the window and double click on it. TileInfo .
*Note – If you don’t find the TileInfo string value, right click in the empty space to the right, select New and then String Value. call it TileInfo.

Step 4: Now, Once TileInfo Just double click on it.
You should now see the Edit String drop-down box.
Copy and paste the following path into the Value data field:
prop:*System.PercentFull;System.Computer.DecoratedFreeSpace;System.Volume.FileSystem
Print ARROW and then save changes and exit.
When you’re done, close the registry editor window and now go to File Explorer > This PC and check if you can show the disk space usage bar again.
If it doesn’t solve the problem, try restarting the computer.
Method 4: Reduce your volume labels
The drive in this PC folder typically displays three lines of information in Tile view. This includes the drive letter, disk space usage bar, and drive label with text information. Because all this information makes the volume label too long, it can sometimes wrap to the next line causing the text message display space to run out.
Therefore, this method is especially useful when you cannot see the text message under the skin tag. Therefore, in this case, you should shorten the length of the skin tag. To do this, follow these steps:
Step 1: Select the drive with a longer name and press F2 on the keyboard.
Step 2: Next, select Rename and now rename with a shorter name.

*Note – This change usually requires administrator privileges. Just click Continue in the permissions box to continue the renaming process.
Method 5: Change permission to full control
If you are facing the problem of not being able to see the drive properties along with the disk space usage bar, changing the ownership from TrustedInstaller to your user ID and then changing the permission to full control can help solve the problem. Make sure you change the ownership first, otherwise you won’t have permission to edit the security rules. Leets, see how to change ownership and then switch to full control to fix the problem:
Step 1: Right click on the driver and select Properties.
Step 2: In the Properties window, Protection.
Click here, click on the high level right corner at the bottom.
Step 3: In the Advanced Security Settings window, go to the bottom left and Change Permissions.
Step 4: In the Advanced Security Settings window, go to the Owner field and change the Color to Blue.
Step 5: While the Select User or Group dialog box opens, advanced.
Step 6: In the next window, click on it. Find now.
You should now see a list in the Search results area.
Here select the account name and bass ARROW.
Step 7: You will now return to the Select User or Subgroup dialog box and click OK.
Step 8: Go back to the Advanced Security Settings window, press Apply then OK to apply the changes and return to the Properties window.
Step 9: In the Security tab, in the Group or username field, select your username and click the Edit button below.
Step 10: Now go to the Permissions area below and next to Full Control check the box under Allow.
Press the Apply button and then OK to save the changes and exit.
Now, in File Explorer > On This PC, check if you can see the driver properties and disk space usage bar.
Method 6: Turn on full column percentage
This method worked for Windows 8 and now also works for Windows 11, although there’s a bit here and there in the preferences’ insert. All you have to do is enable the Full Percent column and show a disk usage bar next to the drive. Here’s how to enable the full percentage column:
Step 1: Go to the Windows (Start) icon on the Taskbar, right click on it and select Program Data Manager to open the file explorer
Step 2: In the File Explorer window, click it. This PC is left
Now, on the right side of the pane, top right view and select Details.
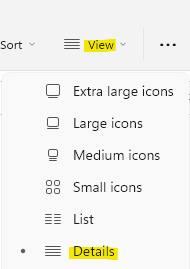
Step 3: You will now see a detailed view of the drivers in the Devices and drivers section.
Here go to the top of any column, right click on it, for example right click Type and choose Percentage Full.
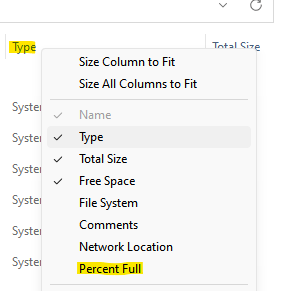
This will add an extra column to the right called Full Percentage. Now, when you go to the drives, you can see the disk space usage bar on the right.

