
How to fix RSAT installation failed on Windows 10/11. Remote Server Administration Tools (RSAT) allows IT administrators to remotely manage roles and features in Windows Server from a Windows client. If RSAT installation failed on your Windows 11 or Windows 10 computer, this post is intended to help you with solutions to the problem. Note that the solutions provided in this post apply to all error codes related to RSAT installation on Windows 10/11.
Table of Contents
How to fix RSAT installation failed on Windows 10/11
If the RSAT installer gets an error and the installation fails with errors 0x800f0954, 0x8024402c, 0x8024001d, 0x80244017, etc., these suggestions will definitely help you fix the problem:
- Initial Checklist
- Install RSAT via PowerShell
- Configure Group Policy to download optional features from Windows Update
- Modify the registry key UseWUServer
- Reset Windows 11/10
Let’s see a description of the process involved in each of the solutions listed.
1]Initial Checklist
Before trying the solutions below, you can try the following and after each action, see if you can successfully install RSAT on your device without problems:
- Restart your PC. This goes without saying, as in most cases restarting your computer quickly will solve most minor problems; typically temporary software glitches.
- Update Windows. More often than not, you may experience problems on your PC if the installed version/build is out of date. Therefore, we recommend that you make sure Windows is always up to date. You can check for updates and install any bit available on your Windows 11/10. In the unlikely event that the problem started occurring after a recent Windows update, since you are sure you can install the RSAT components before the update, you can perform a System Restore or uninstall the update – or continue with the solutions below if you prefer not to, at least not as your first action.
2] Install RSAT via PowerShell
After going through the initial checklist but the RSAT installation still fails via Optional Features in your PC’s Settings app, you can try installing via PowerShell. To perform this task, follow the instructions in the instructions on how to install the Remote Server Administration Tool (RSAT) on Windows 11/10. Since the command line is simple, it will often eliminate the problems associated with performing certain tasks through the GUI.
3]Configure Group Policy to download optional features from Windows Update
Starting with Windows 10 version 1809, FOD (Features On Demand) and language packs can only be installed from Windows Update and not via WSUS. So, since RSAT is an optional feature (aka FOD), you will need to make sure Group Policy is configured to have direct access to Windows Update to download and install FOD. Once done, you can try to reinstall RSAT normally.
If the error recurs, try the next solution.
4]Modify UseWUServer registry key
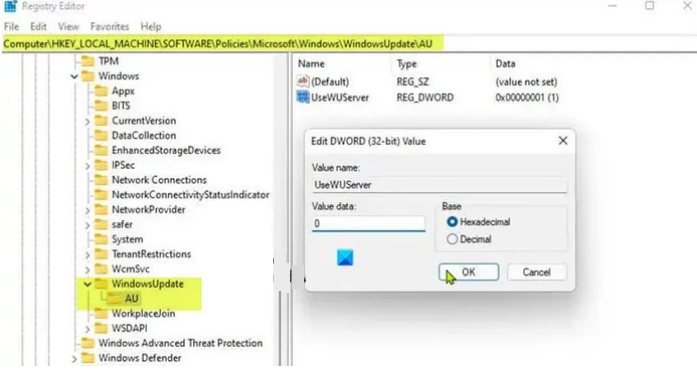
This is an alternative registry hack to the Group Policy method above. The UseWUServer registry key set to a value of 1 configures Automatic Updates to use a server running Software Update Services instead of Windows Update.
This registration method will simply disable WSUS on your device. Since this is a registry operation, you should back up the registry or create a system restore point as necessary precautions. Once done, you can proceed as follows:
- Press Windows key + R to invoke the Run dialog box.
- In the Run dialog box, type regedit and press Enter to open the Registry Editor.
- Navigate or go to the registry key path below:
HKEY_LOCAL_MACHINESOFTWAREPoliciesMicrosoftWindowsWindowsUpdateAU
- At the location, on the right pane, double-click the UseWUServer entry to edit its properties.
- Input 0 inside V data alue field.
- Click OK or press Enter to save the changes.
- Exit the registry editor.
- Restart the Windows Update service or restart your PC.
Once done, you can finish installing RSAT on your device without any problems. Alternatively, you can automatically disable the UseWUServer key in the registry. Here’s how to do it:
- Press Windows key + R to invoke the Run dialog box.
- In the Run dialog box, type notebook and press Enter to open Notepad.
- Copy and paste the code below into a text editor.
[HKEY_LOCAL_MACHINESOFTWAREPoliciesMicrosoftWindowsWindowsUpdateAU]"UseWUServer"=dword:00000000
- Now, click on the File option from the menu and select the Save As button.
- Choose a location (preferably desktop) where you want to save the file.
- Enter a name with the .reg extension (for example; DisableWSUS.reg ).
- Select All files from the Save as type drop-down list.
- Double-click the saved .reg file to merge.
- If prompted, click Run > Yes ( UAC ) > Yes > OK to approve the merge.
- You can now delete the .reg file if you want.
- Restart the PC.
5] Reset Windows 10/11
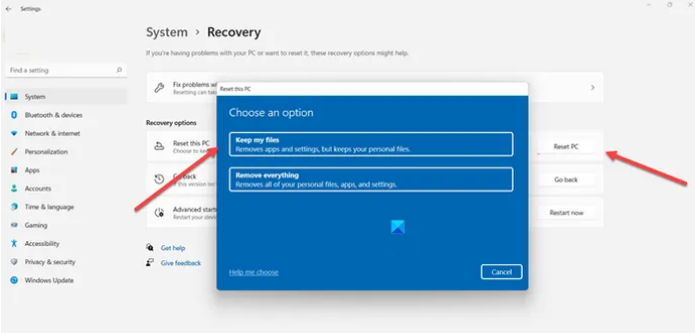
If the problem in focus persists up to this point, you may be experiencing severe operating system failure. In this case, to solve the problem, you can reset Windows 11/10 with the option to keep your personal files. Once your PC has been reset to pristine condition, you can try to install RSAT normally.
Hope this is useful!
FAQ
How to fix RSAT Setup Error 0x80244017?
RSAT error code 0x80244017 can be resolved by temporarily disabling WSUS on the Windows 11/10 client and then manually restarting the Windows Update service.
How to install RSAT on Windows 11?
To add an optional feature (FOD) like RSAT so you can manage Windows Server roles and features from a Windows 11 device, navigate to Settings > Applications > Optional Features.


