How to change the color of an object in Photoshop. Sometimes you have a picture that seems perfect, but something is out of the ordinary the color doesn’t match everything else and you want to change it up. But how can you do this without affecting the colors of the rest of the image?
In this simple tutorial, you’ll learn how to use the object selection tool and layer masks in Photoshop to change the color of an object in an image.

Table of Contents
1. Using the object selection tool
Choosing an object from the rest of the image is exhausting. After Photoshop v21, Adobe introduced the Object Selection tool to select objects in the image. Here’s how you can do it.
Step 1: Open Photoshop on PC or Mac. Make sure your machine meets the minimum Photoshop requirements. Otherwise, you will find Photoshop laggy.
Step 2: Select the Object Selection tool from the left menu bar.

Step 3 : The object selection tool will appear. Now draw a line around the object that you want to change color.
Note : For best results, you should draw close to the subject in the image.
Step 4 : The article tried Photoshop’s Object Selection tool on a complex object like a rose with too many curves. And admittedly, Photoshop has done an excellent job of detecting edges.
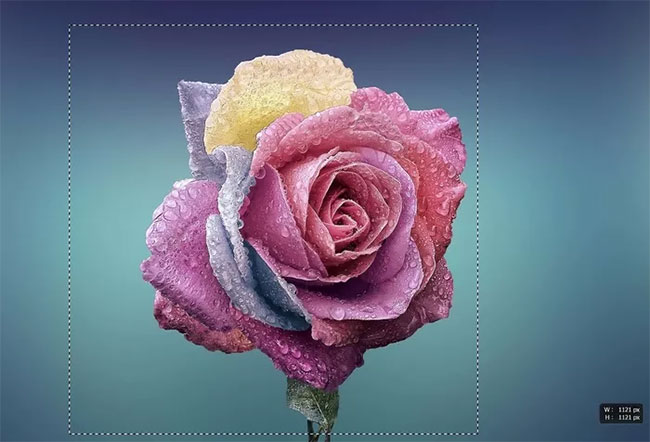
If drawing around the object doesn’t help detect the right edges, you can hover the pointer over the object and Photoshop will provide a preview of an object to select from.

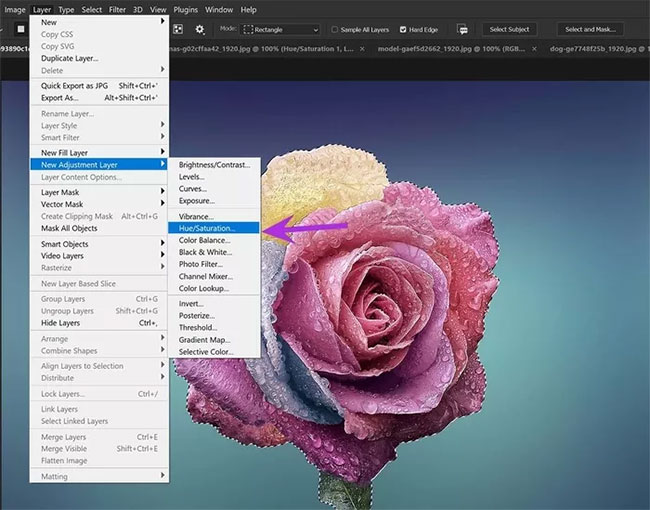
Step 5 : After you select an object, open the Layer menu from the top.
Step 6 : Select New Adjustment Layer .
Step 7 : Open the Hue/Saturation menu and give the layer a name.
Step 8 : From the menu on the right, you have the properties menu.
Step 9 : Experiment with the Hue slider until you are satisfied with a new color.
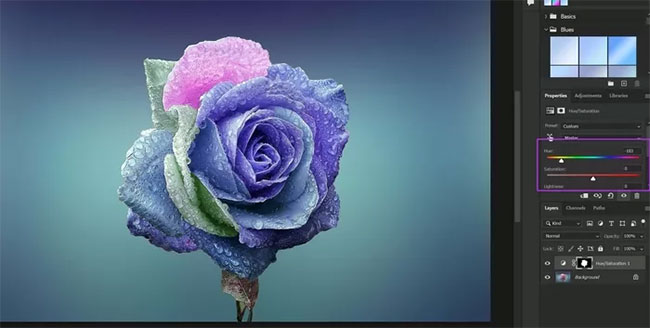
Step 10 : You can also adjust saturation and brightness from the same menu.
Check out the live preview and it’s ready for export.
You can also change the color of an object using the Replace Color option . Let’s explore that in the next section.
2. Use Replace Color function instead
When working with a simple object with only one color, you can change the color using the Replace Color function.
This trick is also useful when you want to change the specific color of an object. Here’s what you need to do.
Step 1 : Open Photoshop and import photos into the software.
Step 2 : Select Image from the menu bar.
Step 3 : Go to the Adjustments menu and choose Replace Color .
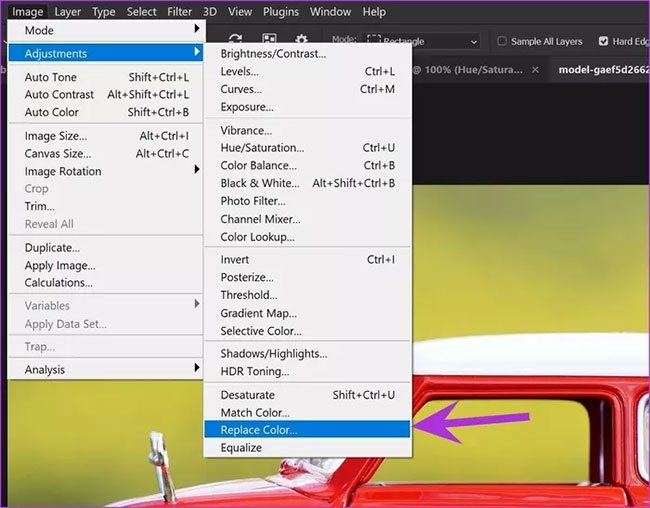
Step 4 : The Replace Color menu will appear.
Step 5 : Select a color from the object that you want to change.
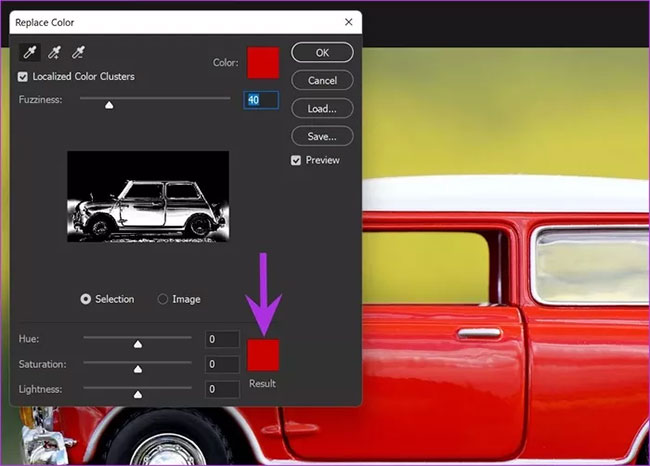
Step 6 : Select Result color from the same menu.
Step 7 : After you select the Result color , the Color Picker color selection menu will appear. Photoshop shows you the current and new colors from said menu.
When you interact with the color slider, you’ll see a live preview of the color that’s changed with the object. Repeat the process for the other colors in the object and make changes until you are ready to export the final image.
Before finalizing the final color, you can try with alternate colors Hue, Saturation and Lightness .

Press Ctrl + Alt + Shift + W and open the Export menu. You can try changing the image size, resolution, etc. before exporting to the desired location on the PC.
If you want to tweak the image further, you can save it as a PSD file.
Hope this article helps you! Visit Macwintips.com to update the most practical and useful tips for Mac and Windows.


