To get started connect a camera -connect a camera error in windows 8 .
I’m probably not the first with the issue, I’ve seen similar topics all around, however, no fixes for my issue so far.
I have a LAptop and for a while now, probably since the update to windows 8.1, my webcam hasn’t been working. When I start the Windows camera app, I get a message stating “To get started, connect a camera”, similar issues with Skype etc., it doesn’t see my webcam. However, there’s and integrated webcam in my laptop.
I’ve tried finding drivers, but the Sony website isn’t really helpful with that. And when I was reading online, I found this ‘tip’ that said that I had to uninstall the only thing I still saw in my Imaging Devices (in Device Manager), the USB 2.0 webcam (or something like that, I can’t really remember what the exact name was). After I did that, it didn’t fix anything. I wanted to do a system restore, but that somehow (probably my own fault) it didn’t work and now I can’t make a system restore anymore to a point before I uninstalled the USB 2.0 webcam thingy.
I’m quite desperate.. Can anyone please help me on how to fix this problem?
Table of Contents
Solution To get started connect a camera
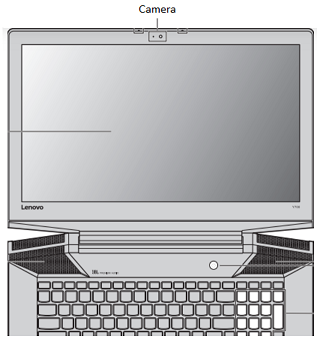
Step One: Confirm the PC has a built-in camera
This device is often installed on top of the LCD panel, if there is a built-in camera.
Step Two: Make sure camera slider is open
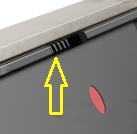

Step Three: Check for a protective seal
If the image is blurry, the protective sticker may still be covering the camera.
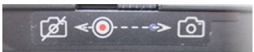
Step Four: Press function key to turn on camera
Try looking for this icon 
Try testing the camera in Windows 10, see Open the Camera in Windows 10.
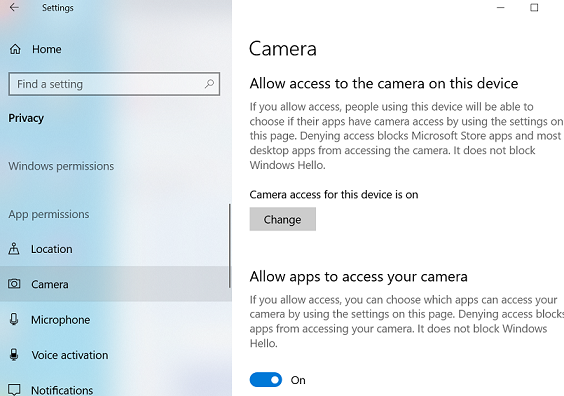
Step Five: Confirm Privacy Settings (Allow Access)
- In Windows 10, open Settings -> Privacy -> Camera. Slide on the webcam or configure to Let these apps use my webcam.
- In Windows 8.1, open Charms Bar via the desktop and click the Settings option. Click PC info or Change PC settings -> Privacy -> Webcam. Slide on the webcam or configure to Let these apps use my webcam.
Privacy settings can also be checked in Lenovo Vantage (if installed).
- From the Vantage dashboard, navigate to the menu at the top of the page. Go to the Device section and select My Device Settings.
- On the My Device Settings page, navigate to the Display & Camera section.
- Scroll down to the Camera settings section. There should be a toggle for Camera Privacy Mode.
- If the toggle is green in color and displays on, click to toggle off. The color should be gray and display off when the setting is disabled.
- If this works, an image should show in the Camera space, indicating that the webcam is no longer under Privacy Mode.
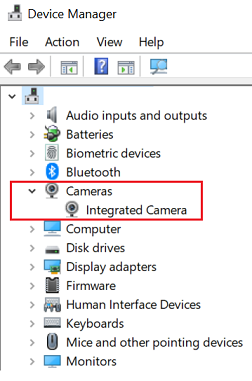
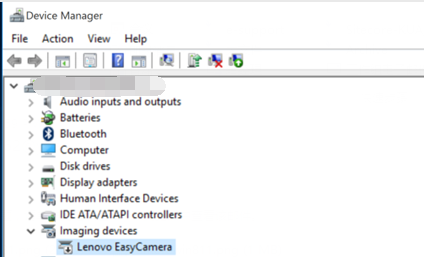
Step Six: Check the camera is recognized correctly in Device Manager
- Open Device Manager. Navigate to Imaging devices.
- If there is no imaging device, then no camera modem is configured or there may be a camera hardware failure.
- A yellow exclamation mark indicates the camera driver is not installed properly or is out of date. Right-click and select Uninstall. Then right-click Imaging devices and select Scan for hardware changes.
- If the yellow exclamation mark still exists, go to https://support.lenovo.com to search the product name and find the corresponding camera driver to install and update. For certain models, there is no separate camera driver. Instead install the Windows inbox driver.
- Search your product name, for example ThinkPad T480s, and open the corresponding product page. Navigate to the Driver & Software tab and filter by Operating System/Component, or search for camera. Then download and install the right camera driver.
Note:
- You may also run Lenovo Vantage to update drivers, see Lenovo Vantage: Using your PC just got easier.
- If the camera is not a built-in camera, check that the camera is properly connected.
Step Seven: Check in Device Manager if camera is disabled
- Under Imaging devices or Camera, the camera will show up. If a down arrow is shown, this indicates the camera device is disabled. Right-click the camera to select Enable.
Note: Some cameras are displayed under Cameras and Integrated Camera.