How to fix red X on WiFi icon Windows 7, windows 8, windows 10 (WiFi capacity turn off). Error WiFi icon appears red X cross section and not to the WiFi icon are quite often very different laptops that typically cause by turning off the WiFi rather than WiFi driver, if the driver WiFi so it will no icon WiFi so when this error you do not need to reinstall, update driver … do anything that can fix by turning on the WiFi up.
Table of Contents
Method to fix red X on WiFi icon
Considering all the troubleshooting you’ve done, there’s one more thing to look at that might be the culprit. The error ‘Wireless capability is turned off’ happens because power management turned off the wireless capability when not in use, or when your battery can’t cope up with the power that needs to be supplied. Fortunately, you can change this setting:
- Open Network Connections.
- Right-click on the wireless connection and then select Properties.
- Click Configure next to the wireless adapter
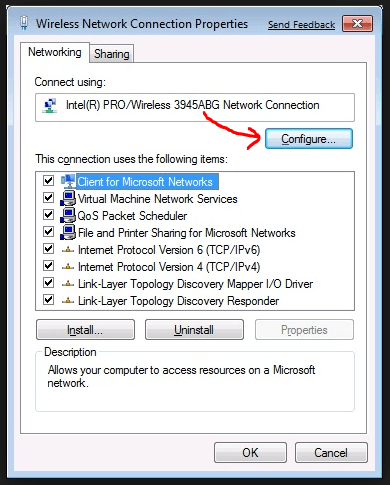
- Click the Power Management tab.
- Uncheck “Allow the computer to turn off this device to save power“.
- Click OK.
Let us know how it turned out.
I will going to hope you fix it soon
* Common fix: The red X on WiFi icon windows error by software – you can auto fix by tool of windows as this video
– Click to Red X WiFi icon, and then, trouble shooting – if appear notification is: wifi capacity is turn off. Please restart 1 time and do as:
:
1-if we forgot turn on Wifi capactiy
Depending on each laptop that will function toggle wifi in different positions, but the Fn + Common Combine 1 F F2 function key or something. But have in common is the key feature wifi icon column as shown below and you can refer to
For example on the ASUS laptop will turn on wifi on by pressing Fn + F2 ; Dell : Fn+F2, thinkpad FN +F5 , HP: FN +F10 or direct
Some other examples Japan laptop as VAIO laptops may have on / off key private wifi on the edge next to the On / Off and not above the keyboard:
2- If it disable in bios
Some time, wifi capacity is disable in bios.
Enable wifi capacity is disable in bios Lenovo laptop:
Enter BIOS (How to enter BIOS in Windows 7, Windows 8/8.1, Windows 10)
Switch to “Configuration” or “Advanced” tab, navigate to Wireless Lan (Wireless or Wireless Device)
Set as “Enabled” or “Disabled”
Save and Exit the BIOS (Figures are for reference)
Enable wifi capacity is disable in bios HP laptop:
Press F10 at the power-on bios screen
Navigate to the Security menu
Choose Device Security
Verify that “Wireless Network Button” is set to enable. If set to disable, change this to enable and press F10 to confirm settings.
Exit the bios from the File menu, Choose Save Changes and Exit.
Enable wifi capacity is disable in bios Dell laptop:
– Power off the laptop
– Power it back on and as ‘Dell splash screen’ appears, repeatedly tap < F2 > (BIOS screen appears)
– Use arrow keys to navigate to the option: ‘Advanced’ (Following screen appears)
– Use arrow keys on the keyboard to open ‘Advanced’ section and further navigate to ‘Wireless’
– Please ensure that ‘Wireless Switch’ is set to ‘All’; and Internal Bluetooth/WLAN/WWAN are all ‘Enabled’
– Tap < F10 > to save settings; and exit
– Enter into ‘Windows’ and recheck the results
Enable wifi capacity is disable in bios Asus laptop:
Press F2 – go to advanced and enable onboard wlan:
Good luck and good helth