Table of Contents
Fix you might not have permission to use this network resource windows 11
After installing WSL 2 and installing a few Linux VMs, Windows Explorer starts displaying a Linux tree, but whenever I try to access it, I get the following error:
“\\wsl.localhost is not accessible. You might not have permission to use this network resource. Contact the administrator of this server to find out if you have access permissions.
Insufficient system resources exist to complete the requested service”

Though my PC is recent with updated specs:
Motherboard: ASUSTeK COMPUTER INC. ROG STRIX B460-G GAMING
Bios: ver.1101
Processor: Intel i9 10th generation @3.7Ghz
Liquid-cooled by Cool Master
RAM: HyperX 64GB RAM & 2666Mhz
Storage: 1TB SSD, 2TB HDD
GPUs:
Intel(R) UHD Graphics 630
NVIDIA GeForce RTX 3060 12GB GDDR6
OS: Windows 11 Professional (x64) Version 21H2 (build 22000.282)
But when I try browsing manually to \\wsl$\ it works. How can I fix this?

The solution was to use the Registry Editor (regedit.msc) to edit
HKEY_LOCAL_MACHINE\SYSTEM\CurrentControlSet\Control\NetworkProvider\Order
and change it to
P9NP,cbfsconnect2017,RDPNP,LanmanWorkstation,webclient,wsauth
(For my computers, it seems that P9NP should be at the beginning, and one needs to remove WinFsp.Np and cbfs6 if present. Not sure whether you need all the other values.)
Make sure that …\HWOrder is also changed to the same value automatically. Close Registry Editor, and then Linux tree is accessible to me.
The registry value gets changed after restarting the computer or installing some network drives, and I will then have to go to the Registry Editor and change it to get it to work.
To work around this issue, use one of the following methods.
Method 1
- Before you upgrade, manually back up the contents of the Provider list at
HKLM\SYSTEM\CurrentControlSet\Control\NetworkProviderand the respective third-party provider settings (underHKLM\System\CurrentControlSet\Services\). - Run the upgrade.
- After the upgrade is completed, restore the registry settings that were backed up in step 1.
Method 2
If you are experiencing issues that affect the third-party network provider settings after you upgrade, manually restore the registry keys that were deleted by the installer.
More information
To verify the network providers list, follow these steps:
-
Open the Run box. To do this, press the Windows logo key (
 )+R.
)+R. -
Type ncpa.cpl, and then press Enter.
-
Press the Alt key to open the menu bar.
-
Select Advanced, and then click Advanced Settings.
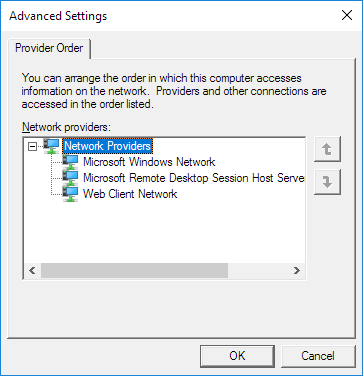
This third-party network providers list is stored in the following registry location:
HKLM\SYSTEM\CurrentControlSet\Control\NetworkProvider\Order\ProviderOrder
Default value: RDPNP,LanmanWorkstation,webclient
HKLM\System\CurrentControlSet\Control\NetworkProvider\HwOrder\ProviderOrder
Default value: RDPNP,LanmanWorkstation,webclient
Note
Each string value has its own settings under HKLM\System\CurrentControlSet\Services.
For example, the following are the default network providers:
HKLM\System\CurrentControlSet\Services\RDPNP\NetworkProviderHKLM\System\CurrentControlSet\Services\LanmanWorkstation\NetworkProviderHKLM\System\CurrentControlSet\Services\WebClient\NetworkProvider
The provider name is removed from the list, and all added registry key are removed

